Photo editing with Darktable 1.6
Mixed Vegetables

© irum, Freeimages.com
Hardly anything affects the quality of photos more than play of light and shadow, or the brilliance of colors. Darktable fixes incorrect exposure, conceals unfavorable lighting conditions, and ensures harmonious colors.
Darktable is not an easy-to-use piece of software. Its range of functions is limited to post-editing light, shadows, and colors. It lacks artistic effects offered in Gimp or Photoshop. However, there is no better piece of software for refining successful and less successful photos – including commercial applications such as Adobe Lightroom.
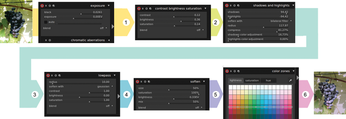
Unlike the first-generation image editing programs, Darktable [1] uses a non-linear principle: An effects pipeline replaces the step-by-step undo function. You can imagine this as keeping the dialogs of all effects permanently open so that the appropriate parameters can be adjusted at any time. The red buttons circled in Figure 1 switch the respective effects on and off – either temporarily, for trial purposes, or permanently.
The whole effect pipeline – that is, the list of all applied effects and their settings – is preserved until the next change and even survives a restart: The software saves the changes in separate files with the .xmp extension and in an internal database as well.
Safe Data
Darktable doesn't need a save button: Each step is immediately stored to disk. Because it is just a text file with effects names and parameters, this happens in the background without causing any significant load on your computer. You can undo unintended changes in the history list.
The software essentially does not touch the output file, which lends itself to a professional workflow: It is impossible to overwrite the original accidentally. Creating duplicates of an image only takes up a few kilobytes of disk space. Darktable also lends itself to using a versioning tool such as Git or SVN thanks to the small amount of data it creates.
Initially, you can only see the results of your editing in Darktable itself. In other words, you don't use an ordinary file browser to browse your edited photos, instead you use Darktable's lighttable mode (Figure 2), which is the mode in which the software comes up. You can open an image for editing (darkroom) by double-clicking the image. You only use the export button in lighttable to export the image as a new image file after you have finished editing.

However, the non-linear operating principle is demanding on the CPU: The computer needs to compute the entire pipeline from the original for each change. Depending on the number of active effects, this can take a few seconds for changes in sliders to take effect in the display. The small preview at top left in the Darktable window (Figure 3.7) responds almost instantly, however. The software also relies on OpenCL [2] to tap the processors on ATI and NVidia graphics cards with at least 1GB of video memory, which can handle this task much faster. Darktable automatically enables hardware support if you have working 3D acceleration. The processing times are still just a few seconds, even without this.

Stemming the Chaos
Dialogs that are only opened to apply an effect violate the non-linear operating principle. Thus, each function in Darktable has its own palette, which you can to collapse to save space but can never close. Nevertheless, the program, unlike many Adobe applications, fits well on a normal-sized display.
Toggle buttons group the effects into categories and are Darktable's core element of operation (Figure 3.1). From left to right, these are active effects and favorites, and the basic group, tone group, color group, correction group, and effect group.
You will find a preselection of modules that should be visible in the toggles referred to in the more modules list box. If you click again on an entry that is already active, it assumes a Favorite status and appears in the favorites toggle, as well as in its original category. Always check whether a desired effect is disabled if you can't find it as described here. The toggle on the left bundles all the effects you have enabled by clicking on the switch symbol in the palette header.
Use the view selector to switch back to lighttable mode (Figure 3.8). The export function, which renders the resulting image as a new TIFF, OpenEXR, PNG, or JPEG file, and thus makes it available for other programs, is in the lighttable right sub-window and may only be visible after scrolling down.
Shaded
Figure 4 shows a poorly exposed image of a ripe bunch of grapes. The unfavorable position of the sun obviously affected the exposure quality when this shot was taken. Darktable can prove its worth on this image.

You can download the image for free at Freeimages.com to try these steps for yourself [3]. To import this image in the lighttable view, click import | image (Figure 2, top left). You can see the work steps for this image in the history panel (center left), which you open by clicking the panel triangle.
The program automatically creates the first two, crop and rotate and exposure, when opening new files. It rotates the image if necessary as per the Exif tag. For RAW images, the exposure step selects a displayable and printable section from the camera's brightness range. Neither is relevant for the sample JPEG.
First, click on 0 – original in the history list to see the uncorrected original image. Then, select 3 – shadows and highlights. This function, which brightens the excessive shadows and reduces overly bright highlights, is ideal for this photo. Figure 5 shows the results, which are already much better, along with the settings in the shadows and highlights palette (basic group category).

I have changed the shadows setting from a neutral value of 50% to about 80%. Some of the brightened dark areas therefore now appear a greenish gray (Figure 5 inset). Darktable intensifies colors by lightening proportionally to the brightness – just as in nature – with stronger lighting. Here, however, the green light let through by the leaves emerges too strongly. To remedy this, you can reduce the shadows color adjustment to almost zero because the dark parts of the bunch of grapes also appear an almost colorless gray in reality.
The soft focus of radius adjusts the hardness of light-to-dark transitions and was reduced by visual judgement compared with the default value. You can recall a slider's default value by double-clicking.
Buy this article as PDF
(incl. VAT)
Buy Linux Magazine
US / Canada
UK / Australia
Subscribe to our Linux Newsletters
Find Linux and Open Source Jobs
Subscribe to our ADMIN Newsletters
Support Our Work
Linux Magazine content is made possible with support from readers like you. Please consider contributing when you’ve found an article to be beneficial.

News
-
Linux Servers Targeted by Akira Ransomware
A group of bad actors who have already extorted $42 million have their sights set on the Linux platform.
-
TUXEDO Computers Unveils Linux Laptop Featuring AMD Ryzen CPU
This latest release is the first laptop to include the new CPU from Ryzen and Linux preinstalled.
-
XZ Gets the All-Clear
The back door xz vulnerability has been officially reverted for Fedora 40 and versions 38 and 39 were never affected.
-
Canonical Collaborates with Qualcomm on New Venture
This new joint effort is geared toward bringing Ubuntu and Ubuntu Core to Qualcomm-powered devices.
-
Kodi 21.0 Open-Source Entertainment Hub Released
After a year of development, the award-winning Kodi cross-platform, media center software is now available with many new additions and improvements.
-
Linux Usage Increases in Two Key Areas
If market share is your thing, you'll be happy to know that Linux is on the rise in two areas that, if they keep climbing, could have serious meaning for Linux's future.
-
Vulnerability Discovered in xz Libraries
An urgent alert for Fedora 40 has been posted and users should pay attention.
-
Canonical Bumps LTS Support to 12 years
If you're worried that your Ubuntu LTS release won't be supported long enough to last, Canonical has a surprise for you in the form of 12 years of security coverage.
-
Fedora 40 Beta Released Soon
With the official release of Fedora 40 coming in April, it's almost time to download the beta and see what's new.
-
New Pentesting Distribution to Compete with Kali Linux
SnoopGod is now available for your testing needs