Secure communication on the Internet with Whonix
In VirtualBox
After creating the gateway and the Whonix machine, you then start the gateway in VirtualBox and make the appropriate selection in the boot manager; the software quickly enables a fresh-looking KDE 4.14.2 desktop using the 32-bit version of Debian 8 as its basis. The hardware requirements for the VM thus are not too demanding, and it works well on a system with only 4GB of memory.
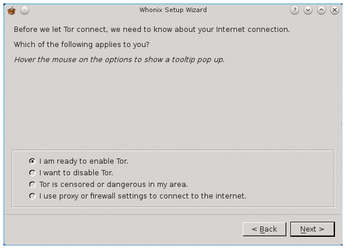
The first window you see has some general information you need to confirm; then, the Setup Wizard appears, in which you can define how you want to set up the gateway. The choices are to connect through Tor, connect without Tor, or use a proxy server with an active firewall for network access (Figure 2).
After setting up network access, the wizard searches for updates in the Whonix "Stable," "Updates," "Testers," and "Developers" repositories. At the same time, the software displays instructions for customizing the locale and warns you not to use the gateway machine as a normal workstation: It is only designed for configuring Tor and Whonix. After you confirm, the system installs any available updates. After the wizard closes, the basic configuration of the system (Figure 3) is complete.
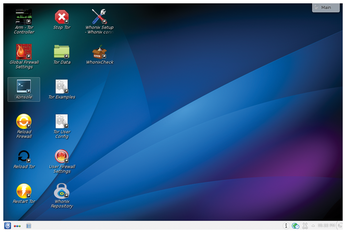
The fairly large number of KDE desktop icons take you to configuration tools. They are designed for graphical management of the firewall, Tor, and Whonix itself. The central elements that grab your attention here are Arm - Tor Controller and Firewall Settings. A distinction is made between global and user-specific firewall settings.
The Arm - Tor Controller (Anonymizing relay monitor Tor Controller) acts as a monitor for the Tor gateway and shows you not only various statistical values, but also data throughput rates and special messages relating to the connection. The firewall works completely independent of the firewall on the host system and is already hardened in the global settings.
Customization
First you need to make some basic adjustments to the gateway to protect the system against physical access by unauthorized persons. The standard users on the Whonix gateway are user and root, each with the password changeme. By typing the commands
sudo passwd user
sudo passwd root
at the command line, you can quickly change both passwords. In a further step, you might want to change the keyboard layout from the US default if you are using different location settings. The Settings | System Settings | Input Devices option lets you switch to the UK layout, for example, in the Keyboard | Layouts tab.
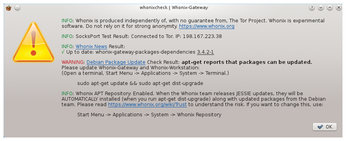
The developers have also implemented a routine on the system that lets you check for correct configuration at any time by simply clicking the WhonixCheck icon on the desktop. The application performs several tests and checks that a proper connection to the Tor service exists and whether updates are available for the operating system. These tests take a few minutes, and the program communicates the results in an information window (Figure 4).
You can also configure how the system should react to future updates. By default, it updates automatically as soon as you trigger a general update by typing
sudo apt-get dist-upgrade
in the terminal. In this case, the routine installs all updates from the Debian and Whonix developers. Because the package manager also loads the data through the Tor network, this process needs more time compared with a conventional Debian system. Therefore, the Whonix developers offer an option for configuring updates, which you can open by clicking the Whonix Repository icon on the desktop. In a simple dialog, you can now define whether you want to install the new files manually or automatically from a certain Whonix repository.
If you notice problems with Internet access, you can reconfigure and restart the Tor service. Whonix provides an easy-to-use graphical tool on the desktop from the Whonix Setup - Whonix connection wizard icon. With the Stop Tor, Reload Tor, and Restart Tor icons, you can control the service from within the current session, as well.
Firewall
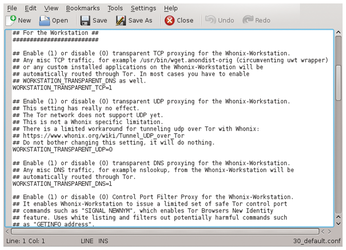
The firewall settings can also be modified simply using existing tools. From the Global Firewall Settings icon on the desktop, you can access the preset rules. After subsequent authentication, KWrite opens the firewall options that apply to the entire system. In the text file, the rules are lined up under appropriate headings, each with a commented paragraph that explains the active rule to help you understand what the rule does (Figure 5).
After making changes to the configuration, you should save the file and enable the new rules by clicking on the Reload Firewall desktop icon. You can define your own firewall rules by clicking the User Firewall Settings icon on the KDE desktop; it comes up with an empty KWrite window in which you can enter your own rules freely. This system also enables the rules after you save and reload the firewall.
« Previous 1 2 3 Next »
Buy this article as PDF
(incl. VAT)
Buy Linux Magazine
US / Canada
UK / Australia
Subscribe to our Linux Newsletters
Find Linux and Open Source Jobs
Subscribe to our ADMIN Newsletters
Support Our Work
Linux Magazine content is made possible with support from readers like you. Please consider contributing when you’ve found an article to be beneficial.

News
-
Linux Servers Targeted by Akira Ransomware
A group of bad actors who have already extorted $42 million have their sights set on the Linux platform.
-
TUXEDO Computers Unveils Linux Laptop Featuring AMD Ryzen CPU
This latest release is the first laptop to include the new CPU from Ryzen and Linux preinstalled.
-
XZ Gets the All-Clear
The back door xz vulnerability has been officially reverted for Fedora 40 and versions 38 and 39 were never affected.
-
Canonical Collaborates with Qualcomm on New Venture
This new joint effort is geared toward bringing Ubuntu and Ubuntu Core to Qualcomm-powered devices.
-
Kodi 21.0 Open-Source Entertainment Hub Released
After a year of development, the award-winning Kodi cross-platform, media center software is now available with many new additions and improvements.
-
Linux Usage Increases in Two Key Areas
If market share is your thing, you'll be happy to know that Linux is on the rise in two areas that, if they keep climbing, could have serious meaning for Linux's future.
-
Vulnerability Discovered in xz Libraries
An urgent alert for Fedora 40 has been posted and users should pay attention.
-
Canonical Bumps LTS Support to 12 years
If you're worried that your Ubuntu LTS release won't be supported long enough to last, Canonical has a surprise for you in the form of 12 years of security coverage.
-
Fedora 40 Beta Released Soon
With the official release of Fedora 40 coming in April, it's almost time to download the beta and see what's new.
-
New Pentesting Distribution to Compete with Kali Linux
SnoopGod is now available for your testing needs