Convert RAW data with LightZone
Light and Shadow

The RAW format preserves the full splendor of digital image data. You can develop this material into a format for everyday use with LightZone.
RAW converters read raw data from cameras and convert that data into bitmap graphics. A whole series of programs in Linux are able to perform these conversions. Darktable leads the field, but others include digiKam, RawTherapee, and UFRaw. Each program has specific advantages and disadvantages, particularly in terms of the degree to which you can edit when converting.
It may seem strange, therefore, that a veteran like LightZone, whose last major changes came in 2011 with version 3.5, still has a loyal following. The reasons for this are good: The software is designed very simply, is easy to operate, and does not confuse users with an impenetrable mess of functions. It is, however, a Java application, which is not exactly the first choice for graphics software.
Support of RAW formats for newer cameras is one the significant improvements made in the new version of LightZone. However, this improvement is currently happening at the expense of some previously supported camera models, such as Olympus. This situation does seem to have been fixed in the current beta version 4.1.1.
The reason for the sustained enthusiasm is probably the good quality of the source code and the images generated with it. The program was in circulation as a commercial alternative to Adobe's Lightroom up to version 3.5. It has a relatively simple operating concept, which, however, does need a bit of getting used to. Many of the functions are found in very dense form in a tight space so that they can easily be overlooked or unintentionally executed.
Recipes and Styles
The software's design provides only a small number of tools, which can be combined in various ways. As a result, 12 tools are – in principle – enough to implement a wide variety of actions and effects. The developers already provide about 30 combinations of tools in the form of styles.
LightZone [1] works non-destructively as a classic RAW converter, because it creates copies of the image when editing. To do this, it creates a recipe containing the required actions and applies it to the file. As a result, you will receive a bitmap image suitable for editing in other programs.
If needed, you can save the recipes separately (also as styles) and apply them as a special tool to other images. LightZone also embeds the recipe in the JPEG and TIFF images created from the raw data as a comment so that it is preserved. Other RAW converters might use a similar approach, but they often use sidecar files for this task. If you forget to copy these text files or even delete them, the recipe used for conversion is lost.
Interface
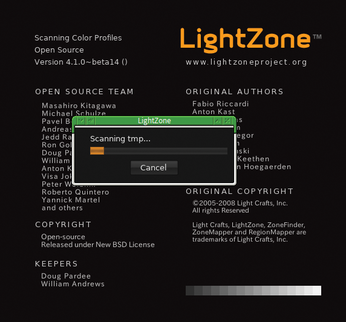
When launched, LightZone comes up with a splash screen (Figure 1) and reads the last used directory. The screen contains a gray strip at the bottom right and the version number. To be able to work properly in LightZone, it is important to set up the monitor so that the 16 grayscale sections are significantly different, especially at the ends.
The program interface does not differ at first sight from other RAW converters. It offers two modes: One is used for managing (Figure 2) and the other for editing. When managing images, the software delivers an overview of all the images contained in a directory. LightZone loads JPEG and TIFF images as well as the RAW formats from various manufacturers and allows them to be edited.

On the left in the typical three-part view for RAW converters, you choose the directory with the images to be edited (Figure 2, item 1), which LightZone then displays in the center. At the top of this area, you can preview one image or multiple images (using Ctrl+click). If you don't have enough space for the preview, you can hide the windows at the side by clicking on their tabs.
LightZone has both a menu and a toolbar (Figure 2, item 2). When managing images, the toolbar mainly offers functions for editing finished images – this changes as soon as you start the internal editor for images.
The Styles button is an exception – it lets you apply one of the existing recipes to the selected images. New bitmap images are created automatically here. You will find your own styles to which you assigned names, in Custom.
To the right, LightZone provides Exif information about the image selected in the middle or the one last selected in the Metadata section (Figure 2, item 3). There you can evaluate an image with the usual star ratings and assign a title and copyright notice for images, as required.
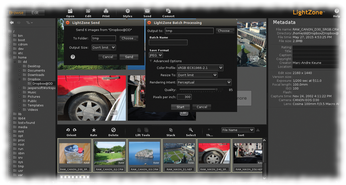
The Send button in the menu is a little confusing: This does not involve sending email, as the name and icon suggest, but rather copying an image to a directory of choice (and converting it at the same time). In doing so, you can set the desired image size. Convert goes one step further and also lets you set the format and many other details (Figure 3).
The program displays all the images in the selected directory that are compatible with the software in a list under the preview. Because previously processed images also appear here, you really need to display the image type. You can do this using the Show Image Types from the Browser menu.
In the toolbar between the preview and the filmstrip of images, you will find functions that let you swap recipes (Figure 2, item 4). The left switch under Lift Tools copies the selected image's recipe to the clipboard; the right button then applies it to a selected image (Figure 4). If you select multiple images, for example from a series, LightZone applies the recipe to all of them uniformly. If a bitmap variant of one of the images already exists, LightZone gives the automatically generated images version numbers. You can quickly generate a range of variants in this way.
A function in the toolbar lets you influence the sort order of the images. In the field on the far right, you can choose from eight criteria (i.e., file name or size, rating, date/time of capture or modification, aperture, shutter speed, lens). Using the arrow next to it, you can determine whether the images sort ascending or descending.
Editing Images
The program switches to the corresponding mode as soon as you select an image for editing. The view presented here differs greatly depending on whether the image already has a recipe (i.e., whether you have previously edited it). Figure 5 shows the simplest case with a previously unedited image.
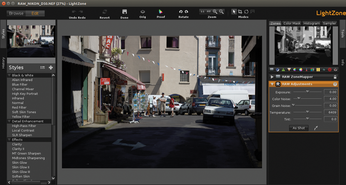
You will find actions (Styles) on the left, the current state of the image in the center, and the individual tools on the right. The preview in the top left shows the results of actions resulting from the style over which you mouse. The preview on the right belongs to the active tool shown below it. A gray box with a smaller red box inside appears in the bottom right of an image as soon as it no longer fits in the central window. Moving the red box displays the part of the image you want to see.
You can return to management mode using the Browser button. The software saves the currently loaded image together with the performed actions if changes have been made. Buttons such as Undo and Redo work as expected. You can discard all changes to the image using Revert. Done saves the image and LightZone then changes back to Browser mode. You can use Orig to compare the current and original states of an image. Proof shows what the image is likely to look like in print, and Rotate allows you to rotate in multiples of 90 degrees.
Functions for activating the standard mode, for cropping images, and for rotating in subtle graduations can be accessed via Modes. Next up are the buttons for the Region Mode. Regions are image areas that you can edit separately – which is essential for detailed modifications (Figure 6). Three types of regions are offered: polygons (straight edges), those with edges limited by splines, and those limited by Bézier curves, which allow particularly soft, rounded edges.
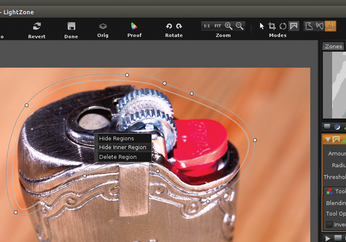
A region consists of control points that determine the process and an inner and outer edge. You can adapt the region by manipulating the points and add additional points at the press of a button. The inner border marks the area where the software applies a tool in full. The effect gradually decreases in the area between the borders. You can determine the distance between the borders by moving the inner border accordingly.
When setting control points for regions, particularly in high-contrast areas, pay attention to the exact placement of your control points; otherwise, you will create "halos" at the border of a region. To place regions at the edges of an image, make the view smaller and set the control points outside the image.
If needed, you can invert a region using the Invert Mask button of the tool or combine them differently, for example, by merging. You can also select multiple regions, which then exist independently and can still be changed separately – unlike regions that have been merged. Under Hide Regions, you will find a function that hides the delimiting lines without disabling the mask in the context menu.
Buy this article as PDF
(incl. VAT)
Buy Linux Magazine
US / Canada
UK / Australia
Subscribe to our Linux Newsletters
Find Linux and Open Source Jobs
Subscribe to our ADMIN Newsletters
Support Our Work
Linux Magazine content is made possible with support from readers like you. Please consider contributing when you’ve found an article to be beneficial.

News
-
Canonical Releases Ubuntu 24.04
After a brief pause because of the XZ vulnerability, Ubuntu 24.04 is now available for install.
-
Linux Servers Targeted by Akira Ransomware
A group of bad actors who have already extorted $42 million have their sights set on the Linux platform.
-
TUXEDO Computers Unveils Linux Laptop Featuring AMD Ryzen CPU
This latest release is the first laptop to include the new CPU from Ryzen and Linux preinstalled.
-
XZ Gets the All-Clear
The back door xz vulnerability has been officially reverted for Fedora 40 and versions 38 and 39 were never affected.
-
Canonical Collaborates with Qualcomm on New Venture
This new joint effort is geared toward bringing Ubuntu and Ubuntu Core to Qualcomm-powered devices.
-
Kodi 21.0 Open-Source Entertainment Hub Released
After a year of development, the award-winning Kodi cross-platform, media center software is now available with many new additions and improvements.
-
Linux Usage Increases in Two Key Areas
If market share is your thing, you'll be happy to know that Linux is on the rise in two areas that, if they keep climbing, could have serious meaning for Linux's future.
-
Vulnerability Discovered in xz Libraries
An urgent alert for Fedora 40 has been posted and users should pay attention.
-
Canonical Bumps LTS Support to 12 years
If you're worried that your Ubuntu LTS release won't be supported long enough to last, Canonical has a surprise for you in the form of 12 years of security coverage.
-
Fedora 40 Beta Released Soon
With the official release of Fedora 40 coming in April, it's almost time to download the beta and see what's new.