Scribus basics
Layout Master
Despite its deceptively simple appearance, Scribus packs serious power. We can help you get started with this desktop publishing powerhouse.
Nowadays, word processors like LibreOffice Writer are powerful enough to be used when working with complex documents and authoring ready-to-publish books. This doesn't make dedicated desktop publishing applications obsolete, though. In fact, using software that is geared toward handling books and documents with complex layouts is a more efficient way of doing things.
On Linux, desktop publishing (DTP) is synonymous with Scribus, and deservedly so. This mature, stable, and open source application offers all the features and functionality you'd expect from a professional DTP tool. Scribus [1] is suited not just for producing printed materials, the PDF export functionality also makes it possible to generate documents and books in this popular format. This means that Scribus still remains relevant in a world dominated by ebooks in the EPUB format.
First Steps
If you use a relatively popular Linux distribution, chances are you'll find Scribus in the distro's official software repositories. Thus, you can install the application via the default package manager. On Debian and Ubuntu, deploying Scribus is a matter of running the apt-get install scribus command as root.
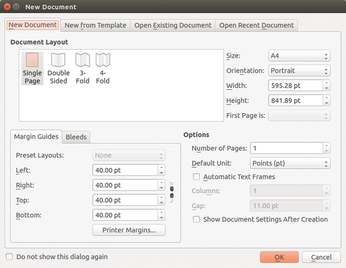
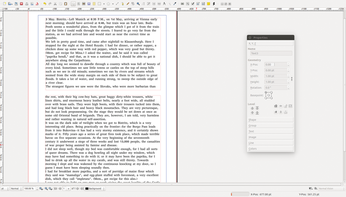
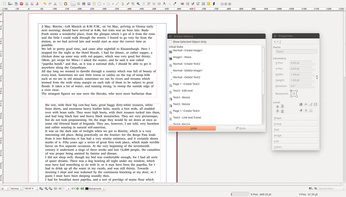
When you launch Scribus, it displays the New Document dialog that helps to set up a new Scribus project (Figure 1). In the New Document tab, you can choose between several layouts as well as configure page settings such as size, orientation, margin guides, and so on. Instead of starting from scratch, you can use one of the templates in the New from Template section. To learn the ropes, though, you might want to create a new project using the default values.
Before you pour content into the created document, you need to do some preparatory work that includes defining styles and setting up master pages. Styles in Scribus are character and paragraph formatting definitions that can be applied to any text selection in the document. Using styles not only ensures consistent formatting throughout the document, it can also save you a lot of time and effort.
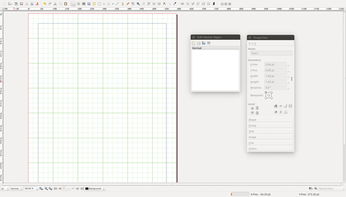
If you are familiar with the style functionality in LibreOffice Writer, you won't have problems figuring out how to handle styles in Scribus. The application comes with default paragraph and character styles that you can use as your starting point. To edit an existing style, choose Edit | Styles (or press F3). In the Style Manager window (Figure 2), click on the Default Paragraph Style item and press the Edit button.
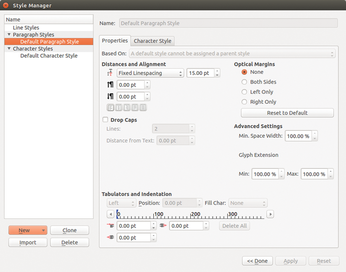
You have plenty of options to tweak, but you might want to focus on a few important ones. To adjust the default line spacing and the space above and below the paragraph, change the appropriate values in the Distances and Alignment section under the Properties tab. Why is it so important to specify the above and below space values? In a text editor or word processor, you'd normally separate paragraphs by adding a blank line between them. However, blank lines can cause all kinds of layout problems in a Scribus document, so the right way to space paragraphs is to define the above and below values.
Instead of tweaking the default styles, you can create a new style from scratch using the New button. If you need to create a style similar to an existing one, use the Clone button to create a copy of the style you want, then adjust the options of the cloned style. Additionally, the Import button can come in useful when you want to use styles from another Scribus project.
Most multipage documents comprise pages with a uniform layout. For example, a page in a typical book may have a header and a footer, with the latter usually including page numbering. Obviously, adding these and other elements manually every time you add a new page is not the most sensible way to go. Fortunately, Scribus lets you set up master pages, which are basically templates that can be applied to any page in the Scribus document.
To switch to the master page mode, choose Edit | Master Pages. Then, create a new master page using the appropriate button in the Edit Master Pages window. Working with master pages in Scribus is no different from editing regular pages. So, the techniques you learn designing master pages are applicable to working with standard pages, too. In Scribus, like many other DTP applications, a page acts as a canvas where you place and arrange various layout containers called frames.
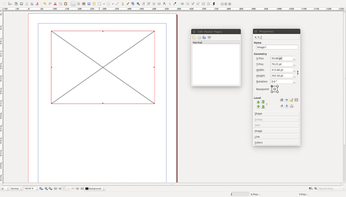
Scribus supports several types of frames, including text and image frames. So, to create, for example, a master page with an image in the header and page numbering in the footer, you need to add appropriate frames and insert an image and text into them (Figure 3). To add the header, press the Insert Image Frame button on the main toolbar (or hit the I key) and use the mouse to draw a frame on the page. For more precise control of the frame's dimensions and position, right-click on the frame and choose Properties (or press F2). Then, use the fields in the Geometry group of the X,Y,Z section to specify the exact position and dimension values.
To insert an image, double-click on the frame and pick the desired graphics file. If the image doesn't fit the frame, right-click on the frame and choose Adjust Image to Frame. Conversely, if the frame is too big for the inserted image, use the Adjust Frame to Image command to fix that. Once you are satisfied with the result, you might want to lock the frame to prevent any accidental changes. To do this, click on the lockpad button in the Level group. (See the "Keeping It All Together" box for additional info.)
Keeping It All Together
Keep in mind that when you add a graphics file to an image frame, Scribus doesn't actually insert the file into the frame but instead creates a link. This means that moving the linked graphics files or the Scribus project file to another location will almost certainly break all links. Thus, it's a good idea to keep all project files neatly organized in a dedicated directory. However, what if you need to move the entire project to another directory? The Collect for Output feature can help you with that. Choose File | Collect for Output and specify the new destination folder, and Scribus duly collects and moves all project files to the specified directory.
Adding pagination in the footer is not particularly difficult either. Press the Insert Text Frame button on the main toolbar (or use the T key) and draw a frame at the bottom of the page. Double-click on the frame and choose Insert | Character | Page Number. That's all there is to it.
Once the master page is done, close the Edit Master Pages window, and you are ready to add content to the regular pages. Similar to the master pages, adding text and images to the pages means creating appropriate frames and filling them with content. Scribus offers several ways to add text to text frames. If you already have text in a file, you can insert it into the frame. To do this, right-click on the frame, choose the Get Text command, and select the document containing the text.
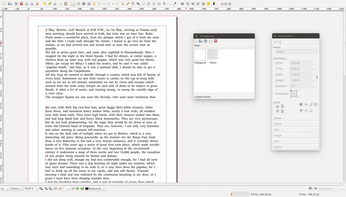
Besides plain text files, Scribus supports documents in other formats, including HTML and ODT. To enter text directly into the frame, double-click on it, and start typing. Finally, Scribus features the built-in Story Editor, which is suitable for working with long texts (Figure 4). To evoke it, select a text frame and press Ctrl+T (or right-click on the text frame and choose Edit Text). Story Editor is basically a lightweight graphical text editor that gives you quick access to all editing and formatting tools, allowing you to apply a specific style easily to the current paragraph or text selection, perform search and replace actions, save the text to a text file, and so on.
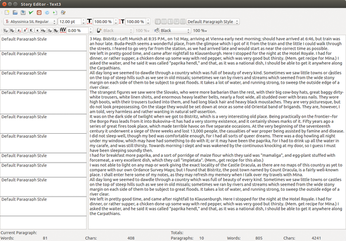
The editor also features a word counter that shows the number of paragraphs, words, and characters in the entire text as well as the current selection. Speaking of long texts, as any DTP application worth its salt, Scribus supports text frame linking that allows the text to flow from one frame to another (Figure 5). To link two frames, select the first frame, press the Link Text Frames button in the main toolbar (or press N), then click on the second frame.
Creature Comforts
Scribus offers a wealth of useful tools for a more efficient workflow. For example, the application provides two features that make it easier to place frames and other elements exactly where you want them on the page: the grid and guides (Figure 6). To enable the grid, right-click on the current page and toggle Show Grid. Instead of the grid (or in addition to it), you can use guides, horizontal and vertical lines you can place anywhere on the page. To add a guide manually, click on the horizontal or vertical ruler, and drag the mouse to the desired position on the page while holding the mouse button down. Release the button to add the guide.
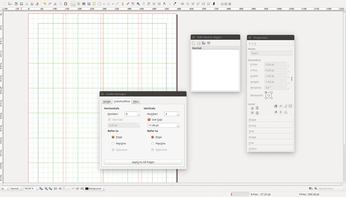
Alternatively, you can use the dedicated Guide Manager tool for working with guides (Figure 7). To activate this tool, right-click on the page and choose Manage Guides. In the Single section, you can add individual guides and specify their position on the page, whereas the Column/Row section lets you automatically add guides by specifying the desired number of guides and a gap value between them. The latter functionality can come in particularly handy for working with multicolumn or multirow layouts. The grid and guide features work in both master and regular pages.
The scrapbook provides a convenient way to store and manage reusable items, such as text snippets, images, shapes, and so on. Better still, the items stored in the scrapbook can be used across different Scribus projects. This way you can maintain a collection of often-used items and insert them into the current Scribus project when needed. To add an item to the default scrapbook, right-click on the item and choose Send to Scrapbook. To view the scrapbook and manage saved items, choose Windows | Scrapbook in the main toolbar (Figure 8).
When you need to rearrange pages in a Scribus project, the Arrange Pages tool can help you with that. Choose Windows | Arrange Pages in the main toolbar, and you can use the tool to rearrange pages by dragging them with the mouse. It's also possible to delete individual pages by dropping them into the Trash.
The outline tool (Windows | Outline) speeds up navigation through complex and long documents. In the Outline window, all pages and layout elements (text, images, etc.) are presented as a hierarchical tree, and you can quickly jump to a specific item by clicking on it in the tree.
Although Scribus does support multiple undos, the application also offers a dedicated Action History tool (Windows | Action History) that lets you view all previous editing actions, as well as quickly redo a specific edit (Figure 9).
Final Word
These days, you can author an ebook in the EPUB format using just a text editor and a couple of simple tools. But, this doesn't mean that Scribus has outlived its usefulness. When it comes to designing printed or electronic materials with a complex layout, this DTP application remains unbeatable. So, next time you need to design a book or a brochure, you might want to use Scribus for the job.
Infos
- Scribus: http://www.scribus.net
Buy this article as PDF
(incl. VAT)
Buy Linux Magazine
US / Canada
UK / Australia
Subscribe to our Linux Newsletters
Find Linux and Open Source Jobs
Subscribe to our ADMIN Newsletters
Support Our Work
Linux Magazine content is made possible with support from readers like you. Please consider contributing when you’ve found an article to be beneficial.

News
-
Linux Servers Targeted by Akira Ransomware
A group of bad actors who have already extorted $42 million have their sights set on the Linux platform.
-
TUXEDO Computers Unveils Linux Laptop Featuring AMD Ryzen CPU
This latest release is the first laptop to include the new CPU from Ryzen and Linux preinstalled.
-
XZ Gets the All-Clear
The back door xz vulnerability has been officially reverted for Fedora 40 and versions 38 and 39 were never affected.
-
Canonical Collaborates with Qualcomm on New Venture
This new joint effort is geared toward bringing Ubuntu and Ubuntu Core to Qualcomm-powered devices.
-
Kodi 21.0 Open-Source Entertainment Hub Released
After a year of development, the award-winning Kodi cross-platform, media center software is now available with many new additions and improvements.
-
Linux Usage Increases in Two Key Areas
If market share is your thing, you'll be happy to know that Linux is on the rise in two areas that, if they keep climbing, could have serious meaning for Linux's future.
-
Vulnerability Discovered in xz Libraries
An urgent alert for Fedora 40 has been posted and users should pay attention.
-
Canonical Bumps LTS Support to 12 years
If you're worried that your Ubuntu LTS release won't be supported long enough to last, Canonical has a surprise for you in the form of 12 years of security coverage.
-
Fedora 40 Beta Released Soon
With the official release of Fedora 40 coming in April, it's almost time to download the beta and see what's new.
-
New Pentesting Distribution to Compete with Kali Linux
SnoopGod is now available for your testing needs