Building a secure, simple VPN connection
Keep it Simple
With a single command, Dead Simple VPN builds a secure VPN connection.
If you are on a business trip and need to transfer data over an open hotel WLAN or use an unencrypted WiFi connection at a conference, you need to establish a secure tunnel to the Internet or a secure connection to your home network to protect your data.
The classic approach for this protection is a virtual private network (VPN). A VPN drills a virtual tunnel from the network you are currently using on your computer through the Internet to a trusted server on a trusted network, keeping third parties from accessing the transferred data.
OpenVPN and the more modern WireGuard [1] are classic tools for setting up a VPN. In practice, however, these tools are not exactly easy to use. Dead Simple VPN (DSVPN) [2] offers a simple solution: After installation, a single command is all it takes to establish the VPN connection.
Installation
With the exception of Arch Linux, DSVPN currently is not available in the package sources of popular distributions. Arch Linux users can install DSVPN with the AUR helper Yay by typing:
yay -S dsvpn
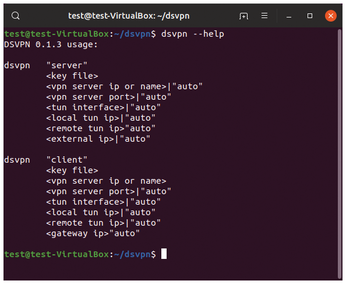
For other distributions, you must compile the application from source code. This sounds more difficult than it is in practice. Listing 1 demonstrates the procedure on a freshly installed Ubuntu 19.04. Listing 1 executes the VPN program with dsvpn --help and displays the individual parameters (Figure 1).
Listing 1
Installing DSVPN
The make install command installs DSVPN, working around the package manager so that it does not appear in the typical package management tools. To cleanly remove the program from the system, either run sudo make uninstall in the source directory or delete the /usr/local/sbin/dsvpn file with root privileges. No other program files or directories are created during the installation. (See the "Raspberry Pi" box for installation on Raspberry Pi.)
Raspberry Pi
The Raspberry Pi's ARM CPU works with the Neon multimedia and signal processing extension. DSVPN supports this function, but you have to enable the Neon optimizations during the build with:
env OPTFLAGS=-mfpu=neon make
Configuration
To establish a connection, you first need a key. DSVPN does not distinguish between private and public keys. To create the vpn.key key file in the current directory using the random number generator /dev/urandom available on the system, use the following command:
$ dd if=/dev/urandom of=vpn.key count=1 bs=32
Later on, you will also need the key on the client computers that you want to connect to the server's DSVPN. Copy the key file to a USB stick.
You have now laid the foundation and completed the installation on the server. Repeat all of these steps on the client computer except for creating a key file. Instead, take the prepared USB stick and copy the vpn.key file to the client system. A VPN/ subfolder in the home directory or the home folder itself is recommended as the storage location.
Next, call the VPN service on the server as shown in Listing 2. In the basic configuration, the system listens on port 443. This port, which is actually used for HTTPS connections, usually also works with public hotspots (such as those at hotels or events).
Listing 2
Calling the VPN Service
However, since you need port forwarding from the router to the DSVPN server, network-attached storage (NAS) may cause you problems since it usually requires ports 80 and 443 for encrypted connections (see the "Forwarded" box). If necessary, extend the call, adding the desired port number (line 5).
Forwarded
On a typical home network, a WiFi router ensures that the connected computers find their way to the Internet. However, the reverse route, from the Internet to a specific computer on the LAN, is not guaranteed: Unsolicited requests from the Internet are usually simply dropped by the WiFi router.
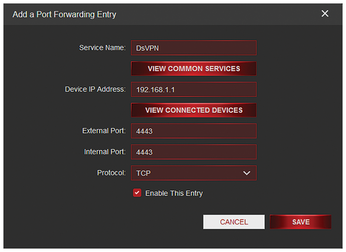
Therefore, for the VPN network, you need to set up port forwarding from the WiFi router to the computer equipped with DSVPN. The procedure is virtually the same for any vendor; in the following example, I use a Fritz!Box with the current firmware version 7.10. Open the administration back end in a web browser with the URL http://fritz.box. Then click on the Port Sharing tab via Internet | Permit Access.
Clicking on Add Device for Sharing launches a wizard that helps you with the subsequent configuration. First select the appropriate device, and then click the New Sharing button. In the dialog, change the selection to Port Sharing and enter the data as shown in Figure 2. Select the Service Name; for the port, you must use the port specified when calling dsvpn.
Opening a Connection
To check the connection, call
ip addr show tun0
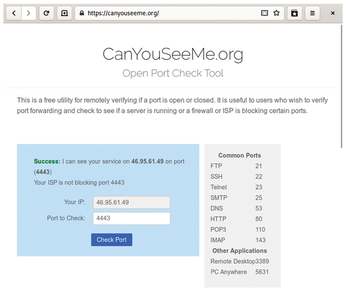
The output from this call should show that there is now a new network device named tun0, as well as its IP address (Listing 3). You can check if port forwarding works with CanYouSeeMe.org (Figure 3). The page should automatically determine your external IP address, so you only need to correct the port number (4443 in this example). If the check returns Success, you can proceed to the next step.
Listing 3
Checking the Connection
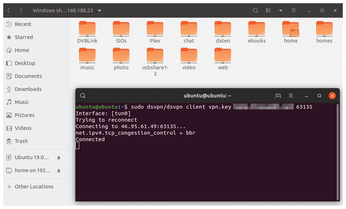
For an initial test, use the command in Listing 4 to enable the VPN connection from a remote network to your home computer (e.g., via a hotspot served up by your mobile phone). You then should be able to use all of your home or office network's resources immediately, even while you are on the move. This includes, for example, file sharing or network drives (Figure 4). The connection is maintained until you close DSVPN on the server or client with Ctrl+C.
Listing 4
Enabling a VPN Connection
If you want to use DSVPN regularly, it makes sense to get a DynDNS address and set up the service on the WiFi router. This means that instead of reaching your network via the Internet IP, which is constantly changing, you use an intuitive URL. Most router manufacturers integrate a corresponding function into the configuration interface; for a Fritz!Box, you will find the settings in Internet | Permit Access | DynDNS. Many DynDNS providers charge a monthly fee, but there are also dedicated services such as FreeDNS, which offers up to five hosts for free [3].
Buy this article as PDF
(incl. VAT)
Buy Linux Magazine
US / Canada
UK / Australia
Subscribe to our Linux Newsletters
Find Linux and Open Source Jobs
Subscribe to our ADMIN Newsletters
Support Our Work
Linux Magazine content is made possible with support from readers like you. Please consider contributing when you’ve found an article to be beneficial.

News
-
TUXEDO Computers Unveils Linux Laptop Featuring AMD Ryzen CPU
This latest release is the first laptop to include the new CPU from Ryzen and Linux preinstalled.
-
XZ Gets the All-Clear
The back door xz vulnerability has been officially reverted for Fedora 40 and versions 38 and 39 were never affected.
-
Canonical Collaborates with Qualcomm on New Venture
This new joint effort is geared toward bringing Ubuntu and Ubuntu Core to Qualcomm-powered devices.
-
Kodi 21.0 Open-Source Entertainment Hub Released
After a year of development, the award-winning Kodi cross-platform, media center software is now available with many new additions and improvements.
-
Linux Usage Increases in Two Key Areas
If market share is your thing, you'll be happy to know that Linux is on the rise in two areas that, if they keep climbing, could have serious meaning for Linux's future.
-
Vulnerability Discovered in xz Libraries
An urgent alert for Fedora 40 has been posted and users should pay attention.
-
Canonical Bumps LTS Support to 12 years
If you're worried that your Ubuntu LTS release won't be supported long enough to last, Canonical has a surprise for you in the form of 12 years of security coverage.
-
Fedora 40 Beta Released Soon
With the official release of Fedora 40 coming in April, it's almost time to download the beta and see what's new.
-
New Pentesting Distribution to Compete with Kali Linux
SnoopGod is now available for your testing needs
-
Juno Computers Launches Another Linux Laptop
If you're looking for a powerhouse laptop that runs Ubuntu, the Juno Computers Neptune 17 v6 should be on your radar.