Using XML code in PHP scripts with XHP
Classic
Besides the specified HTML elements, users can also define their own. It saves a huge amount of time if you just need to add a tag like <ingredients/>, which is swapped automatically by XHP for an HTML list with ingredients. In this way, you can quickly put together a template engine. To use an individual element, you only need to create a new class; however, a couple of conditions apply to the class: It must be derived from the :x:element parent class, which – among other things – provides the appendChild() introduced earlier. Also, the class name must use the tag name and start with a colon. Finally, you need to implement the render() function, which returns XHP objects.
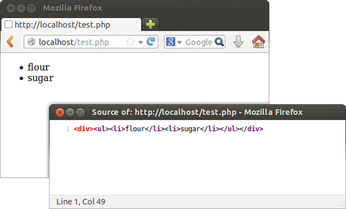
Listing 6 gives an example. The code in Listing 6 creates a new element called ingredients. The first step is to define a matching :ingredients class. This teaches XHP the <ingredients /> tag. Once it shows up somewhere in the PHP code, XHP creates the object. (See line 7 of Listing 6.) Once echo outputs the element, XHP automatically calls the render() method, which returns a small list. At this point, Listing 6 uses a little trick: The <ul> ... </ul> list returned by render() is automatically transformed by XHP into an XHP object. In other words, render() returns an XHP object, as requested. Returning the string An article, however, would result in an error.
Listing 6
Class Definition Example
Listing 6 declares the :ingredients class (Figure 6). Apparently with a view to XML namespaces, XHP classes use a prefix separated by a colon from the actual name. Here, you could select the admin prefix so that the entire class goes by the name of admin:ingredients and the tag is thus <admin:ingredients />. However, this is just a convention; you can leave out the prefix (or namespace) in your own projects.
How Primitive
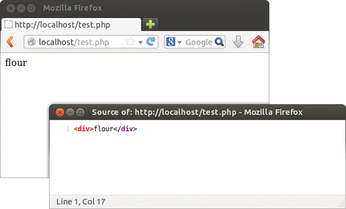
The render() method must always return XHP objects. If you only want to return a string, you have to derive your own class from the x:primitive parent class. However, this class is explicitly designed for "low-level elements," such as the HTML elements a or h1 that need to output the markup or tags. In contrast to x:element, classes derived from x:primitive need to implement the stringify() method, which in turn returns the string that also ends up in the output later. Listing 7 shows an example of an element named ingredient. Its stringify() method simply outputs the <div>flour</div> string.
Listing 7
Derivatives of :x:primitive
Listing 6 and Listing 7 do not worry about their child elements. In the following case,
echo <admin:ingredient> <div>sugar</div> </admin:ingredient>;
the output would still be flour, as shown in Figure 7. <div>sugar</div> is a child element of admin:ingredient.
A loop is needed in stringify() to iterate through all the child elements and integrate them into the output (Figure 8). Listing 8 shows the loop: It uses the getChildren() method to return all the child elements of the object. The code in Listing 8 is available to all classes derived from x:element.
Listing 8
Evaluating the Child Elements

Characteristics
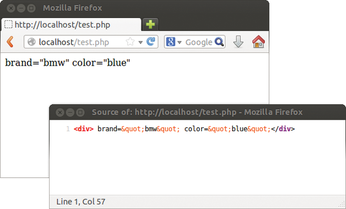
If an element has attributes, you can list them just as easily as in Listing 9 with the attribute keyword. In Listing 9, the element admin:auto receives exactly two attributes. The first is brand; it accepts strings and defaults to a value of Ferrari. The attribute name is followed by @require, stating the attribute is mandatory. Its colleague color can only assume two possible values: blue and red.
Listing 9
Defining Attributes
You can access the attributes using the getAttributes() method (Figure 9), which can then be output in a loop (see Listing 9) within render(). getAttributes() is also available to any class derived from x:primitive.
« Previous 1 2 3 Next »
Buy this article as PDF
(incl. VAT)
Buy Linux Magazine
US / Canada
UK / Australia