Processing loops and more with Giada
Audio Editing
Right-click on the channel name to access the Audio Editor (Figure 4). It enables processing of the audio signal, which is displayed in an envelope curve. Below this are some controllers that let you manage playback. In general, the most important tool will be the one for setting the start and end points of the loop. You can optionally define this through the input fields at the bottom, or slightly more intuitively using the two controllers in the envelope labeled s(tart) and e(nd). To find the appropriate locations as accurately as possible, you can change the view. Additionally, you can adapt the clip volume in the editor. You can decrease the volume via the volume sliders or increase it via the boost slider. However, some caution is required to avoid distortion.
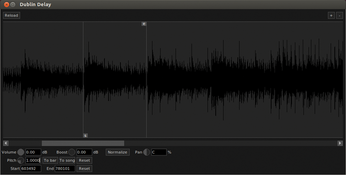
The Normalize feature can be useful. It adjusts the envelope to match the loudest result in the sample, raising the volume of quiet passages more than that of loud ones. This function can help present a sample to better advantage in a sequence; however, it needs to be treated with some caution, because it can spoil a sound experience under certain circumstances. Remember that this function in Giada essentially means automating the boost control.
The third functional unit in the Audio Editor is the pitch control, which lets you adjust the pitch of the sample to suit your needs. The pitch is set manually via the small control, or you can let Giada adapt the speed to match the beat or the sequence. If you are not impressed by the results, there is also a Reset switch here, as well an option for setting the start and end points.
Configuration
In the configuration settings, you can define basic values for the hardware, that is, the input and output channels (Figure 5). You also define the sound system and the buffer size here. If you have more than one audio hardware device, select the desired device. This also applies to the MIDI system settings.
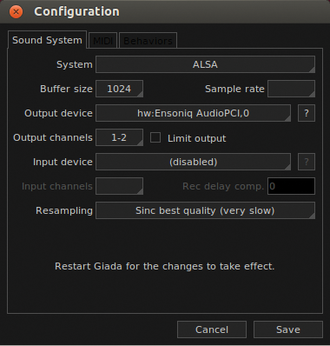
The third tab defines Giada's behavior. Here, you can define whether channels should be stopped immediately or as soon as the channel itself or the sequencer is stopped, or whether to first play all activated sounds to the end. You also decide here whether the channels in which you have stored actions should be treated as loop channels, although the play mode is set to Shot.
Performance
In this article, I have explored working with Giada in preparing a performance or recording session. In the case of Giada and similar software, this is the part of the work that takes the most time. I have described in detail how to make a sequence and possibly create a complete beat.
Giada is also suitable for live use. For this purpose, you need to prepare a complete set of loops and other sounds. You can assign a corresponding key to each channel so that you can easily retrieve the channels/sounds with the computer keyboard. Once you have made all the settings, save the entire set as a Patch.
If you want to use your settings with all your loops on another device, you must save the whole thing as a Project. This saves the Giada settings and all your audio files in a shared folder; you can then transfer the results to the other device. This means you can exchange data between your workstation at home and the laptop that you use on the road, without seeing a message about missing audio files.
« Previous 1 2 3 4 Next »
Buy this article as PDF
(incl. VAT)
Buy Linux Magazine
US / Canada
UK / Australia