Adding Internet data to your home automation dashboard
Scrape and Show

You can use one line of Bash code to scrape a web page and show the data you're tracking in Home Assistant or Node-RED.
Many home automation solutions provide a central dashboard that serves as a nerve center for the Internet of Things (IoT) environment. From the dashboard, you can monitor and manage light levels, thermostat temperatures, and all the other settings the system controls. Some users don't realize that the dashboard can also provide information from beyond your home network. In other words, you can use the tools of the home automation environment to fetch information from the Internet and display it in a handy at-a-glance view along with your IoT settings.
For instance, you might have personal or hobby topics that you check periodically. These personal data points might be the wave height at a local surf spot, the insect levels at a favorite camping area, or the best time of go fishing. You probably know exactly where to find this information, however, it still requires several steps to start up a web browser, click on a bookmark, and scan the page for the desired data – which might just consist of a single number or a couple of words.
In this article, I will look at how to scrape these hobby data points from web pages with just a single line of Bash code and display the results in the dashboards of two home IoT packages, Home Assistant [1] and Node-RED [2].
Getting Started
Several different automation solutions offer web-scraping tools. For example, Python has the Beautiful Soup [3] library, Home Assistant has the Scrape [4] sensor, and Node-RED has the scrape-it [5] flow. These web-scraping tools are all very usable, but unfortunately they require a detailed knowledge of the HTML/Document Object Model for the requested page.
An simple alternative approach is to use the Lynx [6] text-based web browser. You can use Lynx to strip out all the HTML tagging and dump just the text on a page. The output from Lynx can be piped to common commands such as grep, sed, and awk to filter out the required values. The advantage of the Lynx approach is that you don't need to understand the internal HTML on a page, and it only takes one line of Bash code to get what you need.
To install Lynx on Raspian/Debian/Ubuntu:
sudo apt install lynx
Offline Examples
The first step in developing custom web-scraped data points is to find the required Bash commands. Working directly on either Home Assistant or Node-RED can be a little challenging. Luckily, you can do all your basic testing on a laptop, and then, once you've got things working, you can move the code over to your IoT system.
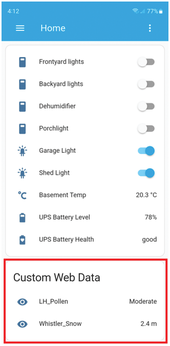
Two personal-interest topics for me are the pollen levels in a local hiking region and the amount of snow at a ski resort where I'm planning to take my family.
The Lynx -dump option will output a stream of text with HTML tags, HTML encoding, and JavaScript removed. The command syntax that I'm looking for is:
lynx -dump http://somepage.com | "filter the output until I get the result"
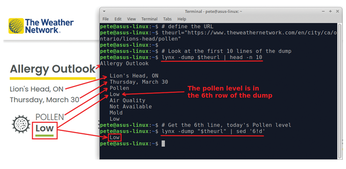
Figure 1 shows how I used Lynx to find the pollen level from a weather page. For this example, I first look at the top 10 lines in the output, and I compare this output to the actual web page. A quick check shows that the pollen level value is on the sixth line. You can use the sed utility to delete all but the sixth line by setting the option to : '6!d'.
The full Bash script to get the pollen level from my favorite hiking area is shown in Listing 1.
Listing 1
Pollen Level
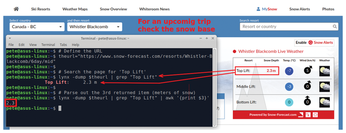
The second example, Figure 2, uses Lynx with a grep call to find the text "Top Lift" on a web page. In this snapshot, the output is returned as four words: Top Lift: 2.3 m. The snow depth (2.3) is the third word in the string. There are a few ways to extract words in a string, and for this example, I use the awk utility. The full Bash script to get the snow base for my upcoming ski trip is shown in Listing 2.
Listing 2
Get the Snow Base
Now that I've got the Bash commands for my personal data points, I can move to the next step of adding them to my Home Assistant and Node-RED systems.
Home Assistant Command-Line Sensors
The Home Assistant command-line sensors offer an interface that makes the output from Bash commands available as Home Assistant viewable entities. The first step is to install the Lynx utility. There are several ways to install applications into Home Assistant. The important point is that Lynx needs to be available in the same working space that the command-line sensors run in. A simple way to ensure this is to use a command-line sensor to install Lynx directly.
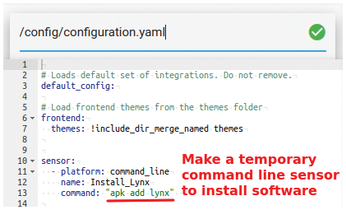
To install sensors, modify the /config/configuration.yaml file. You can access this file through the File Editor or Terminal Home Assistant add-ons, or via a secure shell (SSH) connection.
Figure 3 shows a temporary sensor called Install_Lynx that has been added to /config/configuration.yaml. This sensor will run the apk add command to install software. After this file is updated and saved, you'll need to restart Home Assistant. After you install the required software, you should remove this temporary "install" sensor – otherwise the system will try to re-install Lynx every 60 seconds.
Another approach would be to only install the software if it isn't there. The command would be:
if ! ( apk list lynx ); then apk add lynx; fi
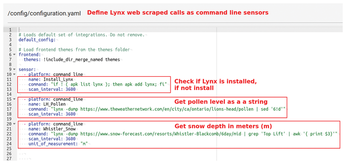
After Lynx is installed, you can add some new command-line sensors that access the personal web-page data. Figure 4 shows a sample /config/configuration.yaml file with the Install_Lynx sensor removed and two new sensors that use the web-scraping Bash commands. These web pages don't update too frequently, so the scan_interval is set to 1 hour (3,600 seconds). As in the previous step, restart Home Assistant after the new sensors are added.
The final step is to put the new sensor tags into a viewable presentation. Select the Home Dashboard from Home Assistant's Overview option. Figure 5 shows the addition of a card that contains the newly created web-scraped command-line sensors.
Buy this article as PDF
(incl. VAT)
Buy Linux Magazine
US / Canada
UK / Australia