Communication in the post-PRISM world
Your Free Switchboard
The SIP server that best combines ease of installation and configuration, offers a large number of functionalities, and complies with the three laws of confidentiality is FreeSWITCH [8]. Although FreeSWITCH is not in the Debian repositories, it is very easy to obtain the software's source code.
To begin, install the Git version control software and then grab the latest stable version of FreeSWITCH from the project's repository:
# apt-get install git
$ git clone -b v1.2.stable git://git.freeswitch.org/freeswitch.git
to grab the latest stable version of FreeSWITCH from the project's repository.
Although you may find compiling from scratch quite daunting, FreeSWITCH comes with well-thought-out scripts to help you along the way.
The next step is to download a couple of tools necessary to build the files you need before starting the compile proper:
# apt-get install autoconf libtool
Then, change to the freeswitch directory where you downloaded the source code,
$ cd freeswitch/
and run a script that builds the files you need to compile:
$ ./bootstrap.sh
On a vanilla Debian install, you need to run the following to satisfy all the dependencies that FreeSWITCH requires:
# apt-get install g++ pkg-config uuid-dev zlib1g-dev libgnutls-dev libjpeg8-dev libncurses5-dev libssl-dev
Next, you can configure the compilation by running the configure script created by the bootstrap.sh script:
$ ./configure
After running configure and before the actual compile, you might want to edit modules.conf and remove the pound sign (#) from the following line:
#asr_tts/mod_flite
This step uncomments the line and makes IVR (Interactive Voice Response – as used in voice-based interactive menus) available later. Finally, enter:
$ make
# make install
to compile.
Honks, Buzzes, and Robot Voices
To complete your setup, you'll need a full library of tones, irritating hold music, and voice prompts. To download and install the FreeSWITCH default library of sounds, enter:
# make all cd-sounds-install cd-moh-install
Of course, these items can be exchanged for your own personalized recordings later, but the files offered by FreeSWITCH are great to get started.
Up and Running
Now you can run FreeSWITCH with:
/usr/local/bin/freeswitch
This step outputs a lot of status lines as it boots and will finally dump you at the FreeSWITCH command line. For all practical purposes, you are now up and running and can start placing calls through FreeSWITCH.
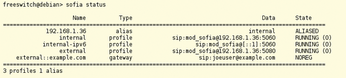
To test your setup, you first need to log on to one of the preset accounts. By default, FreeSWITCH establishes the IP address of the machine it is running on as the "host." If you are unsure what IP address FreeSWITCH is using, type
sofia status
at the FreeSWITCH command line, and you will see something like the information shown in Figure 2.
Several default accounts are set up in FreeSWITCH, including extensions numbered 1000 through 1019, all of which have "1234" as passwords. You might want to change these accounts and their passwords once you move FreeSWITCH into production, but for testing, these accounts will be fine. (You can change default passwords and other variables by editing the var.xml file located in the conf directory.)
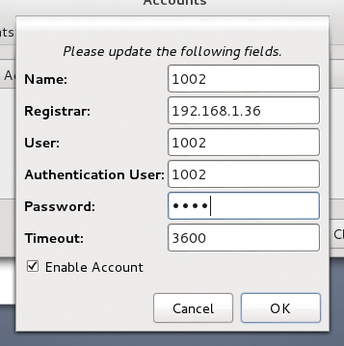
To configure Ekiga [9], for example, go to Edit | Accounts and then choose Accounts | Add a SIP Account and populate the fields with something similar to that shown in Figure 3.
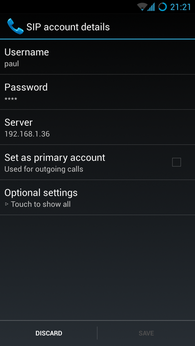
Configuration can vary from phone to phone; however, on a Samsung S3 running the latest CyanogenMod, you can open the Phone App, press Menu, choose Settings, then scroll down and, under Internet settings, select Accounts, then Add Account. You can then fill in the configuration screen as shown in Figure 4.
Next, you can, for example, phone 9198, and you will hear the Tetris theme played by the FreeSWITCH tone system.
To include your own users, create an XML file in the conf/directory/default directory under the FreeSWITCH default directory (if you have followed this tutorial to the letter up to this point, that would probably be the /usr/local/freeswitch/conf/directory/default directory). If you wanted to create an account for user paul, for example, you would create a file that looked something like Listing 1.
Listing 1
paul.xml
This is a bare-bones version of a user setup that will work with the default FreeSWITCH configuration. Realistically, however, a complete user file would look like Listing 2 and would require you to modify the /usr/local/freeswitch/conf/dialplan/default.xml and /usr/local/freeswitch/conf/dialplan/public.xml files to include the 1500 extension. To do this, locate the line that reads
Listing 2
paul.xml, Mark 2
<condition field="destination_number" expression="^(10[01][0-9])$">
in the Local_Extension section in default.xml and change it to
<condition field="destination_number" expression="^(10[01][0-9]|1500)$">
Then locate the line that reads
<condition field="destination_number" expression="^(10[10][0-9])$">
in public.xml and change it to
<condition field="destination_number" expression="^(10[10][0-9]|1500)$">
to include the new extension.
Here, the ^(10[01][0-9])$ string is a regular expression that gives you extensions from 1000 to 1019 by default. You can change it so you have more extensions.
If you rewrote this as ^(10[01][0-9]|150[012])$, for example, you would include, three more extensions, 1500,1501,1502. Before you go around creating tons of new numbers, however, read through default.xml and public.xml carefully and make sure you don't write a regex that overlaps with other patterns already in use.
« Previous 1 2 3 Next »
Buy this article as PDF
(incl. VAT)
Buy Linux Magazine
US / Canada
UK / Australia
Subscribe to our Linux Newsletters
Find Linux and Open Source Jobs
Subscribe to our ADMIN Newsletters
Support Our Work
Linux Magazine content is made possible with support from readers like you. Please consider contributing when you’ve found an article to be beneficial.

News
-
TUXEDO Computers Unveils Linux Laptop Featuring AMD Ryzen CPU
This latest release is the first laptop to include the new CPU from Ryzen and Linux preinstalled.
-
XZ Gets the All-Clear
The back door xz vulnerability has been officially reverted for Fedora 40 and versions 38 and 39 were never affected.
-
Canonical Collaborates with Qualcomm on New Venture
This new joint effort is geared toward bringing Ubuntu and Ubuntu Core to Qualcomm-powered devices.
-
Kodi 21.0 Open-Source Entertainment Hub Released
After a year of development, the award-winning Kodi cross-platform, media center software is now available with many new additions and improvements.
-
Linux Usage Increases in Two Key Areas
If market share is your thing, you'll be happy to know that Linux is on the rise in two areas that, if they keep climbing, could have serious meaning for Linux's future.
-
Vulnerability Discovered in xz Libraries
An urgent alert for Fedora 40 has been posted and users should pay attention.
-
Canonical Bumps LTS Support to 12 years
If you're worried that your Ubuntu LTS release won't be supported long enough to last, Canonical has a surprise for you in the form of 12 years of security coverage.
-
Fedora 40 Beta Released Soon
With the official release of Fedora 40 coming in April, it's almost time to download the beta and see what's new.
-
New Pentesting Distribution to Compete with Kali Linux
SnoopGod is now available for your testing needs
-
Juno Computers Launches Another Linux Laptop
If you're looking for a powerhouse laptop that runs Ubuntu, the Juno Computers Neptune 17 v6 should be on your radar.