Restore Btrfs files at the push of a button with Snapper
Ubuntu and Debian with ext4 and Btrfs
On Debian sid/Siduction and Ubuntu, I tried to get Snapper and the Snapper GUI [8] running using ext4. Several attempts delivered mixed results that do not suggest a predictable experience; therefore, I would advise against the use of ext4 with Snapper right now. Because I had already installed all components and configurations for Snapper and the Snapper GUI, I decided to convert the existing ext4 filesystem to Btrfs.
The Debian instructions on how to perform such a conversion [9] were useful. After a subsequent reboot, Snapper and the Snapper GUI worked well together. Note, however, that it is faster to set up a new system with Btrfs than to convert from ext4. The process described here was more of an exercise to see whether the conversion could work at all.
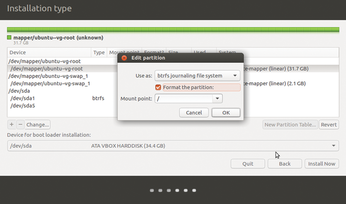
While re-installing Ubuntu with Btrfs as the filesystem on a 30GB partition, I took advantage of putting the system under the control of LVM [10]. If you want to do this, select the Use LVM checkbox during installation, then right-click the partitions below Others at the bottom, which lets you choose Btrfs as the filesystem (Figure 7). The rest of the installation proceeds as usual. After restarting the installed system, you should first upgrade it, because each new kernel of late has introduced optimizations for Btrfs.
Next, install the snapper package; libpam-snapper, if needed, which launches Snapper when you log in to the system; and apt-btrfs-snapshot, which ensures that a snapshop is created after every upgrade with Apt. Then install snapper-gui. As a precondition, you only need to install the git and python3-setuptools packages on a recent Ubuntu. Then, type
git clone --depth=1 https://github.com/ricardomv/snapper-gui.git
cd snapper-gui/
sudo python3 setup.py install
sudo snapper create-config /
sudo snapper-gui
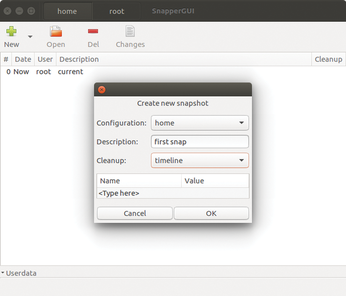
to download the code for and install the GUI, create a basic configuration for snapshots of the entire system, and launch the GUI, which is relatively self-explanatory with its sparse controls (Figure 8).
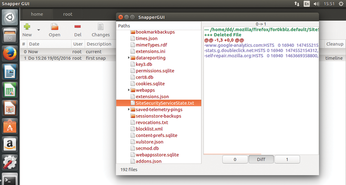
You can create configurations and open, remove, and view the differences between snapshots. You use the left Ctrl key to select the snapshots, and the changes are then displayed when you click on Changes (Figure 9). All told, the Snapper GUI offers roughly the same features as the YaST module in openSUSE. In the end, however, with a little practice, managing Snapper in a terminal window is not rocket science.
Snapper on Ubuntu, Debian, and probably other operating systems uses the same configuration file for snapshots as on openSUSE. Before you start production operation, you will want to check all the configurations you created in /etc/snapper/configs and modify them to match Listing 1 or to suit your own needs. All further management steps are as already described; the commands described for openSUSE also work on Debian and Ubuntu.
Although I chose to use LVM, it is not mandatory because Btrfs already has LVM functionality built in. Setting it up in this case can be viewed as more of a test as to whether the duplicate functions would interfere with each other, which could not be proved in the lab. An error with the apt-btrfs-snapshot package, which is supposed to ensure that a snapshot is automatically created after every upgrade with Apt, currently prevents it from working; therefore, before a system upgrade, you should use the command line or the GUI to create a snapshot.
Conclusions
Snapper optimizes the Btrfs snapshot feature, making it a valuable helper on systems subject to continuous change, such as developers and users of rolling release distributions. The software provides a valuable service by letting you roll back to a prior state before upgrading.
If you operate a stable system and do not install a lot of software daily, it is worthwhile calculating Snapper's overhead. Under certain circumstances it might be advisable to disable the snapshots launched every hour by cron and to only use automated snapshots when installing or upgrading.
The stability of Btrfs is an important factor. During the tests on three operating systems, more than 100 snapshots were created automatically and manually; they were compared, rolled back, and used to launch snapshot systems in GRUB. Under Btrfs, Snapper and the Snapper GUI on Ubuntu were stable; no errors endangered the data in any way. All the same, you should remember that Snapper is not a replacement for complete backups: In fact, it is more like the well-known Windows System Restore feature.
Infos
- Btrfs: http://en.wikipedia.org/wiki/Btrfs
- ZFS: https://en.wikipedia.org/wiki/ZFS
- Snapper in Arch: https://wiki.archlinux.org/index.php/Snapper#Create_a_new_configuration
- Snapper configuration: http://snapper.io/manpages/snapper-configs.html
- SUSE documentation for Snapper: https://www.suse.com/documentation/sles-12/book_sle_admin/data/sec_snapper_config.html
- Snapper man page: http://snapper.io/manpages/snapper.html
- Rolling back files: https://www.suse.com/documentation/sles-12/book_sle_admin/data/sec_snapper_snapshot-boot.html
- snapper-gui: https://github.com/ricardomv/snapper-gui
- Debian how-to: https://www.debian-administration.org/article/675/How_to_convert_a_Wheezy_or_newer_system_to_btrfs
- LVM: https://en.wikipedia.org/wiki/Logical_volume_management
« Previous 1 2
Buy this article as PDF
(incl. VAT)
Buy Linux Magazine
US / Canada
UK / Australia
Subscribe to our Linux Newsletters
Find Linux and Open Source Jobs
Subscribe to our ADMIN Newsletters
Support Our Work
Linux Magazine content is made possible with support from readers like you. Please consider contributing when you’ve found an article to be beneficial.

News
-
TUXEDO Computers Unveils Linux Laptop Featuring AMD Ryzen CPU
This latest release is the first laptop to include the new CPU from Ryzen and Linux preinstalled.
-
XZ Gets the All-Clear
The back door xz vulnerability has been officially reverted for Fedora 40 and versions 38 and 39 were never affected.
-
Canonical Collaborates with Qualcomm on New Venture
This new joint effort is geared toward bringing Ubuntu and Ubuntu Core to Qualcomm-powered devices.
-
Kodi 21.0 Open-Source Entertainment Hub Released
After a year of development, the award-winning Kodi cross-platform, media center software is now available with many new additions and improvements.
-
Linux Usage Increases in Two Key Areas
If market share is your thing, you'll be happy to know that Linux is on the rise in two areas that, if they keep climbing, could have serious meaning for Linux's future.
-
Vulnerability Discovered in xz Libraries
An urgent alert for Fedora 40 has been posted and users should pay attention.
-
Canonical Bumps LTS Support to 12 years
If you're worried that your Ubuntu LTS release won't be supported long enough to last, Canonical has a surprise for you in the form of 12 years of security coverage.
-
Fedora 40 Beta Released Soon
With the official release of Fedora 40 coming in April, it's almost time to download the beta and see what's new.
-
New Pentesting Distribution to Compete with Kali Linux
SnoopGod is now available for your testing needs
-
Juno Computers Launches Another Linux Laptop
If you're looking for a powerhouse laptop that runs Ubuntu, the Juno Computers Neptune 17 v6 should be on your radar.