Self-organization with Getting Things Gnome
Projects
Tasks that you want to complete yourself, and that take more than two minutes, are referred to as projects in GTD. Such projects are typically broken down into individual tasks.
First, create a new task for the overall project in the usual way by pressing Ctrl+N. If you want to write an article for a professional journal, the title could be Write article. The following tags seem appropriate: @projects @article. The completion date is the editorial deadline. Enter the individual sub-tasks line by line with a leading dash; for example: -1. Literature research, -2. Get literature, -3. Read literature, -4. Write draft, -5. Send draft to editor, -6. Incorporate editorial changes, -7. Send finished article to editor.
GTG creates its own sub-entry for each part of the task and also creates a corresponding link in the main entry's window. In the main window, the entries are shown indented under the main entry. To keep track, it is useful to enumerate the tasks in the order in which you want to complete them.
In the sub-tasks, you can save notes for each step, for example, a list of the literature you want to read. As usual, you also have the option of entering tags. After sending a draft of your article to the editor, you can to add the @wait tag to the corresponding sub-item.
You need to assign start dates and due dates for sub-tasks. In this way, you can keep track of which sub-task is pending; of course, the due date for a sub-task must be no later than the due date for the project. After you complete a sub-task, right click on it and select Mark as Done from the menu.
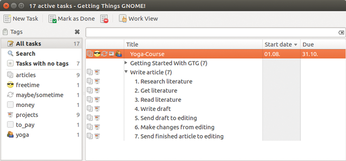
Regular Processing
To see which tasks are currently pending, you need to work through GTG regularly as part of your daily routine. In the main window, click the Work View button. Pressing the button changes the view of the main window (Figure 2). GTG only displays those tasks that you need to complete. They include tasks that either have no start date or whose start date has already been reached. If required, you can filter this list for keywords.
For example, if you are heading into town for shopping, you can display all items with the keyword @shopping, so that you are sure to complete all your pending purchases in a single visit. You can then highlight any completed tasks, and they will disappear from the list.
Simplification
Various plugins add functionality to GTG. To view and enable any available plugins, select Edit | Plugins. You'll find plugins that let you automatically delete highlighted tasks, color-code tasks for easy recognition of urgency, and more.
Use the Tomboy/Gnote plugin to sync tasks between GTG and the Gnote or Tomboy note-taking tools (Figure 3). First enable the plugin, and then enable synchronization using Edit | Synchronization Services. A new menu appears bottom left; now click on Add.

Then select the program with which you want to sync tasks and notes (for example, Tomboy) and confirm by pressing OK. You just need to decide whether GTG should synchronize all tasks and notes or just those that contain a specific keyword, say @GTG-Tomboy. Click on Enable Synchronization and Close to complete the synchronization.
« Previous 1 2 3 Next »
Buy this article as PDF
(incl. VAT)
Buy Linux Magazine
US / Canada
UK / Australia
Subscribe to our Linux Newsletters
Find Linux and Open Source Jobs
Subscribe to our ADMIN Newsletters
Support Our Work
Linux Magazine content is made possible with support from readers like you. Please consider contributing when you’ve found an article to be beneficial.

News
-
XZ Gets the All-Clear
The back door xz vulnerability has been officially reverted for Fedora 40 and versions 38 and 39 were never affected.
-
Canonical Collaborates with Qualcomm on New Venture
This new joint effort is geared toward bringing Ubuntu and Ubuntu Core to Qualcomm-powered devices.
-
Kodi 21.0 Open-Source Entertainment Hub Released
After a year of development, the award-winning Kodi cross-platform, media center software is now available with many new additions and improvements.
-
Linux Usage Increases in Two Key Areas
If market share is your thing, you'll be happy to know that Linux is on the rise in two areas that, if they keep climbing, could have serious meaning for Linux's future.
-
Vulnerability Discovered in xz Libraries
An urgent alert for Fedora 40 has been posted and users should pay attention.
-
Canonical Bumps LTS Support to 12 years
If you're worried that your Ubuntu LTS release won't be supported long enough to last, Canonical has a surprise for you in the form of 12 years of security coverage.
-
Fedora 40 Beta Released Soon
With the official release of Fedora 40 coming in April, it's almost time to download the beta and see what's new.
-
New Pentesting Distribution to Compete with Kali Linux
SnoopGod is now available for your testing needs
-
Juno Computers Launches Another Linux Laptop
If you're looking for a powerhouse laptop that runs Ubuntu, the Juno Computers Neptune 17 v6 should be on your radar.
-
ZorinOS 17.1 Released, Includes Improved Windows App Support
If you need or desire to run Windows applications on Linux, there's one distribution intent on making that easier for you and its new release further improves that feature.