Tips for securing your SSH server
Whitelisting IP Addresses
A whitelist is a list of IP addresses that are explicitly granted access to the server. A blacklist is a list of address that are explicitly denied access. The TCP Wrappers feature built into many Linux distributions lets you define whitelists and blacklists for services like SSH.
To whitelist specific IP addresses for the sshd service, open the hosts.allow file by running the following command in the server terminal:
$ sudo nano /etc/hosts.allow
Then put the IP addresses you want to whitelist in this file, either individually:
sshd: 192.168.2.2
or as a group using CIDR notation:
sshd: 192.168.2.0/24
You can then blacklist all the remaining IP addresses by modifying the hosts.deny file. Open the hosts.deny file:
$ sudo nano /etc/hosts.deny
And add following line:
sshd: ALL
If you would prefer to just blacklist specific addresses, enter the specific address or address range in hosts.deny:
sshd: 192.168.2.2
sshd: 192.168.5.0/24
After changing the hosts.allow and hosts.deny files, restart your SSH server by running following command:
$ sudo systemctl restart ssh
Now your SSH server is open to only specific IP addresses.
Blocking Addresses with a Firewall
An SSH server accessible by the public is bound to come under attack. The hosts.deny file is one way to block access to a specific IP address, but a firewall is another important line of defense.
For this example, I'll use the Uncomplicated Firewall (UFW) tool used to configure firewalls in Ubuntu. UFW comes preinstalled on many Linux distributions, but if your Linux uses a different tool, the concepts are similar. Check the status of UFW by running the following command (Figure 4):
$ sudo ufw status

If UFW is inactive on your server, activate it as follows:
$ sudo ufw enable
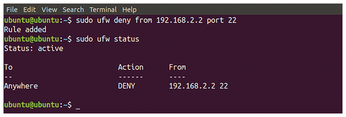
Now say you want to block the IP address 192.168.2.2 and a range of IP addresses (192.168.5.0/24) on the SSH server, which is running on port 22 (of course, if you follow the advice given in this article, you'll be using a different port instead of port 22). Use the following command to block a single IP address:
$ sudo ufw deny from 192.168.2.2 port 22
This command will add a rule to block this IP address on port 22. Now check the status of UFW by again running the status command:
$ sudo ufw status
If UFW is active, the command will display all the rules, as shown in Figure 5.
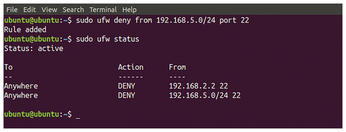
Now run the following commands to block a range of IP addresses, and then check the UFW status on the SSH server:
$ sudo ufw deny from 192.168.5.0/24 port 22
$ sudo ufw status
These commands block the IP addresses and display all the rules, as shown in Figure 6.
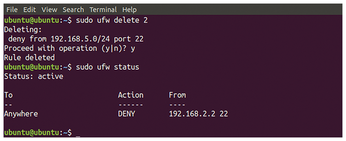
Now your server is secure against attacks from these IP addresses. You can restore access to these addresses by deleting the rules. To delete the second rule from UFW rules (Figure 7):
$ sudo ufw delete 2
$ sudo ufw status
Adding Two-Factor Authentication
One of the best ways to secure your SSH server against hijack is adding two-factor authentication (2FA). In this example, I will use Google Authenticator to add multifactor authentication to the SSH server. Following are the steps to activate 2FA on the SSH server.
First of all, install Google Authenticator on your Android device. You can install Google Authenticator with the following link:
https://play.google.com/store/apps/details id=com.google.android.apps.authenticator2&hl=en
Now log into the SSH server and run the following command in the terminal to install Google Authenticator on the server:
$ sudo apt-get install libpam-google-authenticator
After installing, open Google Authenticator by typing following command:
$ google-authenticator
You will be asked if you want Google Authenticator to generate time-based authentication tokens. If you reply with yes, tokens will expire after a specific time and new tokens will be generated. It is more secure to use time-based authentication tokens.
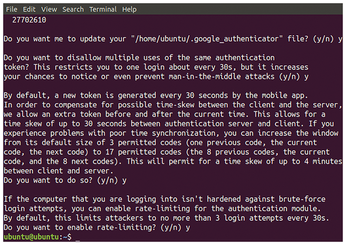
Answering this question will generate some credentials, including a QR code, a verification code, a secret key, and emergency scratch codes. Now open Google Authenticator on your Android device and scan the QR code generated on the terminal.
If your mobile device does not support QR code scanning, you can use a verification code to get started. Now you will be asked if you want to change the Google Authenticator configuration file. If you want to customize Google Authenticator, select yes (Figure 8).
Once you have Google Authenticator configured and working, the next step is to configure SSH to use Google Authenticator for two-factor authentication. Open the SSH configuration file by typing the following command:
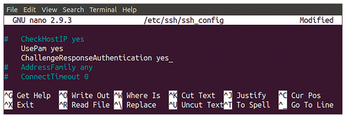
$ sudo nano /etc/ssh/sshd_config
Find the following lines and set them to yes:
UsePAM yes
ChallengeResponseAuthentication yes
After changing the configuration file (Figure 9), restart the SSH server by running following command:
$ sudo systemctl restart ssh
Now whenever you try to login to your SSH server, it will ask for secondary credentials, which will then be generated on your smartphone. You can get access to the server after providing these credentials.
« Previous 1 2 3 Next »
Buy this article as PDF
(incl. VAT)
Buy Linux Magazine
US / Canada
UK / Australia
Subscribe to our Linux Newsletters
Find Linux and Open Source Jobs
Subscribe to our ADMIN Newsletters
Support Our Work
Linux Magazine content is made possible with support from readers like you. Please consider contributing when you’ve found an article to be beneficial.

News
-
TUXEDO Computers Unveils Linux Laptop Featuring AMD Ryzen CPU
This latest release is the first laptop to include the new CPU from Ryzen and Linux preinstalled.
-
XZ Gets the All-Clear
The back door xz vulnerability has been officially reverted for Fedora 40 and versions 38 and 39 were never affected.
-
Canonical Collaborates with Qualcomm on New Venture
This new joint effort is geared toward bringing Ubuntu and Ubuntu Core to Qualcomm-powered devices.
-
Kodi 21.0 Open-Source Entertainment Hub Released
After a year of development, the award-winning Kodi cross-platform, media center software is now available with many new additions and improvements.
-
Linux Usage Increases in Two Key Areas
If market share is your thing, you'll be happy to know that Linux is on the rise in two areas that, if they keep climbing, could have serious meaning for Linux's future.
-
Vulnerability Discovered in xz Libraries
An urgent alert for Fedora 40 has been posted and users should pay attention.
-
Canonical Bumps LTS Support to 12 years
If you're worried that your Ubuntu LTS release won't be supported long enough to last, Canonical has a surprise for you in the form of 12 years of security coverage.
-
Fedora 40 Beta Released Soon
With the official release of Fedora 40 coming in April, it's almost time to download the beta and see what's new.
-
New Pentesting Distribution to Compete with Kali Linux
SnoopGod is now available for your testing needs
-
Juno Computers Launches Another Linux Laptop
If you're looking for a powerhouse laptop that runs Ubuntu, the Juno Computers Neptune 17 v6 should be on your radar.