Darktable 1.2 RAW converter
Image Processing
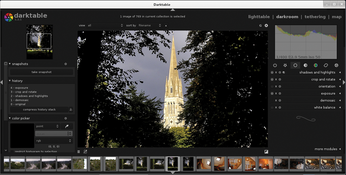
After selecting an image, head to the darkroom for editing (Figure 5). Again, Darktable splits the window into three areas: The left sidebar contains information about the current image, and the right sidebar is for selecting and applying the tools. In the context of Darktable, these are known as "modules."

Darktable is among the best software the image processing world has to offer today. And, it's no coincidence that many of the developers are employed in image processing research [5]. Darktable 1.2 offers around 50 tools sorted into five groups. All of these tools can be accessed via the right panel, but by default, you only see a title bar with multiple switches. The switches enable the tool and create and restore default settings; some modules also allow "multiple instances actions." In most cases, a menu defines important presets and your own presets after you have saved them (Figure 6).

The equalizer is one of the most important tools when it comes to sharpening images or improving their brilliance (clarity). The filter has a number of useful presets that indicate the bandwidth of this tool. Additionally, you can manually modify the lightness (luma), color saturation (chroma), and sharpness in the tool window. To do this, use the mouse to modify the control line in the window so that the desired effects occur. If you lift the line at the right edge, it also improves the sharpness.
Tool Groups
The basic group includes white balance, demosaic, exposure, orientation, base curve (corrects sensor characteristics), crop and rotate, and shadow and highlight tools.
The tone group contains tools for tone mapping, contrast (tone curve), and local contrast, as well as fill light to brighten shadows. The levels tool affects the entire exposure. Using three pipettes, you can select the whitepoint, blackpoint, and greypoint in the image; Darktable then adjusts the exposure accordingly. A special variant of this tool is the zone system.
The color group facilitates color processing and lets you select an input color profile and adjust an output color profile. Additionally, tools for color contrast, color zones, and color correction are available, as well as the vibrance tool and the similar (but less subtle) velvia tool. The channel mixer lets you mix colors or create monochrome images by setting the destination to gray. The monochrome tool has fewer features.
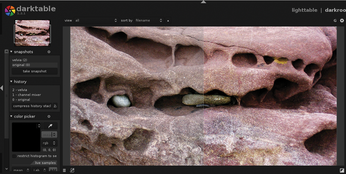
In many of these tools, it is not easy to see and understand the effects. Help is available in the form of new, enlarged snapshots that clarify the effects. To find this function, go to the top of the left panel. The take snapshot button grabs a snapshot, which you can then in display at any time in the image window by clicking. Then Darktable splits the window horizontally or vertically into two areas of equal size that show the current image and the snapshot. You can use the mouse to adjust size allocation and direction (Figure 7).

In the correction group you will find both the equalizer referred to earlier and other tools for making important adjustments, including noise removal at different levels (raw denoise) together with a denoise (profiled) tool for camera-specific noise, as well as non-local mean value and bilateral filter denoising. Also, distortions caused by the lens (lens correction), hot pixels, spots, and chromatic aberrations can be cleaned up here.
The final group of utilities, in the effect group, are not absolutely necessary; but, they are often useful and could save you a lot of work. For example, you can embed watermark, employ framing, try your hand at vignetting, or simulate a film grain. Other options are highpass and lowpass filters, a soften effect to blur your image, and fun effects like lowlight vision or bloom, which boosts highlights. A colorize function (like the GIMP filter) and a gradient filter graduated density round off the selection.
The filters [6] in Darktable applied to RAW images will produce better results than you could achieve by filtering images after conversion to a bitmap format. Thus, it is often a good idea to create and export multiple versions of an image with the filters provided by the RAW converter; then further processing can then be done in GIMP.
Conditional Blending and Masks
Layers, as used in GIMP and other graphics programs, can be computed against one another in layer modes, thus achieving special effects. Darktable has added this concept to version 1.2 and provides it for almost all filter modules with the conditional blend option (only, if..). This gives you access to the same modes as in GIMP, as well as some additional ones.
However, all filter modules today also have an option to that lets you apply them to specific sections of an image. After a lengthy discussion, the Darktable programmers developed a very effective mask model that differs from that in GIMP [7]. Depending on the filter, you create a mask in LAB, HSV, RGB, or any other color model.
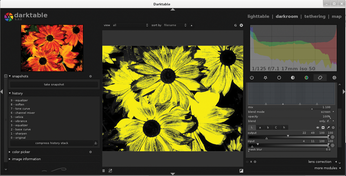
The exact shape can be adjusted using several controls and then blurred to avoid hard – and thus clearly visible – boundaries. Two switches help create the mask: The eye icon disables the mask temporarily, and the symbol next to it tells Darktable to display the current mask as a yellow film in the image (Figure 8).

« Previous 1 2 3 Next »
Buy this article as PDF
(incl. VAT)
Buy Linux Magazine
Subscribe to our Linux Newsletters
Find Linux and Open Source Jobs
Subscribe to our ADMIN Newsletters
Support Our Work
Linux Magazine content is made possible with support from readers like you. Please consider contributing when you’ve found an article to be beneficial.

News
-
Linux Servers Targeted by Akira Ransomware
A group of bad actors who have already extorted $42 million have their sights set on the Linux platform.
-
TUXEDO Computers Unveils Linux Laptop Featuring AMD Ryzen CPU
This latest release is the first laptop to include the new CPU from Ryzen and Linux preinstalled.
-
XZ Gets the All-Clear
The back door xz vulnerability has been officially reverted for Fedora 40 and versions 38 and 39 were never affected.
-
Canonical Collaborates with Qualcomm on New Venture
This new joint effort is geared toward bringing Ubuntu and Ubuntu Core to Qualcomm-powered devices.
-
Kodi 21.0 Open-Source Entertainment Hub Released
After a year of development, the award-winning Kodi cross-platform, media center software is now available with many new additions and improvements.
-
Linux Usage Increases in Two Key Areas
If market share is your thing, you'll be happy to know that Linux is on the rise in two areas that, if they keep climbing, could have serious meaning for Linux's future.
-
Vulnerability Discovered in xz Libraries
An urgent alert for Fedora 40 has been posted and users should pay attention.
-
Canonical Bumps LTS Support to 12 years
If you're worried that your Ubuntu LTS release won't be supported long enough to last, Canonical has a surprise for you in the form of 12 years of security coverage.
-
Fedora 40 Beta Released Soon
With the official release of Fedora 40 coming in April, it's almost time to download the beta and see what's new.
-
New Pentesting Distribution to Compete with Kali Linux
SnoopGod is now available for your testing needs

