Create, display, and evaluate geodata with QGIS
Online
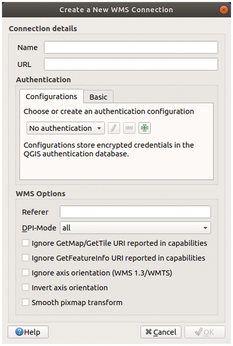
If you want to add data from a WMS server to your own project, you need to know its URL. You can usually find the URL on the providers' website and copy it to the clipboard first. Then open the Add Layer | Layer | WMS dialog in QGIS. In the new window, enter the URL in the input field and give the map a meaningful name. A final click on OK accepts the data (Figure 4).
You can usually adjust the size of the data provided on the WMS server to your needs by setting an appropriate value in the Magnification box below the map area. However, the program reloads the maps from the server each time. Complex projects therefore require a fast Internet connection. The integration of large, high-resolution maps into a project also puts a great strain on the computer, as it has to render very large amounts of data. Depending on the hardware, it can take more than ten seconds for a new map to appear.
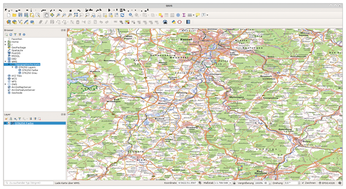
Geodata that you obtain from a WMS server and integrate into your project cannot be modified. You insert the WMS data like locally stored raster and vector data as layers into your project (Figure 5).
Tile Server Fix
QGIS also allows you to integrate external data from OpenStreetMap and other services. However, the change from version 2.18 "Las Palmas" to the new version 3.0 "Girona" resulted in some problems.
With the older QGIS versions, a plugin named QuickMapServices could be integrated into the program via the dialog Extensions | Manage and Install Extensions…, which then offered convenient access to the relevant services via the Web menu. By the way, the same applies to several other addons, which are not yet available for the new version. However, the developers are gradually completing the plugin list.
Until then, you need to integrate this external data into your installation via tile servers. The tile servers provide tiles with raster data [3]. First you copy the desired URL to the clipboard. Then open the XYZ Tiles dialog in the QGIS browser segment by right-clicking on it and then clicking on the New Connection…. option. In the dialog that now opens, copy the URL into the corresponding input field. To allow the program to call the URL correctly, remove all $ symbols from it.
Do-It-Yourself
To insert your own data into maps, generate files in shapefile format (a geospacial vector data format for GIS software) [4]. Then fill the files with the desired raw data. For example, you might wish to add the coordinates of roads, railway lines, waterways, or buildings. The software saves these files as individual layers that can be shown or hidden.
To create a shapefile, select the Create Shapefile Layer…. option in the Layer | Create Layer menu. First enter the data type and the coordinate system in the dialog. When entering the coordinate system, make sure that it corresponds to the base plane. Then enter the fields, where you can choose between different types. Note that QGIS does not support non-standard characters.
Then click the Add to Field List button to add the new field to the list at the bottom of the window. OK closes the window and opens the file manager for saving the shapefile in the older program versions. When the file is saved, the software transfers the file with the arbitrary assigned name to the layer segment.
Then fill the shapefile with the desired data. Select the layer and then activate the editing mode by clicking on the Switch editing mode button in the upper-left corner of the program window. Then click on the Add object button and select a corresponding object in the map view on the right side of the program window.
A mouse click on the desired object opens an attribute window in which you enter the different properties of the object based on the predefined shape files. Complete the entry by pressing OK. The software then transfers the new object to the map view.
« Previous 1 2 3 4 Next »
Buy this article as PDF
(incl. VAT)
Buy Linux Magazine
US / Canada
UK / Australia
Subscribe to our Linux Newsletters
Find Linux and Open Source Jobs
Subscribe to our ADMIN Newsletters
Support Our Work
Linux Magazine content is made possible with support from readers like you. Please consider contributing when you’ve found an article to be beneficial.

News
-
Canonical Releases Ubuntu 24.04
After a brief pause because of the XZ vulnerability, Ubuntu 24.04 is now available for install.
-
Linux Servers Targeted by Akira Ransomware
A group of bad actors who have already extorted $42 million have their sights set on the Linux platform.
-
TUXEDO Computers Unveils Linux Laptop Featuring AMD Ryzen CPU
This latest release is the first laptop to include the new CPU from Ryzen and Linux preinstalled.
-
XZ Gets the All-Clear
The back door xz vulnerability has been officially reverted for Fedora 40 and versions 38 and 39 were never affected.
-
Canonical Collaborates with Qualcomm on New Venture
This new joint effort is geared toward bringing Ubuntu and Ubuntu Core to Qualcomm-powered devices.
-
Kodi 21.0 Open-Source Entertainment Hub Released
After a year of development, the award-winning Kodi cross-platform, media center software is now available with many new additions and improvements.
-
Linux Usage Increases in Two Key Areas
If market share is your thing, you'll be happy to know that Linux is on the rise in two areas that, if they keep climbing, could have serious meaning for Linux's future.
-
Vulnerability Discovered in xz Libraries
An urgent alert for Fedora 40 has been posted and users should pay attention.
-
Canonical Bumps LTS Support to 12 years
If you're worried that your Ubuntu LTS release won't be supported long enough to last, Canonical has a surprise for you in the form of 12 years of security coverage.
-
Fedora 40 Beta Released Soon
With the official release of Fedora 40 coming in April, it's almost time to download the beta and see what's new.