Peer-to-peer file sharing
Setting up Syncthing
Syncthing's installation routine creates three entries for Syncthing in the desktop environment menu hierarchy. Besides a launcher for the actual program, which then runs in the background, a second launcher activates the GTK-based GUI. A third launcher runs Syncthing in the browser.
The developers follow a very unusual operating concept: Syncthing is configured in the web browser the first time it is called up. First you start the actual program and then, using the appropriate launcher, you open the web browser with the application's configuration interface (Figure 5).
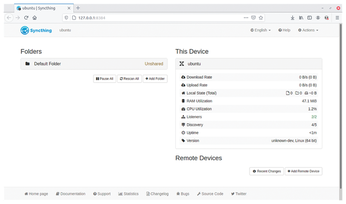
In the background, the software generates the required certificates and creates the Sync/ folder in your home directory, the contents of which it will then synchronize with other computers later on. In the graphical interface in the browser, these folders are preconfigured as the Default Folder located on the window's left. On the right, Syncthing lists various statistics for the system and data transfers.
Syncthing communicates with individual computers via a unique ID that is set when the software is first launched on each computer. You can discover your device's ID by clicking the Actions button in the top right corner of the browser window and selecting Own ID from the context menu that opens. A QR code and the system's identifier, comprising a total of 56 alphanumeric characters, now appear in a separate window.
To synchronize data between your computer and a remote computer, you also need to know the remote system's ID. To integrate the second computer's ID, click Add Device bottom right in the web interface and enter the remote system's ID in the window that opens. You do not need to type in the complete ID: All computers running a Syncthing instance share their IDs on the intranet. They all appear with their IDs in the computer's web interface, letting you select a remote station with a simple mouse click.
To replace the somewhat cryptic default name of the remote system with a more meaningful name, you just need to type a name in the Device Name field. The remote computer is then displayed with the new name. After clicking the Save button, the newly detected device is displayed bottom right under Remote Devices.
New Folders
Click on Add Folder to add more folders to the synchronization routine. You only need to do this on one of the two devices to be synchronized. Syncthing detects that a new folder has been created on one system and asks the connected system if the new folder should be added there, too. After clicking the Add button, it will add the new folder to the system and synchronize it automatically (Figure 6).

Synchronization
To synchronize the files that exist in a folder with the second computer, you first need to tag the corresponding source folder as a folder to be shared. To do this, click on the Edit button under Remote Devices below the device list. In the window that opens, select the target system and then go to the Sharing tab, where you will find Default Folder.
If you have specified additional folders that you want Syncthing to include, they will also be in the list. To enable a folder to be synchronized, check the box for the corresponding directory. After a short delay, the application will now start synchronizing the two folders, with a corresponding progress indicator appearing above the synchronizing folder under Folders. To the right of the folder name, Syncthing also displays the transfer rates for upload and download. When the sync is complete, the folder's status changes to Up to Date to the right of the folder name.
Buy this article as PDF
(incl. VAT)
Buy Linux Magazine
US / Canada
UK / Australia
Subscribe to our Linux Newsletters
Find Linux and Open Source Jobs
Subscribe to our ADMIN Newsletters
Support Our Work
Linux Magazine content is made possible with support from readers like you. Please consider contributing when you’ve found an article to be beneficial.

News
-
TUXEDO Computers Unveils Linux Laptop Featuring AMD Ryzen CPU
This latest release is the first laptop to include the new CPU from Ryzen and Linux preinstalled.
-
XZ Gets the All-Clear
The back door xz vulnerability has been officially reverted for Fedora 40 and versions 38 and 39 were never affected.
-
Canonical Collaborates with Qualcomm on New Venture
This new joint effort is geared toward bringing Ubuntu and Ubuntu Core to Qualcomm-powered devices.
-
Kodi 21.0 Open-Source Entertainment Hub Released
After a year of development, the award-winning Kodi cross-platform, media center software is now available with many new additions and improvements.
-
Linux Usage Increases in Two Key Areas
If market share is your thing, you'll be happy to know that Linux is on the rise in two areas that, if they keep climbing, could have serious meaning for Linux's future.
-
Vulnerability Discovered in xz Libraries
An urgent alert for Fedora 40 has been posted and users should pay attention.
-
Canonical Bumps LTS Support to 12 years
If you're worried that your Ubuntu LTS release won't be supported long enough to last, Canonical has a surprise for you in the form of 12 years of security coverage.
-
Fedora 40 Beta Released Soon
With the official release of Fedora 40 coming in April, it's almost time to download the beta and see what's new.
-
New Pentesting Distribution to Compete with Kali Linux
SnoopGod is now available for your testing needs
-
Juno Computers Launches Another Linux Laptop
If you're looking for a powerhouse laptop that runs Ubuntu, the Juno Computers Neptune 17 v6 should be on your radar.