Breathe life back into your old Chromebook with GalliumOS
Recovery and Developer Mode
The keyboard shortcut Esc+F3+Power boots the Chromebook's recovery system; when you get there, pressing Ctrl+D – not displayed on the screen – boots into Developer mode. In the graphical login manager, log in as a guest and start a Chrome Shell (Crosh) with Ctrl+Alt+T. In a second browser tab, go to the MrChromebox [8] website, which provides the Chrome OS Device Firmware Utility Script (Listing 3), which can be downloaded using curl at the Crosh terminal (Listing 3, first line). Then proceed to install and launch (second and third line).
Listing 3
Launching the Firmware Utility
$ curl -LO mrchromebox.tech/firmware-util.sh
$ sudo install -Dt /usr/local/bin -m 755 firmware-util.sh
$ sudo firmware-util.sh
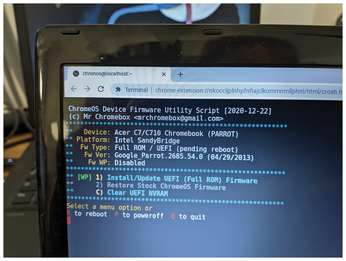
The largely self-explanatory utility script (Listing 4) installs either a UEFI update or a stock recovery image for Chrome OS. Some dead devices can also be persuaded to cooperate again by pressing C (Clear UEFI NVRAM) (Figure 7). Again, caution is advised; only start the firmware update if you have the correct hardware specs as identified by the script. If the aluminum rice grain is still in the right place, the script shows the note Fw WP: Disabled in the fifth line of the hardware information. Then it should run without any problems, including booting from the USB stick.
Listing 4
firmware-util.sh
#!/bin/bash
#
# This script offers provides the ability to update the
# Legacy Boot payload, set boot options, and install
# a custom coreboot firmware for supported
# Chrome OS devices
#
# Created by Mr.Chromebox <mrchromebox@gmail.com>
#
# May be freely distributed and modified as needed,
# as long as proper attribution is given.
#
#where the stuff is
script_url="https://raw.githubusercontent.com/MrChromebox/scripts/master/"
#ensure output of system tools in en-us for parsing
export LC_ALL=C
#set working dir]\
if cat /etc/lsb-release | grep "Chrom" > /dev/null 2>&1; then
  # needed for ChromeOS/ChromiumOS v82+
  mkdir -p /usr/local/bin
  cd /usr/local/bin
else
  cd /tmp
fi
#get support scripts
echo -e "\nDownloading supporting files..."
rm -rf firmware.sh >/dev/null 2>&1
rm -rf functions.sh
 >/dev/null 2>&1
rm -rf sources.sh >/dev/null 2>&1
curl -sLO ${script_url}firmware.sh
rc0=$?
curl -sLO ${script_url}functions.sh
rc1=$?
curl -sLO ${script_url}sources.sh
rc2=$?
if [[ $rc0 -ne 0 || $rc1 -ne 0 || $rc2 -ne 0 ]]; then
  echo -e "Error downloading one or more required files; cannot continue"
  exit 1
fi
source ./sources.sh
source ./firmware.sh
source ./functions.sh
#set working dir
cd /tmp
#do setup stuff
prelim_setup
[[ $? -ne 0 ]] && exit 1
#show menu
menu_fwupdate
Testing and Installing Gallium
At this point, the paths with and without tinfoil meet up again; now the USB stick with GalliumOS, created earlier on, is used for booting. As with all modern Linuxes, you can see how things will work using a live system before an installation on the hard disk gives you the hard facts. This includes accessing the hard disk previously used by Chrome OS, although recovery mode has permanently deleted it for security reasons.
Anyone who decides to install GalliumOS on the hard disk will quickly find themselves at home in Ubuntu's default installer, Ubiquity. From then on, the Chromebook behaves like any other PC or laptop system. The advantage is that the Linux image is already adapted to the existing hardware, much like with Apple. Now, at last, assuming everything worked out, the aluminum rice grain has to be removed. From now on, the Chromebook will boot willingly from USB.
Xfce Desktop with HDMI Output
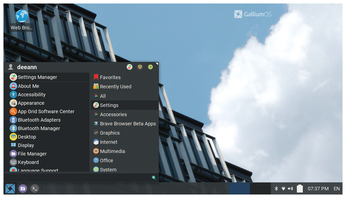
The Xfce desktop on GalliumOS (Figure 8) has everything a modern desktop needs. The layout and many settings are well tailored to the small display and low-powered hardware of the Acer.
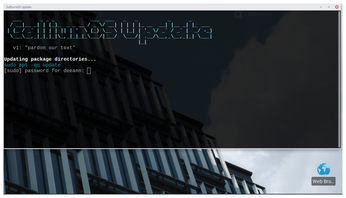
Having said this, the start menu already has a surprising number of entries, for example, a separate menu item for GalliumOSUpdate – a link to a root shell that executes apt -qq update (Figure 9). The -qq parameter ensures that all output except error messages is suppressed.
« Previous 1 2 3 Next »
Buy this article as PDF
(incl. VAT)
Buy Linux Magazine
US / Canada
UK / Australia
Subscribe to our Linux Newsletters
Find Linux and Open Source Jobs
Subscribe to our ADMIN Newsletters
Support Our Work
Linux Magazine content is made possible with support from readers like you. Please consider contributing when you’ve found an article to be beneficial.

News
-
TUXEDO Computers Unveils Linux Laptop Featuring AMD Ryzen CPU
This latest release is the first laptop to include the new CPU from Ryzen and Linux preinstalled.
-
XZ Gets the All-Clear
The back door xz vulnerability has been officially reverted for Fedora 40 and versions 38 and 39 were never affected.
-
Canonical Collaborates with Qualcomm on New Venture
This new joint effort is geared toward bringing Ubuntu and Ubuntu Core to Qualcomm-powered devices.
-
Kodi 21.0 Open-Source Entertainment Hub Released
After a year of development, the award-winning Kodi cross-platform, media center software is now available with many new additions and improvements.
-
Linux Usage Increases in Two Key Areas
If market share is your thing, you'll be happy to know that Linux is on the rise in two areas that, if they keep climbing, could have serious meaning for Linux's future.
-
Vulnerability Discovered in xz Libraries
An urgent alert for Fedora 40 has been posted and users should pay attention.
-
Canonical Bumps LTS Support to 12 years
If you're worried that your Ubuntu LTS release won't be supported long enough to last, Canonical has a surprise for you in the form of 12 years of security coverage.
-
Fedora 40 Beta Released Soon
With the official release of Fedora 40 coming in April, it's almost time to download the beta and see what's new.
-
New Pentesting Distribution to Compete with Kali Linux
SnoopGod is now available for your testing needs
-
Juno Computers Launches Another Linux Laptop
If you're looking for a powerhouse laptop that runs Ubuntu, the Juno Computers Neptune 17 v6 should be on your radar.