Connect Pi devices and a smartphone with Bluetooth
Contactless Data
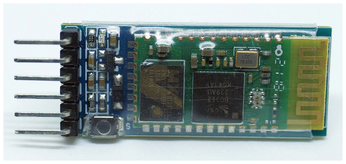
In the first use case, the smartphone was the host and the Raspberry Pi was the device. Now, the small-board computer (SBC) is going to assume the host role. (SBC will always refer to the Raspberry Pi, not the Pi Pico.) A typical use case is data logging over Bluetooth. For this purpose, the microcontroller writes its output to the serial port in the usual way, but instead of a cable, an HC-05 serial Bluetooth breakout module is connected (Figure 4). This device implements universal asynchronous receiver/transmitter (UART) communication over Bluetooth. The big advantage is that you don't have to change the program on the microcontroller because it already writes its data to the serial port.
The breakout comes in different versions. Exactly which you have hardly matters in the end. The board typically has a button, an LED, and a voltage converter, which makes the power supply flexible. However, the signal level on the RX/TX lines is always 3.3V, so if you connect an Arduino, you should adjust the voltage with a resistance division circuit (5V to 3.3V ) between the Arduino TX pin and the module RX pin.
The HC-05 supports the command and data modes. The first mode is for configuration; for new devices, it is important to complete the steps described in the "Configuring HC-05" box. You also need to pair the Raspberry Pi and the breakout once, as described earlier, remembering the MAC address of the HC-05.
Configuring the HC-05
The HC-05 almost always comes with the same preset username and password and with the transfer rate preconfigured for data mode at a meager 9,600 baud. You can change that with a few AT commands. The easiest approach is a USB-to-UART adapter that supports 3.3V. Alternatively, you can use the Raspberry Pi. However, its serial port occupies the system console, so you have to free this up first. To do so, remove the console=serial0,115200 string in the /boot/cmdline.txt file and add the enable_uart=1 line to /boot/config.txt.
After a reboot, connect GPIO14 (TX) to RX on the HC-05 and GPIO15 (RX) to TX and GND. Before applying the voltage (3.3V or 5V), press and hold the small button on the breakout. The LED should now flash slowly. The exact pattern depends on the version; in my case, it was a double flash at one-second intervals. Although the transfer rate in data mode is 9,600 baud, the HC-05 operates at 38,400 baud in command mode. You can connect to the device in the terminal program of your choice with
$ miniterm --eol CRLF -e /dev/ttyUSB0 38400
and then execute the following commands to configure the HC-05:
01 --- Miniterm on /dev/ttyUSB0  38400,8,N,1 ---
02 --- Quit: Ctrl+] | Menu: Ctrl+T | Help: Ctrl+T followed by Ctrl+H ---
03 AT
04 OK
05 AT+NAME?
06 [...]
07 AT+NAME=PICO_42
08 [...]
09 AT+PSWD?
10 [...]
11 AT+PSWD="9999"
12 AT+UART?
13 [...]
14 AT+UART=115200,0,0
Pay attention to case. The first command should return OK (line 4) – if it does not, then something is wrong with the connection. The AT+<XXX>? command queries the current value in each case and resets them. The commands in lines 11 (pin) and 14 (transfer rate) are especially important. Even though Bluetooth does not have a long range, the signal will often reach the neighboring apartment, which is why changing the default PIN is recommended. I chose the transfer rate in line 14 to match the default for the Pi Pico. If you use a different microcontroller, adjust the value accordingly.
After completing the preparation work, the application is child's play. Connect the HC-05 to the microcontroller; it outputs its data in the usual way with a print or printf function. You now connect the Raspberry Pi to the HC-05 and redirect incoming data to a file with cat:
$ sudo rfcomm bind hci0 <aa>:<bb>:<cc>:<dd>
$ cat /dev/rfcomm0 > <MyData>.log
The value <aa>:<bb>:<cc>:<dd> is the MAC address of the breakout. If the microcontroller also processes input, commands can be sent (e.g., to /dev/rfcomm0) by calling a terminal program with the device file as an argument.
Instead of the Raspberry Pi, you can connect to the HC-05 from the Android app, which proves useful for a quick test, because you can immediately see whether the Pi Pico is sending data. Also, the Raspberry Pi or app can send data to the microcontroller (e.g., to turn LEDs and motors on/off, etc.) by the HC-05. However, the microcontroller needs to both write to the serial interface, and read from it.
Pico as a Host
The previous scenario showed how the Raspberry Pi fetched data from the Pi Pico, and it works well as long as the microcontroller is already running and the connection from the Raspberry Pi to the Pico works. However, if the microcontroller is not running, the Raspberry Pi constantly has to try to re-establish the connection in a loop.
Regardless, you have another problem: If the Pi Pico sends data only now and then (e.g., because of large intervals between reading sensors), then the Raspberry Pi can only reliably retrieve data by keeping the connection constantly open. In this case, it makes more sense to let the Raspberry Pi and the Pico swap roles so that the microcontroller actively creates the connection. The Raspberry Pi then runs a service that accepts connection requests and fields and stores the data.
For this scenario, the HC-05 must play host and establish the connection, which is precisely what can turn out to be a major obstacle because the breakout comes in different versions. Many postings online describe the procedure with firmware from 2010. However, all of my devices use a firmware version from 2017 that behaves differently when you get into the details. The procedure described here will not necessarily succeed with your device, but you can query the firmware version in command mode with the AT+VERSION? command.
Also in command mode, you can change the role of the HC-05:
AT+CMODE=0
AT+ROLE=1
AT+BIND=4D65,4D,CA6612
The first line tells the chip to only connect to a specific address (given in line 3), the second line sets the host mode, and the third line binds the target device address – the Bluetooth MAC address of the Raspberry Pi, which you query with:
echo list | bluetoothctl
However, instead of using the colon-separated format seen earlier, the BIND command requires the information in a slightly different format, so 4D:65:4D:CA:66:12 becomes 4D65,4D,CA6612.
Before rebooting, make sure the Raspberry Pi is ready to connect, and it works exactly as described in the first use case. Because microcontrollers usually send data and not commands, you do not need an application program with logic on the Raspberry Pi side, so in the simplest case, you only need a redirection to a file:
$ sudo rfcomm watch hci0 | cat /dev/rfcomm0 >> pico-data.csv &
If you now start the Pico with the HC-05 connected, all data should end up on the Raspberry Pi, unless it is not available, then the HC-05 will abort the connection. Even if the Raspberry Pi is online later, the connection is not established because the HC-05 does not retry. For a robust process, the Pi Pico needs to switch on the HC-05 before each connection attempt and then switch it off again. If the microcontroller reads and sends data from a sensor at fixed intervals, this approach also saves power.
Collecting data from multiple Picos with the Raspberry Pi requires a bit more effort. The RFCOMM server [4] could be useful as a blueprint. Note that the Raspberry Pi only maintains one connection at any given time. Theoretically, more connections would be possible with Bluetooth and the SBC, but both the HC-05 and the Android apps always contact the device on default SPP channel 1. Of course, this would be fine for sensors that only occasionally send short signals, as long as the Pi Pico quickly releases the connection again after the data has been delivered.
Conclusions
From the third generation onward, the Raspberry Pi comes with Bluetooth built in. Therefore, you can control the SBC from an external device and control any microcontroller with the Raspberry Pi. The HC-05 does a good job, because the chip removes the need for you to plumb the depths of the Bluetooth protocol. Apart from a one-off configuration, you're left with just a little wiring. Older Raspberry Pis can be upgraded for a small charge by plugging in a USB Bluetooth dongle.
Classic Bluetooth, though, has disadvantages. The power consumption in particular makes the technology uninteresting for IoT devices. Bluetooth Low Energy (BLE) steps in with a protocol variant optimized for minimal power consumption. How you get the various devices in your home IT zoo to work with it is the topic for a future article.
Infos
- "Setting Up Bluetooth on the Raspberry Pi 3" by Bernhard Bablok, Raspberry Pi Geek, issue 18, 2016, https://www.raspberry-pi-geek.com/Archive/2016/18/Setting-up-Bluetooth-on-the-Raspberry-Pi-3/
- Serial Bluetooth Terminal: https://play.google.com/store/search?q=serial%20bluetooth%20terminal&c=apps
- Bluetooth Control Panel: https://play.google.com/store/apps/details?id=com.martyncurrey.Bluetooth_Control_Panel
- PyBluez: https://github.com/pybluez
« Previous 1 2
Buy this article as PDF
(incl. VAT)
Buy Linux Magazine
US / Canada
UK / Australia
Subscribe to our Linux Newsletters
Find Linux and Open Source Jobs
Subscribe to our ADMIN Newsletters
Support Our Work
Linux Magazine content is made possible with support from readers like you. Please consider contributing when you’ve found an article to be beneficial.

News
-
Canonical Releases Ubuntu 24.04
After a brief pause because of the XZ vulnerability, Ubuntu 24.04 is now available for install.
-
Linux Servers Targeted by Akira Ransomware
A group of bad actors who have already extorted $42 million have their sights set on the Linux platform.
-
TUXEDO Computers Unveils Linux Laptop Featuring AMD Ryzen CPU
This latest release is the first laptop to include the new CPU from Ryzen and Linux preinstalled.
-
XZ Gets the All-Clear
The back door xz vulnerability has been officially reverted for Fedora 40 and versions 38 and 39 were never affected.
-
Canonical Collaborates with Qualcomm on New Venture
This new joint effort is geared toward bringing Ubuntu and Ubuntu Core to Qualcomm-powered devices.
-
Kodi 21.0 Open-Source Entertainment Hub Released
After a year of development, the award-winning Kodi cross-platform, media center software is now available with many new additions and improvements.
-
Linux Usage Increases in Two Key Areas
If market share is your thing, you'll be happy to know that Linux is on the rise in two areas that, if they keep climbing, could have serious meaning for Linux's future.
-
Vulnerability Discovered in xz Libraries
An urgent alert for Fedora 40 has been posted and users should pay attention.
-
Canonical Bumps LTS Support to 12 years
If you're worried that your Ubuntu LTS release won't be supported long enough to last, Canonical has a surprise for you in the form of 12 years of security coverage.
-
Fedora 40 Beta Released Soon
With the official release of Fedora 40 coming in April, it's almost time to download the beta and see what's new.