Shutter: Finally, a screen capture utility worth having

Off the Beat: Bruce Byfield's Blog
Whether you write documentation or simply want to add pictures to your blog, a screen capture program is an essential desktop utility. The trouble is, none of the standard options is very satisfactory. While both gnome-screenshot and ksnapshot are minimalist programs with few options, the GIMP is overkill for editing, and its capture tool has the annoying habit of closing after every shot. Finally, though, GNU/Linux has a capture tool between these extremes in the form of Shutter (formerly GScrot). Better yet, although only at version 0.70.2, Shutter already has a selection of tools that is exactly what those who take screen shots are likely to need.
Shutter is developed by a small team working within Ubuntu. For this reason, the latest packages tend to be in .DEB format and suitable for installation on Debian or Ubuntu. However, the download page also includes source code and recent .RPM packages for the Fedora and Mandriva distributions. Before installing your Shutter package of choice, you will also need to install libgoocanvas3 from your system's standard repositories and the libgoo-canvas-perl package, which is available along with the shutter package from the project's website. Naturally, you also need to have GNOME installed, as its former name of GScrot suggests.
Shutter Preferences
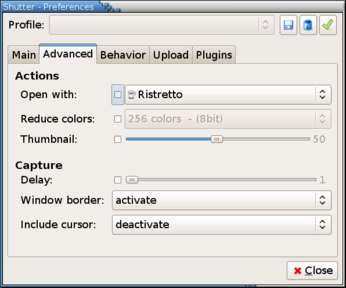
The first time you run preference, you may want to spend some time in Edit -> Preferences -> Main, setting the default format for captures, as well as the naming convention and directory. You may also want to go to the Behavior tab of the Preferences window to automatically hide Shutter while you are taking a shot.
The Preferences window also includes tabs for options that you may want to set for specific capture sessions. For example, in the Advanced tab, you might want to set a delay so that you can set up a window before taking a shot, or include the mouse cursor and window borders in the shot. You might also chose on the Upload tab to upload new shots automatically if you happen to use one of the sites listed.
If you have regular different needs for screen captures, you can also create separate profiles in the Preferences window and swap them as necessary.
The main window
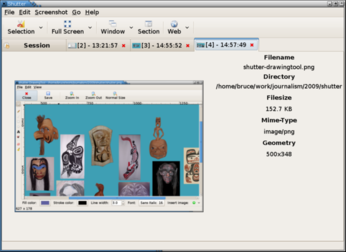
Shutter opens in a main window that is well-designed enough that you can start using the program a few seconds after it opens. Across the top are the main options for a screen capture: A selection of the screen, the full screen, a window, a window section (such as a pane or a child window) or a web page. Each has a pull-down menu for options. If you choose Full Screen, you can select a virtual workspace or monitor to capture. Similarly, if you choose Window, you can choose any open window, even a minimized one. Presumably, the Web options works the same way, although it was not working when I tried it on my Debian system.
The rest of the window is tabbed. The first tab, which is always marked Session, gives a summary of the shots you have taken and lists your current preferences. On each of the other tabs is a single screen shot, with its characteristics, such as its format, file name and size listed in a column on a right.
The one weakness of the main window is that it has no zoom feature, apart from resizing the window. However, since you do not edit from the main window, this omission is a minor one.
The DrawingTool window
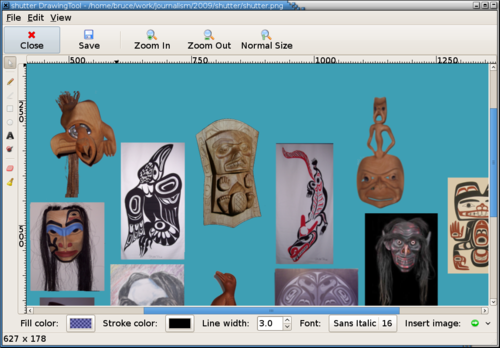
When you have taken a screen shot, you can edit it by selecting its tab in the main window, followed by Screenshot -> Edit and opening the DrawingTool window.
At first glance, the DrawingTool window looks like a graphics editor. That impression is accurate, so far as it goes, but, when you look closer, the window turns out to be a graphics editor customized for screen shots. Although the window includes a freehand drawing tool, the other tools along its left side are ones to help you annotate a screen shot.
For example, the primitives are limited to a straight line, rectangle and ellipse -- the shapes you might want to use in order to highlight a feature you mention in the text near to the screen shot. The text tool provides a means of adding captions, while the Censor tool can quickly obscure private data. If you make a mistake, you can delete one or the objects you added, or all of them.
Along the bottom of the DrawingTool window are tools for setting the fill and stroke colors of objects as well as line thicknesses and the preferred font. On the bottom right, you also have a library of clipart such as arrows that you can use to further annotate your screen shot.
The DrawingTool window could be improved with a few more tools, notably the ability to add to the canvas size so you could add a caption without obscuring any of the original screen shot. But, unlike the main window, this one does have a zoom feature. In general, it shows an awareness of the task of screen-capturing that promises a strong final version.
Choosing plug-ins
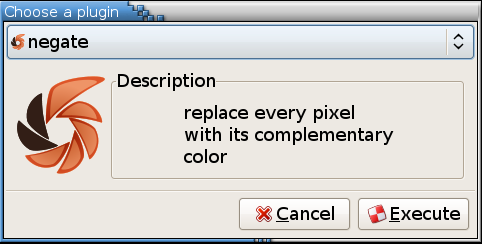
In addition to the manual editing options, you can also select Screenshot -> Plugins for additional functionality. Many of these plug-ins give a particular affect, such as changing the shot to grayscale or sepia tones. You can also add shadows and offsets to the shot. Others, however, are more practical, such as exporting to pdf or resizing the selected shot.
As many projects have found, plug-ins are a handy way of getting small contributions. Shutter is no different, from I hope that these plug-ins will eventually be integrated more closely into the menus and toolbars. As things are, the selection is a grab bag of unsorted features in which finding a specific tool can be difficult.
Conclusion
Shutter is missing a few features. It has no Undo or Redo features (although the DrawingTool window does have a Stop feature, presumably for runaway programs). Nor does it have any way of batch-processing screen shots. All the same, Shutter has got so many things right for the task it is designed for that such details seem only a matter of time. An afternoon's exploration was more than enough for me to start thinking of Shutter, even in its current beta state, as an essential tool, and it now has a permanent place on my desktop.
Comments
comments powered by DisqusSubscribe to our Linux Newsletters
Find Linux and Open Source Jobs
Subscribe to our ADMIN Newsletters
Support Our Work
Linux Magazine content is made possible with support from readers like you. Please consider contributing when you’ve found an article to be beneficial.

News
-
Yet Another Linux Kernel Vulnerability Discovered
Affecting millions of systems, a kernel flaw discovered by Qualys could allow users to gain root privileges.
-
Ubuntu 26.10 to Include Ubuntu Certified Hardware Check
If you've ever wondered if your laptop or PC is officially certified to run Ubuntu, that curiosity will soon be met.
-
Substantial Update to IPFire Now Available
The lastest version of IPFire features a fundamental change to how the system handles DNS.
-
Gnome Working on Test Center App to Make Testing Easier
It's now possible to test experimental features on the Gnome desktop without worrying that you'll break things.
-
New Vulnerability Discovered in Linux Kernel
Hiding out for nearly 15 years, the Ghostlock vulnerability allows a standard logged-in user to gain root privileges.
-
New Linux Flaw Lets Attackers Escape VMs
A 16-year-old vulnerability allows an attacker to escape a virtual machine, gain access to the host, and execute malicious code.
-
Hannah Montana Linux Is Back!
Developer Noah Cagle decided the world needed the once obscure but beloved Linux distribution and gave it a decidedly pink refresh.
-
System76 Refreshes the Lemur Laptop
If you're looking for a laptop with tons of power and battery, look no further than the latest iteration of the System76 Lemur Pro.
-
More than 43 Million Lines of Code in Linux Kernel 7.2
Using the cloc utility, Michael Larabel of Phoronix discovered that Linux kernel 7.2 has over 43 million lines of code.
-
Kubuntu Focus Goes Ultra
The Kubuntu Focus team has upped the performance ante of its M2 and Zr laptops with the latest, greatest CPUs from Intel.
undo in works