Arduino Bricks
Graphical, Scratch-like programming languages for Arduino
ByGetting a handle on Arduino boards can be difficult. Luckily, quite a few block-based, Scratch-like programming environments are at hand that make the learning curve easier to climb.
Below is the Blockly for Arduino video associated with this article.
Programming the Arduino using Processing, a C-like language, is tough. C is unforgiving and can be arcane, which makes it difficult to teach to beginners and kids. Fortunately, several graphical programming languages, similar to Squeak or Scratch, can help you learn the basics of the Processing language.
Even before the Raspberry Pi (Rasp Pi)was a twinkle in Eben Upton's eye, Arduino was already being used in education, albeit originally for higher education and professionals. As Arduino became more and more popular, it was unavoidable that someone, somewhere would come up with the idea of using it with younger students. To further this goal, several Squeak/Scratch-like projects popped up over the years that can help newbies and younger kids get their heads around programming for the Arduino. I'll discuss a few of them.
BlocklyDuino
BlocklyDuino [1] is based on Google's Blockly library [2] project, which allows developers to create graphical block-based front ends for any language or, in this case, device. For example, the Rasp Pi has a Blockly implementation [3].
To get started, either grab the code for BlocklyDuino from the GitHub website or use git to clone the repository:
git clone https://github.com/BlocklyDuino/BlocklyDuino.git
BlocklyDuino works by connecting to a Python web server that serves as the front end to a web browser and then uses tools from the Arduino IDE to compile and upload your programs. That means you have to have a working version of the official Arduino IDE installed for BlocklyDuino to work.
In theory, when you run the Python web server, it should be able to detect the port your board is connected to, but that didn't work for me. You can specify the port by hand, though: Plug your board into your computer and, in Raspbian and other Linuxes, look at the output from:
ls /dev/tty*
Your board will normally appear connected to the /dev/ttyACM0 or /dev/ttyACM1 port, or something like that. Now pass the port onto the server when you run it:
python arduino_web_server.py --port=/dev/ttyACM0
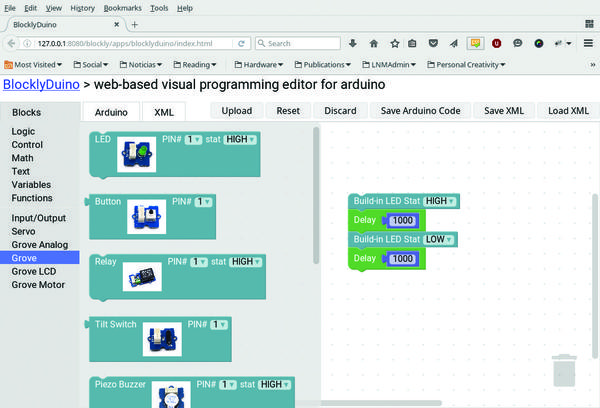
The output will inform you that the server is running on 127.0.0.1:8080. Open a web browser and visit that address, and you will see the BlocklyDuino web interface (Figure 1).
If you have ever used Scratch, the interface should immediately be familiar: Use the menu on the left to choose a category and drag and drop blocks onto the workspace. You can then click them together like Lego bricks to build programs. In the example shown in Figure 1, you can see the classic "Blink" script.
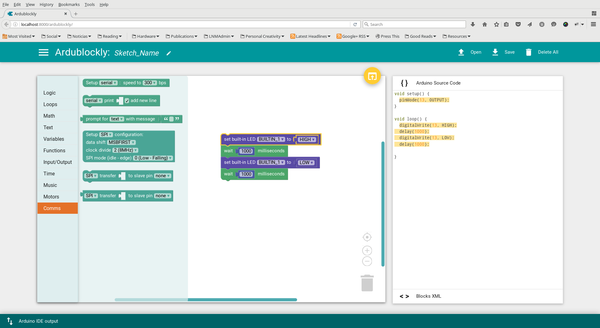
Clicking the Upload button at the top of the workspace uploads the sketch to the board. You can also see what the code would look like translated into Arduino's native Processing language. Click on the Arduino tab at the top of the workspace, and you'll see something like the code in Figure 2. You can't actually modify anything in this screen, so it is more useful as a learning aid than anything else. I suppose you also could use it to copy and paste code from BlocklyDuino to the Arduino IDE if you are having trouble uploading via the Python web server.

Internally, BlocklyDuino uses an XML file to store the "code," so if you want to save your work and later continue, you should use the Save XML and Load XML buttons. You can also export your work to an Arduino-compatible file, but that is only useful if you want to continue working on it in the Arduino IDE, because you can't go the other way round (i.e., from Arduino code to BlocklyDuino).
Although you can't import customized libraries into BlocklyDuino, it does come with some built-in goodies. If you drag out one of the blocks under Servo, for example, BlocklyDuino will automatically import the Servo.h library. BlocklyDuino also includes blocks for many of the Grove Arduino add-ons, including actuators (buttons, buzzers, joysticks, etc.) and sensors that can easily be connected to Arduino. Because beginners and kids learning to use Arduino use the Grove add-ons, it makes sense to support them.
Does it work on the Raspberry Pi, though? Yes. The server is pretty lightweight, so it doesn't bog the Rasp Pi 3 (RPi3) down too much. You will have to install Firefox ESR (sudo apt-get install firefox-esr) to get all the JavaScript bits working. Having had bad experiences with JavaScript-heavy web apps in the past, I thought that BlocklyDuino might tie up the Pi, but no: Everything worked very smoothly.
Ardublockly
Another Blockly Arduino language, Ardublockly [4], is quite similar to BlocklyDuino, which is not surprising because it is a fork of latter. However, it does have some distinguishing features that make it worth looking at.
To begin, grab the latest code from the project's GitHub repository, change into the ardublockly/ directory, and initialize some submodules:
git clone https://github.com/carlosperate/ardublockly.git
cd ardublockly
git submodule update --init --recursive
As with BlocklyDuino, you start a server/application from the main directory:
python start.py
Although BlocklyDuino requires you to navigate to a web page, Ardublockly opens a browser window for you (Figure 3) – or a new tab if you already have your default browser open. If that fails, you can point your browser to http://localhost:8000/ardublockly/.
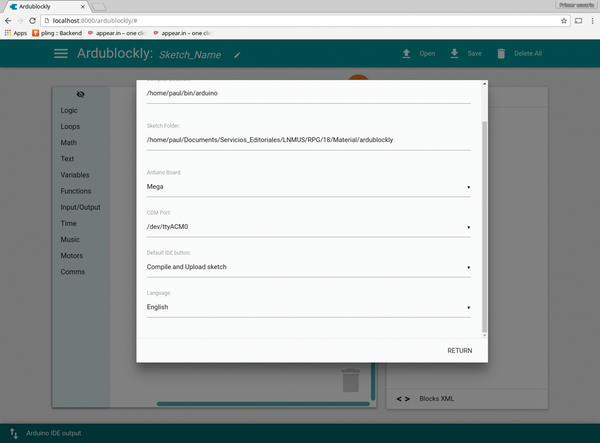
Once you have the interface up on your browser, the first thing you should do is configure it for your board. Click on the three-line menu icon in the upper left corner and select Settings. Here you will be able to tell Ardublockly where it can find your Arduino executable (yes, as with BlocklyDuino, ArduBlockly needs the standard Arduino IDE files to compile and upload your programs), the type of board you are using, the port it is connected to, and so on (Figure 4). Be warned that the interface worked only so-so in Firefox. It worked much better in Chromium and Chrome.
Use the buttons in the upper right corner of the workspace to check and upload your program. You also have the option of opening your sketch in the Arduino IDE.
Ardublockly does not include Grove System blocks, but it does have more general-purpose blocks, including ones that allow you to monitor, read from, and write to the serial channel (useful for debugging). However, Ardublockly doesn't seem to have its own serial monitor, so you will have to use the button mentioned above to open your program in the official Arduino IDE and use the monitor that comes with that (Figure 5).

Another nice touch is that Ardublockly comes with a fold-down panel at the bottom of the screen that can show you the output from the Arduino IDE. This is useful if, for example, you are having trouble uploading a sketch or it isn't working as it should.
Does it work on the Rasp Pi? Kinda. The server doesn't seem to bog down an RPi3 much, but as with Blocklyduino, you will have to install Firefox ESR to get all the JavaScript goodness to work. Even on Firefox, though, I had problems with some of the interface's elements misbehaving or not showing up at all.
Snap4Arduino
Back in issue 6 of Raspberry Pi Geek [5], I wrote about Snap!, a very capable, web-based alternative to Scratch. I was even able to create blocks using XML and Python that allowed Snap! to access and use the Rasp Pi's GPIO pins. Snap! is so easily extended that it wouldn't be surprising to see versions for the Arduino; hence, Snap4Arduino [6].
Being Snap-based, Snap4Arduino is quite different from the two options already mentioned. First, its interface (Figure 6) is much more similar to Scratch. Second, it doesn't rely on the Arduino IDE to program a board (well, after a bit of pre-configuration – see below); rather, it goes a completely different way.
You can get a zipped package for your platform from the project's homepage and decompress it in the directory of your choice; however, before you start using Snap4Arduino, you have to upload the StandardFirmata [7] sketch to the board you want to use. To do this, make sure your board is connected to your computer and open your Arduino IDE. Configure the port and type of board as usual, and navigate to Files | Examples | Firmata | StandardFirmata. Once the sketch is open in the IDE, upload it to your board. You can now close the Arduino IDE because you won't be using it anymore. You can even use Snap4Arduino on a computer that doesn't have the Arduino IDE installed, and it will still work, as long as the board is running StandardFirmata.
Note that I hit a snag on my Linux box when the startup script Snap4Arduino could not find the libudev library. Changing the line in the script from
if test -e /lib/x86_64-linux-gnu/libudev.so.1; then
ln -s /lib/x86_64-linux-gnu/libudev.so.1 $BASEDIR/libudev.so.0
to
if test -e /usr/lib64/libudev.so.1; then
ln -s /usr/lib64/libudev.so.1 $BASEDIR/libudev.so.0
(/usr/lib64/libudev.so.1 being the correct location of the library) sorted that out.
After that, Snap4Arduino behaved extraordinarily well. For one, Snap has a lot more default blocks than any of the two Blockly-based programming languages. Another thing going for it is that, once you have uploaded StandardFirmata to the board, you can forget about the official Arduino IDE. If you are working with students, that's one less program you have to worry about.
However, as with BlocklyDuino, you have no way to include customized libraries: no serial channel and no panel for messages from the IDE; in fact, no connection to the IDE at all.
Another drawback is that it doesn't work on the Rasp Pi at all. Only Intel-based operating systems are supported.
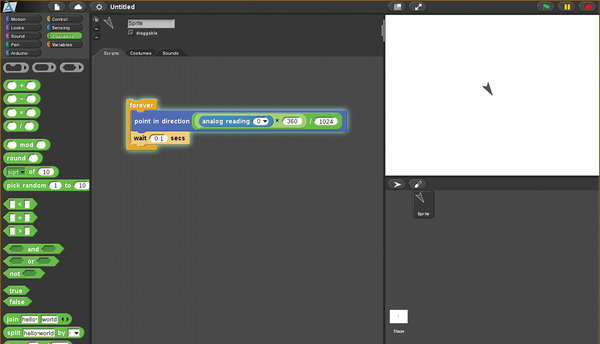
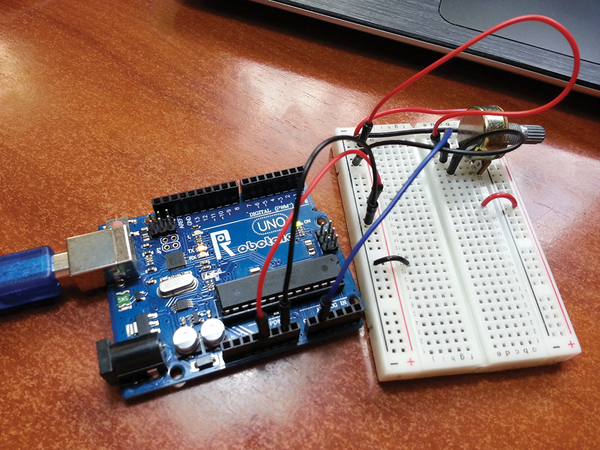
That said, you can do plenty of cool things with Snap4Arduino to initiate students and beginners into the mysteries of Arduino programming. Figure 7 shows a script that, given the hardware setup shown in Figure 8, reads in a value from the potentiometer and spins the sprite on the stage (top right) accordingly.
Snap!2Arduino
Snap!2Arduino [8], or s2a for short, is an extension for Scratch and Snap that provides support for Arduino boards. For some hare-brained backward reason, the people in charge of Scratch have decided to rewrite the language entirely in Flash (!), so I will be ignoring the Scratch bit and concentrating on the Snap! bit.
To get s2a up and running, download the software from the developers' GitHub repository and install some dependencies:
git clone https://github.com/MrYsLab/s2a_fm.git
pip install pyserial
pip install pymata
The pySerial module allows Python to talk with the Arduino over the Serial channel and the PyMata module is Python's interface for the Firmata protocol you installed on your Arduino board earlier.
From the above, you might have guessed that, as with Snap4Arduino, you first have to upload the StandardFirmata sketch to the board you're going to use, if you haven't done so already, by opening the Arduino IDE, configuring it for your board, navigating to Files | Examples | Firmata | StandardFirmata, and uploading.
Leave your Arduino board hooked up to your computer, change into the s2a_fm/ directory, and run
python s2a_fm.py
to start a server that acts like bridge between Snap! (or Scratch) and the Arduino.
You can now start a server running Snap! locally as explained in the Snap! article [5], or you could just visit the official Snap! server online [9]. One way or the other, you will first see a vanilla Snap! without any Arduino extensions.
To load in the extensions, click on the left-most button in the toolbar (with the icon that looks like a sheet of paper with a folded corner). In the menu that opens, choose Import and navigate to the s2a_fm/Snap!Files/ directory on your hard disk. Select the s2a_fm_Snap_base.xml file and click Open.
Now you have a number of new blocks that allow you to interact with your Arduino.
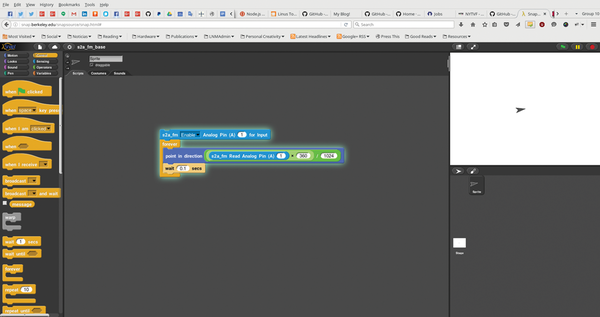
Whereas the Snap4Arduino program discussed earlier places its blocks in a specific Arduino category, s2a spreads them out over several categories depending on their function. You will find a servo block under Motion and analogue and digital input blocks in Sensing, for example.
Another difference is that, in s2a, you have to designate a pin explicitly as input or output (as you would in the setup() section of a native Arduino sketch), whereas in Snap4Arduino, it is done automatically. In Figure 9 you can see how the Snap4Arduino script would have to be rewritten in s2a. Notice the extra block to initialize the pin.
Does it work on the Raspberry Pi? Sort of. Again, you will have to resort to Firefox, but even then, the heavy JavaScript load Snap! puts on the Rasp Pi will make the interaction with the interface laggy and might even crash your Pi. You are better off accessing it from a regular computer.
Conclusion
None of the above programming environments is a serious drop-in for the standard Arduino IDE, but that is not their aim anyway. As with Scratch, BlocklyDuino, Ardublockly, Snap4Arduino, and s2a are designed as teaching tools. The graphical blocks help students visualize how the abstract keywords of other programming languages work.
The added incentive of being able to interact with an Arduino makes a block-based programming language all that more enticing. In that way, the IDEs discussed here are great and an excellent way of getting students into being creative with Arduino.
- BlocklyDuino's GitHub repository: https://github.com/BlocklyDuino/BlocklyDuino
- Google Blockly: https://developers.google.com/blockly/
- BlocklyPi: https://github.com/karstenda/BlocklyPi
- Ardublockly: https://github.com/carlosperate/ardublockly
- "Snap!" by Paul Brown, Raspberry Pi Geek, issue 06, 4/2014, pg. 86: http://www.raspberry-pi-geek.com/Archive/2014/06/A-web-based-alternative-to-Scratch
- Snap4Arduino: http://s4a.cat/snap/
- The Firmata protocol for Arduino: https://www.arduino.cc/en/Reference/Firmata
- Snap!2Arduino: https://github.com/MrYsLab/s2a_fm
- Online Snap! server: http://snap.berkeley.edu/snapsource/snap.html
next page » 1 2 3
Subscribe to our Linux Newsletters
Find Linux and Open Source Jobs
Subscribe to our ADMIN Newsletters
Support Our Work
Linux Magazine content is made possible with support from readers like you. Please consider contributing when you’ve found an article to be beneficial.

News
-
Gnome Working on Test Center App to Make Testing Easier
It's now possible to test experimental features on the Gnome desktop without worrying that you'll break things.
-
New Vulnerability Discovered in Linux Kernel
Hiding out for nearly 15 years, the Ghostlock vulnerability allows a standard logged-in user to gain root privileges.
-
New Linux Flaw Lets Attackers Escape VMs
A 16-year-old vulnerability allows an attacker to escape a virtual machine, gain access to the host, and execute malicious code.
-
Hannah Montana Linux Is Back!
Developer Noah Cagle decided the world needed the once obscure but beloved Linux distribution and gave it a decidedly pink refresh.
-
System76 Refreshes the Lemur Laptop
If you're looking for a laptop with tons of power and battery, look no further than the latest iteration of the System76 Lemur Pro.
-
More than 43 Million Lines of Code in Linux Kernel 7.2
Using the cloc utility, Michael Larabel of Phoronix discovered that Linux kernel 7.2 has over 43 million lines of code.
-
Kubuntu Focus Goes Ultra
The Kubuntu Focus team has upped the performance ante of its M2 and Zr laptops with the latest, greatest CPUs from Intel.
-
Linux Gamers May Soon See Less Mouse Lag in KDE Plasma
Gamers using KDE’s Plasma desktop have been suffering from a slight input delay in mouse movement that could lead to getting fragged.
-
Three Lines of Code Improve Linux Storage Performance
A developer changed three lines of code, giving Linux storage performance a 5% bump.
-
AUR Hit Again with Malicious Packages
Once again the Arch User Repository is plagued by a high volume of malicious packages.