Exploring the new Bind 10 name server
Test Drive

Admins have waited all of five years for the 10th major release of the Bind name server, which appeared at the end of March this year. The latest release is a complete rewrite of the DNS server, with a modular design and new configuration tools, but is it ready for business?
The Bind name server has a mixed reputation. Although the lion's share of DNS servers on the web run it, veteran administrators will recall – with a mixture of melancholy and horror – the difficult transition from Bind 4 to Bind 8: Although the zone files were almost identical, the configuration moved from named.boot to named.conf. The format suddenly contained brackets and semicolons that were once unnecessary. Additionally, Bind 8 and its successor allowed more configuration options, for which the old format proved insufficient.
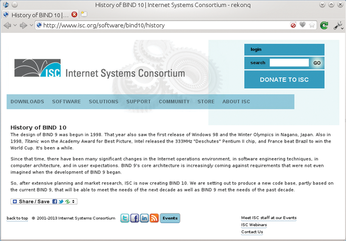
After five years of development (Figure 1), Bind 10 brings even greater upheaval. Not only the configuration, but also the architecture has changed fundamentally. JSON database files replace named.conf; zones are still configured with familiar zone files, but in operation they are also stored in SQLite. (The administrator has the option to disable the default database storage option and go back to storage in normal zone files.)

Configuration is managed through a Rest API using HTTPS. To allow this to happen, Bind 10 comes with a command-line utility that lets administrators make configuration changes in a proprietary language.
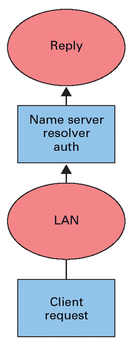
Finally, instead of a named, Bind 10 operates through 12 processes (DHCP not included), most of which are Python processes. The built-in DHCP components, according to the project website, are still "experimental," but you can already configure and test. The modularization of Bind 10 into individual daemons is the biggest change for administrators, and it prevents you from upgrading many existing enterprise scenarios. Figure 2 shows the setup that most enterprises use for name resolution. A single name server instance handles both the authoritative and the recursive service. All clients use the name of an existing server that provides all the answers.

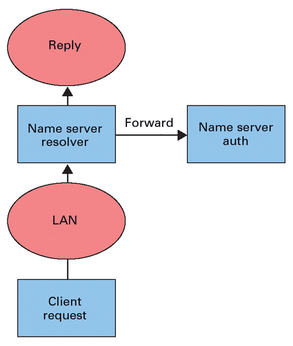
But the standard scenario depicted in Figure 2 is not ideal. A cleaner approach would be to separate the two functions, as shown in Figure 3. The recursive name server in this configuration has entries for the local zones that tell it to query the authoritative name server explicitly – through either the secondary mechanism or the forward zone entries.

As an inquiry on the Bind 10 mailing list confirmed, the configuration shown in Figure 3 is currently not possible with Bind 10. Requests for the local network would go through the Internet, with no prospect for successful responses because they only exist locally.
However, the developers say they plan to implement the setup shown in Figure 3 in a later version by letting the server evaluate the RD (Recursion Desired) bit in the query. The server will then either forward the request to the authoritative component or to the resolver. As of now, if your network reflects the scenario shown in Figure 3, you can't use Bind 10.
Installation
Bind 10 is still quite new, with no official packages, let alone repositories, when this issue went to press. The Linux Magazine test team had to build the complete application from source [1]. Shortly before the editorial deadline, packages for Bind 10 appeared on the openSUSE Build Service, which allowed for easy installation with just one click [2].
On the Gentoo installation used for the test, we needed to install the boost, botan, log4cplus, and sqlite3 packages before building Bind; Python version 3.1 or later is also required. The DHCP component requires MySQL, but you can do without it for simple tests. After installing the packages, quickly compile using:
w ./configure && make && make install
If you want to run the DHCP server with a MySQL back end, you need the --with-dhcp-mysql option.
After installing Bind 10, you first need an administrative account for the configuration interface. To set it up, run b10-cmdctl-usermgr; this utility prompts you for a username and password, which it then adds to the cmdctl-accounts.csv file in $INSTALLDIR/etc/bind10. The program is still very rudimentary and only allows you to add users; it has no other functions. Incidentally, the utility names all start with b10.
Before you set out to configure the name server, you need to decide on the mode in which you will be running it: recursive or authoritative (i.e., as the master for your own zones). Unlike the previous versions, modularization in Bind 10 leads to only one component accepting connections on one IP address. Things are different for a host with multiple IPs.
Commissioning
To start the name server, run the INSTALLDIR/sbin/bind10 wrapper script, which, in turn, starts b10-init, which is located in the libexec directory of the installation. b10-init launches the configured components. When you first start Bind 10, all the log messages are routed to the console. In a second shell on the same machine, you then launch bindctl from the INSTALLDIR/bin directory. This command-line front end for the Restful API is used to configure Bind 10.
By default, the server accepts requests on localhost port 8080 and accepts only secure SSL connections. A self-signed certificate is installed with Bind 10, but you can replace it if necessary. When a connection is opened for the first time, bindctl queries the username and password; they are sent to ~/.bind10/default_user.csv for reuse – but in plaintext.
After logging on to the server with the user you created, you need to create the desired component. In the first example (Listing 1), this is an authoritative name server. The first line creates an instance of an authoritative name server. Line 2 is used to tag Bind services that require special attention at start and stop time, including the resolver and the web server for the configuration.
Listing 1
Creating an Auth Server
The third line indicates whether the auth service is necessary for this configuration. config commit enables the changes, and you can then immediately test the name server. To query the version.bind entry, for example, use the following command:
dig @127.0.0.1 -c CH -t TXT version.bind
Now it is time to teach the name server about the zones it needs to provide. Bind 10 can use a SQLite database or legacy zone files to manage them. Despite SQLite, you still need to use zone files.
Apart from dynamic DNS updates, changes end up in the zone file; the old zone definition is automatically overwritten when you import the new version. Although it is possible to modify the database directly using requests, this will most likely cause inconsistencies; the bind authors advised against doing this when I asked. The import program goes by the name b10-loadzone. Listing 2 shows a sample call.
Listing 2
Importing a Zone into Bind 10
Zone Import
Bind 10 not only imports zones but also implicitly runs the bindctl commands, which are necessary for creating the zone. The zone is then immediately enabled. Although it is possible to point to your own SQLite database using the -c option, it is probably only necessary to split the file if you are a large provider supporting many zones. If you do not want to copy the zone to the database, but prefer to go on working with traditional zone files, you need to stick with bindctl (see Listing 3).
Listing 3
Creating a Zone with Zone Files
In the first step, Listing 3 creates a new instance of the class IN, to which it then adds parameters. The type is MasterFiles, in contrast to sqlite3 in the standard configuration. The parameters comprise the zone and the corresponding file in JSON format. The last line finally enables the cache, which serves up the zone from main memory instead of from the disk. This step is absolutely essential for zones made up of text files.
An entry in the data_sources/classes/IN hierarchy is not created for every new IN zone, only for the MasterFiles and sqlite3 types. The SQLite database can contain multiple zones, in which the Master Files type requires a JSON entry for each pair from a zone together with the associated file, all neatly separated by commas. As with legacy versions of Bind, admins need to communicate changes in the zone file; in Bind 10, the auth loadzone example.org command reloads the example.org zone.
Buy this article as PDF
(incl. VAT)
