Ceph and OpenStack join forces
Guests at the Pool
CephX [7] is Ceph's internal function for user authentication. After deploying the Ceph cluster with the ceph-deploy installer, this authentication layer is enabled by default. The first step in teaming OpenStack and Ceph should be to create separate cephX users for Cinder and Glance. To do this, you define separate pools within Ceph that only the associated service can use. The following commands, which need to be run with the permissions of the client.admin user, create the two pools:
ceph osd pool create cinder 1000
ceph osd pool create images 1000
The administrator can then create the corresponding user along with the keyring (Listing 1). The best place to do this for Glance and its users is the host on which glance-api is running, because this is where Glance expects the keyring. If you want glance-api to run on multiple hosts (e.g., as part of a high-availability setup), you need to copy the /etc/ceph/ceph.client.glance.keyring file to all the hosts in question.
Listing 1
Creating a Glance User
The commands for the Cinder user are almost identical (Listing 2). The ceph.client.cinder.keyring file needs to be present on the host or hosts on which cinder-volume is used. It is then a good idea to add an entry for the new key to the /etc/ceph/ceph.conf configuration file (Listing 3).
Listing 2
Creating a Cinder User
Listing 3
ceph.conf
Preparing Glance
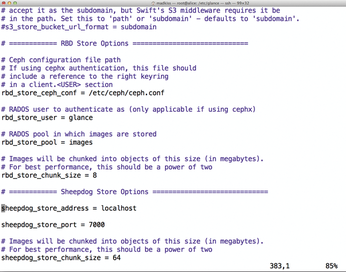
After applying the aforementioned steps, Ceph is ready for OpenStack. The components of the cloud software now need to learn to use Ceph in the background. For Glance, this is simple: You just set up the glance-api component. In its configuration file, which usually resides in the path /etc/glance/glance-api.conf, take a look at the default_store parameter (Figure 3). This parameter determines where Glance stores its images by default. If you enter the value rbd here, the images end up with Ceph in the future. After restarting glance-api, the changes are now active.

Lower down in the file, you will also see some parameters that determine the behavior of Glance's rbd back end. For example, you can set the name of the pool that Glance will use (Figure 4). The example shown uses the default values, as far as possible.

Getting Cinder Ready
Configuring Cinder proves to be more difficult than configuring Glance because it involves more components. One thing is certain: The host running cinder-volume needs to talk to Ceph. After all, its task later on will be to create RBD images on Ceph, which the admin then serves up to the VMs as virtual disks.
In a typical Ceph setup, the hosts that run the VMs (i.e., the hypervisors) also need to cooperate. After all, Ceph works locally: The host on which cinder-volume runs does not act as a proxy between the VM hosts and Ceph; this would be an unnecessary bottleneck. Instead, VM hosts talk directly with Ceph later on. To do this, they need to know how to log in to Ceph as cephX.
The following example describes the configuration based on KVM [8] and Libvirt [9], which both have a cephX connection. Other virtualizers provide their own control mechanisms that let them talk to Ceph – other hypervisors, such as VMware [10], do not have direct Ceph back ends.
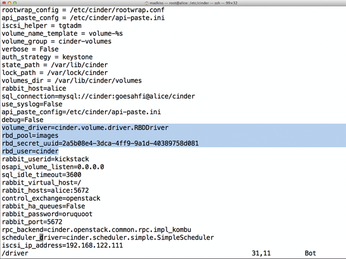
The first step in configuring the hypervisor is to copy a functioning ceph.conf file from an existing Ceph host. Also, any required cephX key files need to find their way to the hypervisor. For the Ceph-oriented configuration of Libvirt, you first need a UUID, which you can generate at the command line using uuidgen. (In my example, this is 2a5b08e4-3dca-4ff9-9a1d-40389758d081.) You can then modify the Cinder configuration in the /etc/cinder/cinder.conf file to include the four color-highlighted entries from Figure 5. Restarting the Cinder services cinder-api, cinder-volume, and cinder-scheduler completes the steps on the Cinder host.

« Previous 1 2 3 4 Next »
Buy this article as PDF
(incl. VAT)
