Installing the CyanogenMod 12 alternative OS on an Android phone
Reception
The custom recovery can be installed several ways; however, it is advisable to stick to the ClockworkMod recovery recommended on the CyanogenMod website [13]. After downloading the approximately 12MB file, you can configure it virtually the same way as unlocking the bootloader. On the Nexus 5, put the phone into bootloader mode and then install the new recovery image:
adb reboot bootloader
fastboot flash recovery recovery-clockwork-6.0.4.5-hammerhead.img
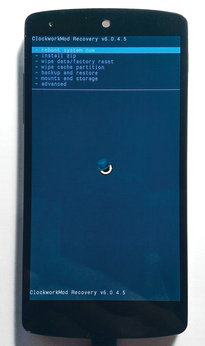
You do not need to reboot; you can instead switch from the green Start (Figure 2) to the red Recovery mode entry using the volume control lever; ClockworkMod Recovery (Figure 3) appears instead of the standard Google recovery.
Availability
Being familiar with the internal Android code names will help with downloading the appropriate version of CyanogenMod. The Nexus 5, for example, is called "Hammerhead," [14] the Nexus 10 "Manta," and the Nexus 7 "Flo." You will find a list of firmware versions available for each device in the CyanogenMod wiki. After you enter a provider, such as Google or LG, the filter window restricts the search to a specific device.
Continue to the download page [15], which lists all supported devices in the left pane. The hammerhead link is for the Nexus 5. You now need to choose the desired build version; change the entry to All under Type to see all available builds. At this writing, only nightly builds are available for Android 5.0, but the nightly builds are already quite stable. Alternatively, another option is a stable build from KitKat (Android 4.4).
Anyone who shies away from risk should use the stable version of the last Android version (e.g., 4.4) until the new version 5.0 is developed to a point where a monthly build is released. However, more adventurous users do give the project valuable feedback. It may well happen that a particular device works perfectly with a specific nightly build, but you shouldn't rely on it.
This article uses the nightly build version from February 25, which is available for download [16]. You need to download the matching Google Apps for Android 5.0, to which the CyanogenMod wiki links [17].
Friendly Takeover
The actual installation occurs through custom recovery and a terminal window. Traditionally, you first transfer the ROM file and the Google Apps archive onto the phone and install them afterward. However, the following solution using adb sideload is much more elegant.
Select the install zip | install zip from sideload menu item in custom recovery (adb reboot recovery). A Sideload started message appears at the bottom of the touchscreen. On the Linux computer, sideload the ROM file to your phone:
adb sideload cm-12-20150225-NIGHTLY-hammerhead.zip
This process will take a few minutes. Make sure you only wait until the terminal is available again, but follow the messages on the display. Then sideload the Google Apps package:
adb sideload gapps-lp-20141212-signed.zip
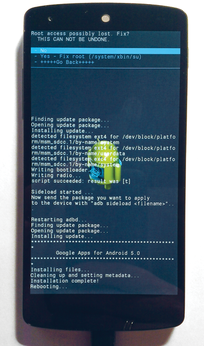
It takes about a minute for the transfer to complete and the Nexus 5 to install the Google Apps. Now leave the recovery menu, go back to the main menu, and select reboot now. It is important to complete this step via the menu and not to run a reboot command from the Linux terminal because the menu is the only way to make sure the routine that sets root privileges appears (Figure 4).
CyanogenMod 12 and Google Apps are now installed. The first boot takes a while because the new Android run time adjusts all apps to the Nexus 5.
« Previous 1 2 3 Next »
Buy this article as PDF
(incl. VAT)
Buy Linux Magazine
US / Canada
UK / Australia