Restore Btrfs files at the push of a button with Snapper
Oh, Snap!

© Lead Image © citalliance, 123RF.com
Thanks to Btrfs snapshots, Snapper lets you restore a system to a previous state in case of failure.
The Snapper tool uses Btrfs or Logic Volume Management (LVM) to manage system states, giving users an easy way to restore working files in case of problems. OpenSUSE offers a matching module for YaST. For other operating systems and filesystems, you will find a neutral user interface on GitHub.
OpenSUSE developers trust the Btrfs filesystem [1]. Since openSUSE 13.2, or version 12 of SUSE Linux Enterprise Server (SLES), it has been the filesystem of choice for the root partition. On the other hand, the CoreOS distribution, which focuses strongly on container technology, recently dropped Btrfs, because the filesystem was too buggy in production use (see the "Warning" box).
Warning
Different distributions and experts assess the security of the fledgling Btrfs filesystem differently, depending to a great extent on the application and the features you use. Btrfs lead developer Chris Mason, who deploys the filesystem on the back end belonging to his employer Facebook, says it is ready for production use. The Meego mobile operating system also relies on Btrfs.
I was unable to find any reports of data loss in connection with Btrfs and Snapper in the SUSE support channels. To try out Snapper, it makes sense to set up a test system first, or at least create backups so that no valuable data is lost.
Work on the filesystem has been progressing for about eight years now. Like the ZFS [2] OS developed by Sun for Solaris 10, Btrfs offers features that are not usually part of the filesystem's repertoire. In addition to an extended storage area, these features include support for RAID0, 1, 5, 6, and 10; snapshots and sub-volumes; and the ability to defragment partitions on the fly. It is also possible to convert ext3/4 partitions to Btrfs, after creating a backup, with the btrfs-convert utility from the Btrfs toolbox.
Snapping openSuse
To test Snapper with Btrfs in the test lab, I used the latest release of openSUSE Leap 42.1 and a current Ubuntu 16.04 beta, whereas the experiments with ext4 used Siduction (aka Debian "sid") underpinnings. Because a current kernel is one of the most important prerequisites for working with Btrfs and snapshots, I updated all three systems to the latest versions before starting the experiments. In SUSE, that meant installing kernel 4.1.15 as well as btrfsprogs 4.1.2-10.1 and snapper 0.2.9.1. Additionally, I installed pam_snapper to launch Snapper when logging in to the system. Siduction and Ubuntu were updated in a similar style.
One factor that prompted the choice of openSUSE as a test platform was that SUSE developer Arvin Schnell was the main developer behind Snapper and that the distro has a graphical tool that facilitates the task of managing the snapshots. However, Snapper can also be found in the archives of other distributions, such as Arch [3], Debian, and Ubuntu. With Debian, I could also test whether Snapper works on ext4, because the statements on the Internet are somewhat contradictory. Additionally, I wanted to convert a Debian installation with ext4 to Btrfs and then test Snapper.
Configuration
After installing openSUSE Leap 42.1, Snapper is already set up for the root partition. In this state, it creates a snapshot before and after each action with YaST or Zypper. It is also possible to set up hourly snapshots via the timeline; alternatively, you can create snapshots manually. The software removes most snapshots according to a defined schedule, but it does keep some of them by default.
If you leave the default settings from the /etc/snapper/configs/root file, then the snapshots will quickly occupy a large amount of space. You need to consider this when partitioning. A root partition that is normally fine with 30GB of disk space, will need between 100 and 300GB of space for snapshots – depending on the intended Snapper configuration.
Unfortunately, commands such as df -h or du, when used to display used and free space for the various snapshot partitions residing on sub-volumes, do not work as expected, as evidenced by the many occurrences of the no space left on device error message among the complaints associated with Btrfs. In general, it is therefore advisable to use the btrfs filesystem show command instead of the classic tools (Figure 1).

If you also want to use Snapper for the home partition, you need to convert the filesystem for this partition from XFS to Btrfs during the installation. If Home lives on the root partition, Snapper does not cover it.
After the kernel update,
$ sudo zypper ar -f http://download.opensuse.org/repositories/Kernel:/stable/standard/kernel
$ zypper ref
$ zypper dup -r kernel
but before updating the system via YaST or Zypper, you need to edit the /etc/snapper/configs/root file to specify the intervals for creating and deleting snapshots. For a desktop system, it makes sense to lower the default values in some places. Listing 1 shows the most critical parameters as examples. The man page for snapper-configs [4] provides further insight. For a detailed list of parameters, see the SUSE documentation [5].
Listing 1
Snapshot Configuration
If you want to create a snapshot of the home partition, first create the appropriate configuration with the
sudo snapper -c homecreate-config/home
command and then edit it as shown for root. To check that the system has integrated the two subvolumes correctly, type:
sudo snapper list-configs
In addition to root, you should have an entry for home (Figure 2).

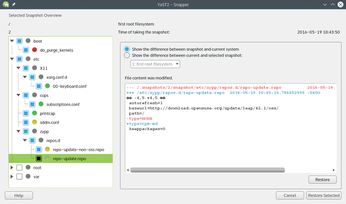
The etc/snapper/filters file lists the files the software never restores, so you can enter the files here that you want to exclude from the restore. Now that the configuration is complete, you can manage Snapper in the graphical user interface (Figure 3). The corresponding man page explains how to manage Snapper at the command line [6].

GUI Control
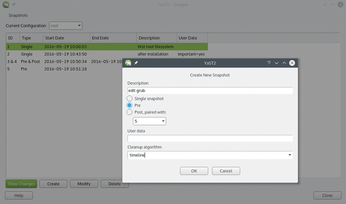
In the YaST Control Center below Software is a Miscellaneous section with a Snapper module that lets you create, view, compare (Figure 4), restore, or delete snapshots in a GUI. In addition to automatic snapshots, whether cron-controlled or generated by updates, pressing the Create button takes a new snapshot manually (Figure 5), which makes sense after a major change has been made to files.


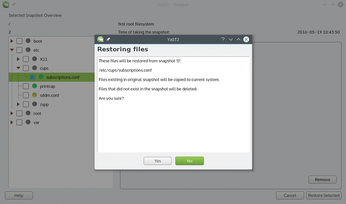
If you encounter any problems later, you can use Restore Selected to revert to a state before the change [7] (Figure 6). If the system is in a state that no longer allows you to roll back within the existing session, you can also select a snapshot in GRUB after a restart and boot to it.

Buy this article as PDF
(incl. VAT)
