Raspberry Pi media center with DIY ambient light
Optimization
The most difficult part of the configuration is defining the order and position of the LEDs in the "leds" section of the /etc/hyperion/hyperion.config.json configuration file. The entry for a single LED (or, in the case of Lightpack, for an LED strip) is shown in Listing 5.
Listing 5
Single LED Entry
Each entry can be assigned uniquely by the index value. A pair of coordinates defines the position, or rather the area, in which the system should react to the contents displayed on the screen. The values run from 0.0000 to 1.0000. The information in Listing 6 shows the setting for the upper left corner of the screen.
Listing 6
Upper Left Corner
However, in the case of the devices I used in the lab test, the order of the connections on the control unit and the index number did not match; thus, I had to reposition either the connections or the LEDs accordingly: I opted for the latter to keep the cable routing and arrangement on the control unit as clean as possible.
The Lightpack kit contains 10 LED strips, and the control unit controls each of these by reference to a unique index. It makes sense to isolate a certain area in the configuration file and assign it to the various lighting elements one after another.
With the LED configuration from Listing 7, the active area for the first LED strip is in the upper left corner of the screen. First place all other LED strips on the bottom right area, and then apply the changes by restarting the Hyperion service:
$ sudo systemctl enable hyperion
Listing 7
LED Configuration
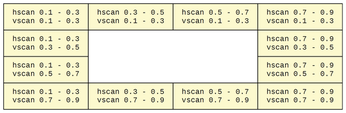
Once you have assigned all elements, the alignment can be corrected by means of coordinates. Figure 4 shows a simple configuration. The values are then transferred to the appropriate LEDs.
Color Intensity
In practice, the system should now light the area behind the TV to match the screen content. However, the brightness of the LEDs, and thus the intensity of the effects, may leave much to be desired.
If necessary, you can also control luminance with the hyperion.config.json configuration file. The "transform" section (Listing 8) is responsible for the intensity of the color effects. An optimal setting requires a successful balance between saturation ("saturationGain") and brightness ("luminanceGain").
Listing 8
JSON transform Section
Tests have shown that brightness values above 1.5000 have a counterproductive effect: The colors appear rather pale, if not white. The best way to find out the optimum configuration for your requirements is to conduct your own experiments.
Conclusions
With a Rasp Pi, the relatively inexpensive Lightpack, Hyperion software, and a little configuration work, you can save yourself the cost of an Ambilight TV. However, Lightpack only "lights up" content played back by the Media Center, not conventional television programs.
The biggest task is reworking the configuration: The file created by the setup tool requires some adjustments. If you like to experiment with media center distributions and avoid modern smart TVs with all the extras, this task should not deter you.
Infos
- Lightpack: http://www.lightpack.tv
- Lightberry: http://lightberry.eu
- AmbiLED HD: http://www.ambiledhd.com
- Lightpack PC: https://store.lightpack.tv/products/lightpack
- Boblight: https://code.google.com/archive/p/boblight
- Hyperion: http://hyperion-project.org
- HyperCon: https://github.com/hyperion-project/hypercon
- Kodi Boblight add-on: http://kodi.wiki/view/Add-on:XBMC_Boblight
- Kodi AmbiBox add-on: http://kodi.wiki/view/Add-on:AmbiBox @IE
« Previous 1 2
Buy this article as PDF
(incl. VAT)
Buy Linux Magazine
US / Canada
UK / Australia