Create system snapshots with CYA
Enumerated
If you call cya list, you will see the first snapshot with its date and time under point 1. Other snapshots that you created automatically or by running cya save are numbered by the tool and rotated as needed (Figure 3).

The cya keep command lets you create manual snapshots that are not subject to rotation, which is a good way to take a snapshot immediately after installing the operating system under a name such as basisinstallation. Even if you are importing a large update or an extensive package, creating a snapshot up front gives you additional assurance.
If something goes wrong, you can roll back the system to a previous state. Although you will want to keep basisinstallation and even archive it with cya archive, you can dispose of snapshots created before updates with the cya remove command as soon as you no longer need them.
Manual and Scripted
After entering the cya keep command, the program prompts for a unique snapshot name, which must not contain spaces. Alternatively, enter a name with the command; if run in scripts, use:
cya keep name pre_upgrade
The rest of the process is the same as the automatic backups, except that the snapshot does not reside in a numbered directory. Instead, it ends up in a folder with the assigned name. So, if you stick to the above backup as an example right after installing the operating system, then the data could be found in /home/cya/points/basicinstallation.
If you want to use the software in a script that automatically creates a snapshot every month and overwrites the previous one, the command is:
cya keep name monthly overwrite
Here, the tool takes an incremental approach and only considers changes since the last snapshot.
If you do not want to overwrite the backups, use
cya keep name monthly-DATE
instead; this tells the script to append the respective date to the name.
Recovery
Any backup or snapshot system is only as good as its data recovery function. It is therefore worth testing the restore before an emergency occurs. First, use the cya script command to create a recovery script.
Specify which directories the system must mount when restoring. You can make your own entries here if you want to include additional directories (Figure 4). You will want to create the script immediately after configuration and save it separately.
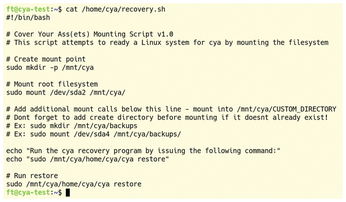
If data to be restored resides outside the default directories, you can manually enter the under /home/cya/. For example, if /var/ is on an external hard disk, you need to add the mountpoint here. Then, copy the finished recovery.sh script to a USB stick, which you later mount in a Live system and use to restore the backups.
As already mentioned, you should test the process before an emergency occurs so that you are familiar with the procedure. If the hardware, partition layout, or CYA version changes, you will want to run cya script again to customize the script.
The recovery process requires a Live system. You start this from a USB stick, an optical medium such as a CD, or a Netboot image. If possible, use a version of the operating system that matches the installation to be restored.
In a field test, I deleted the boot/ directory on a machine with:
sudo rm -rf /boot
This meant the computer was no longer bootable. CYA had to restore this directory to have a bootable system after the restore.
« Previous 1 2 3 Next »
Buy this article as PDF
(incl. VAT)
Buy Linux Magazine
US / Canada
UK / Australia