The Treasure Macropad Type-9

Open Hardware – TMT9

© Lead Image © lightwise, 123RF.com

© Lead Image © lightwise, 123RF.com

Article from Issue 229/2019
Author(s):

This DIY, programmable input device is a compact companion to your keyboard, with nine keys and 16 layers that can be customized for different applications and games.

From keyboards to graphic tablets, modern input devices are sporting programmable keys. These keys are not only convenient, but help to reduce repetitive stress injuries by keeping the fingers on the keyboard. Yet there is something to be said for a single compact programmable device rather than several scattered across your workspace. That is the advantage of the Treasure Macropad Type-9 (TMT9) [1], the first product of Eric Boudo's new company (Figure 1). Measuring a little over 2x2 inches, the TMT9 has only nine keys, but includes 16 different layers, for a total of 144 programmable keys altogether. It's a compact little device, although for Linux users it requires a certain amount of work and patience, since only graphical setups for Windows and macOS are available.

Figure 1: The TMT9 ships with some assembly required.

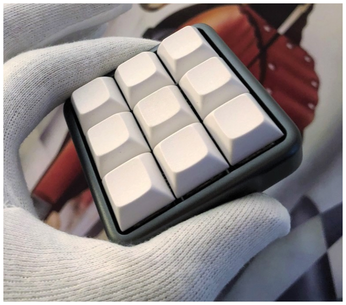
No matter what your operating system, the TMT9 requires some DIY adjustments, especially since the company is not set up for technical support. Fortunately, ample help is available on the Quantum Mechanical Keyboard (QMK) website [2], although configuration takes several steps. In addition, units ship unassembled, although no soldering is required. Nor do units ship with keycaps for the Cherry MX mechanical key switches, which have to be ordered separately from a third party [3] (Figure 2). Also, while a newer model that supports USB C is due out soon – and may be available by the time you read this article – the TMT9 requires a USB 2.0 A-Male to Mini-B cable, which is not easy to find in computer stores these days. In the end, I had to order one from Amazon.

Figure 2: The TMT9 ships without keycaps, providing another opportunity to customize.

Configuring QMK for Linux

However, for Linux users, the challenge is just starting. The most common tools for flashing firmware, the Arduino IDE and the avrdude command, will not work. The TMT9 uses the Atmel DFU bootloader, which neither of the two usual tools supports. However, this fact is obscured by avrdude's man page being out of date, which can easily lead the inexperienced – like me – on a false path.

Instead, what you need is to install QMK, an open source toolset specifically designed for keyboard input devices that must be installed before creating firmware. The instructions are for Debian or one of its derivatives. With git and AVR-GCC installed, create a clone of the QMK repository (Figure 3):

Figure 3: The first step in configuration is to clone the QMK repository.
git clone --recurse-submodules https://github.com/qmk/qmk_firmware.git
cd qmk_firmware

The repository includes a number of keyboards that use QMK that will help you build firmware. Continue by running this script to finish setting up the repository:

util/qmk_install.sh

The script is set up for Debian and its derivatives, and installs or updates all the necessary packages (Figure 4). However, be aware that the script mistakenly looks for pip3, when the package required is python3-pip. Installing python3-pip will also pull in a lot of dependencies, but it is necessary for successful setup.

Figure 4: The qmk_install.sh script installs and updates the necessary packages.

You can check that the build environment is sound by running:

make treasure/type9:default:

This command gives the path to the firmware tools for a default piece of software, followed by the name of the firmware version after the colon. You may need to reset the bootloader by poking the wrench that comes with the device into the hole in the back of the device. If no error message is given, try tapping one of the keys in a text editor. The result will be a number from 0 to 8 if the firmware was successfully loaded (Figure 5).

Figure 5: If the environment test gives no error message and pressing a key results in a number from 0 to 8, then the default firmware was uploaded to the device.

Creating and Uploading the Firmware

The easiest way to create new custom firmware is to copy the default one and modify the original. Copying the default not only preserves a workable firmware if you need to recover from a flawed one, but saves you typing. To customize, open a copy of keymap.c, and scroll down to the line:

const uint16_t PROGMEM keymaps[][MATRIX_ROWS][MATRIX_COLS] =

Following this line are the key layouts for each layer. The first layer is designated 0, and has the nine keys laid out in three rows, with each row a comma-separated list of keycodes (Figure 6). You can have up to 16 layers, each customized, if you choose, for a particular application or game, or any other combination of keys you find useful. Note that some keys may have no effect in a particular application; for example, an F11 key will have no effect if an application does not use that function key. You can edit the default layer or add another layer by copying the default layer, changing the layer number, and modifying the keycodes. In either case, use the summary of keycodes as a guide [4].

Figure 6: To customize the firmware, edit the text-based map of the keys in a copy of keymap.c.

Keys can be alphanumeric, control or function keys, or for sound, Bluetooth, or toggling backlights and changing their brightness. Advanced key functions include one-shot keys that remain active until another one is pressed, making key combinations easier, and Mod-Taps keys that behave differently when tapped instead of held down. When building a custom setting, it is best to do it one key at a time, because not all keycodes in the QMK documentation appear to be implemented, and some are specific to the operating system. Be sure to preserve the commas and the surrounding parentheses, or your custom layer will not compile.

If you have multiple layers, be sure that you provide a navigation system to switch between layers. Since the documentation suggests not switching to a lower level, the best method is to create a toggle system, using the keycode DF(1) on layer 0 to allow switching to layer 1, DF(2) on layer 1, and so on, ending with DF(1) on the highest layer you are using, DF(2) on layer 1, and so on. This navigation system uses one key on each level, but still leaves plenty for other macros.

When your custom firmware is completed, save it as the default and upload it using the version of the command structure given above to test the environment. Contrary to the documentation, a keymap with a different name may not compile. At times, too, an Error 1 message is given, but checking the device shows that the firmware was successfully uploaded.

If you prefer a graphical interface, you can customize layers using the online instructions' steps 9-16 [5], and place the resulting .json file in a place where you can conveniently compile and flash it. To customize, open the QMK Keyboard Firmware page, and scroll down to the Treasure Keyboard Macropad button. Either way, a simple map of the TMT9's keys displays (Figure 7). Do not change anything on the Wiring or Pin tabs, but click instead on the Keymap or Macro tab.

Figure 7: The online configuration tool.

To program a key with the online interface, select the layer (starting at 0), and click a key. At the bottom of the page, the current configuration for the key displays in a box. Click the box, and chose another configuration from the graphic interface. The site contains a summary of the available keycodes built into the interface.

When you have configured all the keys you want in the graphical interface, go to the Settings tab to save the source file on your machine. The only setting you need to change is the name, but you might want to set the brightness of the backlights on a 10 point scale, with 10 being the highest (Figure 8). Then move to the Compile tab to produce the finished .hex file and download it to your computer. As you work, you may want to record a layer's contents on one of the two cards that comes with the device for future easy reference.

Figure 8: You can adjust the backlight's brightness in the Settings tab.

To upload the .json file, install QMK CLI [6], and use the command qmk compile; don't forget to disable the bootloader by poking the wrench into the hole on the bottom of the device.

The End Results

Countless variables make setting up the TMT9 with Linux a slow process. Here, I can only discuss the circumstances you are most likely to find. Setup is not helped by the fact that the TMT9 hides the indicator light that shows when it is reset, and the DIYer can only go by the slight give when the wrench is poked into the inner workings. Would an external LED really be too much to ask?

Still, that is the nature of DIY products. While my stubbornness in insisting on working in Linux complicated setup immensely for me, in the process I learned a lot about AVR devices and how they work, gaining a body of knowledge that I would have missed had I given in to the temptation to work on a neighbor's Windows machine.

I am surprised, though, that Treasure has not bothered to add Linux support. After all, while Linux users may be a small minority, I suspect that they include a percentage of DIYers that is far higher than among Windows or macOS users. Or possibly, the expectation is that Linux users will know enough to follow the instructions on the QMK site.

However, in the end, I don't regret the effort. The TMT9 offers more convenience and efficiency than any other device with the smallest footprint that I have ever encountered. I would far rather have a TMT9 on a keyboard than a number pad, for instance. Moreover, in its red anodized aluminum case, it is an elegant device. I am still organizing layers, but I can already see that it will lead to a major improvement in my workflow – to say nothing of my efforts to reduce repetitive stress injuries.

Buy this article as PDF

Express-Checkout as PDF
Price $2.95
(incl. VAT)

Buy Linux Magazine

SINGLE ISSUES
 
SUBSCRIPTIONS
 
TABLET & SMARTPHONE APPS
Get it on Google Play

US / Canada

Get it on Google Play

UK / Australia

Related content

comments powered by Disqus