Open source Symfonisk WiFi speaker
Software Crossover
To access the individual speaker drivers with the two stereo channels of the Amp2, you need plugins. They do the filtering work for certain frequencies so that the player routes the high frequencies to the tweeter and the low frequencies to the midrange driver.
Again, several alternatives are available. I chose the Linux Audio Developers Plugin API (LADSPA) plugins by Richard Taylor [8]. This project has been around for quite some time, and its easy installation is impressive.
As tinycore loads everything into RAM on boot; the system is built out of different extensions, which are pretty much ZIPs that contain the files for that extension. All loaded extensions are merged into one filesystem in the RAM on which the system is running. Most components are already prepackaged and can be downloaded as an extension; however, for the piCorePlayer used in this project, you have to recompile the plugins. Although quick to accomplish, it requires either a running player or a cross-compile environment. You will find a version that I built myself in the download area for this article [9].
piCorePlayer Setup
Start by downloading the image of the current piCorePlayer and write the image file to an SD card [10] as you would for other Rasp Pi operating systems. To set up the WiFi, create the wpa_supplicant.conf file on the PCB_BOOT partition and enter the login information there. As a template, you can take the contents from a wpa_supplicant.conf.sample file [11].
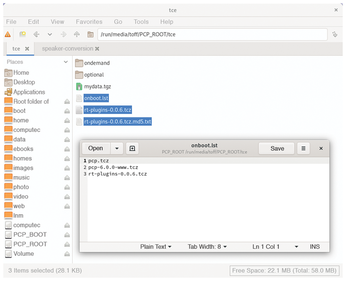
Now copy the downloaded plugin manually to the memory card. To do this, write the rt-plugins-0.0.6.tcz and rt-plugins-0.0.6.tcz.md5.txt files to the PCP_ROOT partition in the tce/optional/ folder. For the system to load the plugin at boot time, you need to enter its file name (rt-plugins-0.0.6.tcz) in the tce/onboot.lst text file (Figure 4). You might have to start the file manager and the editor with administrative rights to do this.
Additionally, you will want to enlarge the PCP_ROOT partition to use the whole SD card. On Linux this can be easily done with programs such as GParted. Alternatively, you can do this after first launching piCorePlayer, but you will need to copy the required plugins to the SD card first.
First Start
Now remove the SD card from the card reader, insert it into the Raspberry Pi, and switch on the system. After starting the Rasp Pi, piCorePlayer should be accessible over a web interface (Figure 5) by calling up in a web browser the Rasp Pi IP address, which you can discover from the web front end of your WiFi router or with arp-scan:
$ sudo arp-scan --localnet | grep Raspberry
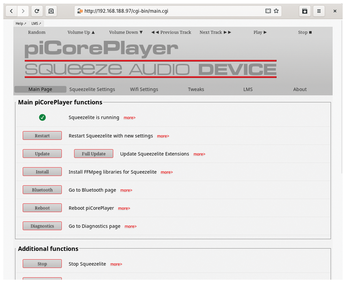
Now you have to configure various settings. Some of them require you to restart your Rasp Pi, which you should do every time anyway, just to be on the safe side. First, switch to Advanced Mode at the bottom. Then do the following:
- Update the player under Main Page | Full Update
- Update the extensions under Main Page | Update
- Check for possible hotfixes under Main Page | HotFix
Second, go to the Squeezelite Settings tab and set Amp2 as the audio output device, which appears as HiFiBerry DAC+ (and Pro, AMP2). After a restart, flip the Card control switch to disable the Rasp Pi's internal sound card. Now Squeezelite will start up when you boot the system.
Back on the Squeezelite Settings tab, enter the name of the speaker (e.g., Living Room) and the IP address of the Logitech Media Server. Finally, in the Tweaks tab, turn on the ALSA 10 Band Equalizer.
You have now completed the basic configuration and the speaker should work. However, it will still sound a little strange.
Buy this article as PDF
(incl. VAT)
Buy Linux Magazine
US / Canada
UK / Australia