Open source Symfonisk WiFi speaker
Configuring the Drivers
For the following settings, you enter commands directly on the Rasp Pi speaker console. To do this, connect to the speaker's IP address over SSH. By default, the system uses tc as the user and piCore (case sensitive) as the password.
For the crossover (i.e., the treble and bass filters), you have to edit the /etc/asound.conf file as shown in Listing 1. The only editor the system comes with is the legacy Vi, which although outstanding in performance is not completely intuitive. Beginners can learn the most important commands in an old Linux Magazine article [12].
Listing 1
Adjusted asound.conf
01 # default - Generated by piCorePlayer
02 pcm.!default {
03   type plug
04   slave.pcm "plugequal"
05 }
06
07 ctl.!default {
08   type hw
09   card 0
10 }
11
12 pcm.pcpinput {
13   type plug
14   slave.pcm "hw:1,0"
15 }
16
17 #---ALSA EQ Link--------
18 ctl.equal {
19   type equal;
20   controls "/home/tc/.alsaequal.bin"
21   library "/usr/local/lib/ladspa/caps.so"
22 }
23
24 pcm.plugequal {
25   type equal;
26   slave.pcm "plug:crossover";
27   controls "/home/tc/.alsaequal.bin"
28   library "/usr/local/lib/ladspa/caps.so"
29 }
30
31 pcm.equal {
32   type plug;
33   slave.pcm plugequal;
34 }
35
36 #---Speaker crossover Verknüpfung-----
37 pcm.crossover {
38   type ladspa
39   slave.pcm "amp2"
40   path "/usr/local/lib/ladspa"
41   channels 6
42   plugins
43   {
44     0 {
45        label RTlr4lowpass # lowpass output left on channel 2
46        policy none
47        input.bindings.0 "Input"
48        output.bindings.2 "Output"
49        input { controls [ 3000 ] }
50       }
51     1 {
52        label RTlr4lowpass # lowpass output right on channel 3
53        policy none
54        input.bindings.1 "Input"
55        output.bindings.3 "Output"
56        input { controls [ 3000 ] }
57       }
58     2 {
59        label RTlr4hipass # highpass output left on channel 4
60        policy none
61        input.bindings.0 "Input"
62        output.bindings.4 "Output"
63        input { controls [ 3000 ] }
64       }
65     3 {
66        label RTlr4hipass # highpass output right on channel 5
67        policy none
68        input.bindings.1 "Input"
69        output.bindings.5 "Output"
70        input { controls [ 3000 ] }
71       }
72   }
73 }
74
75 #----Output device and mono downmix link-----
76 pcm.amp2 {
77   type plug
78   slave {
79     pcm "t-table"
80     channels 6
81     rate "unchanged"
82   }
83 }
84
85 pcm.t-table {
86   type route
87   slave {
88     pcm "hw:0,0"
89     channels 2
90   }
91   ttable {
92     2.0 0.5 # Mix stereo low signal to mono (mid-range)
93     3.0 0.5
94     4.1 0.5 # Mix stereo high signal to mono (tweeter)
95     5.1 0.5
96   }
97 }
98
99 pcm.plughw.slave.rate = "unchanged";
The configuration shown here creates a chain of filters that is sent to the hardware over the equalizer and crossover. The entry in pcm.!default redirects the default device to the plugequal equalizer. Below this you will find the equalizer settings in pcm.plugequal and pcm.equal.
The pcm.crossover section integrates the plugins developed by Richard Taylor that split the stereo signal into four channels: two channels (left and right) above 3000Hz and two channels below 3000Hz. The configurations in pcm.amp2 and pcm.t-table then mix the four channels into two mono channels and pass them on to the hardware.
This chain will give you two mono signals, one each above and below 3000Hz. The system then distributes these to the tweeter and midrange drivers, respectively. The 3000Hz limit was purely an empirical selection – exact specifications of Sonos drivers are not available. You can also influence the overall sound of the speaker with the equalizer.
Setting Up the Equalizer
To adjust the sound, use the Alsamixer equalizer. To configure it, reconnect to the speaker over SSH and run the export TERM=xterm command to avoid the Error opening terminal: xterm-256color error message.
Next, start the mixer by typing
sudo alsamixer -D equal
and select the different frequency ranges with the left and right arrow keys (Figure 6). Use the up and down keys to adjust the signal, and press Esc to terminate the program.
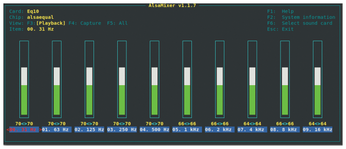
The correct setting is partly a matter of taste and partly depends on the location of the speaker. However, it is important to note that, often, less is more. The rather weak bass of the Ikea speaker cannot be resolved with the help of the equalizer. You can adjust the equalizer again after assembling and setting up the speaker. With the now closed resonance body, the sound from the speaker will be different.
Because the piCorePlayer runs entirely in the memory of the Rasp Pi, any changes you make during operation are lost as soon as you disconnect the speaker from the power supply or reboot the system. Therefore, you should explicitly save the changes made to asound.conf and to the equalizer settings in the web interface. To do this, press the Backup button on the Main Page tab of the web interface.
Front Buttons
To use the buttons on the front panel to control the player, you need an extension to the piCorePlayer, which is installed from the web interface. Log in as usual in a browser and go to the Main Page tab; then, click the Extensions entry. Access Available extensions – the system needs Internet access for this step.
From the extensions listed under Available extensions, find the entry pcp-sbpd.tc. Clicking Info gives you more details about the package. Select the entry and click Load to install and activate the extension.
Working over SSH, use Vi to create the /home/tc/sbpd-script.sh file with the content in Listing 2. In the final sbpd command, you need to adapt the values in the angle brackets for the IP address of the SlimServer after -A and the port after -P to match your setup (do not retain the angle brackets). Theoretically, you could omit this information and set it to automatic speaker search, but this did not work in my setup.
Listing 2
sbpd-script.sh
#!/bin/sh
# Launch the pigpiod daemon
sudo pigpiod -t 0
# Wait 1 second for the daemon to start
sleep 1
# Load the uinput module, then adjust permissions to run sbpd as an unprivileged user
sudo modprobe uinput
sudo chmod g+w /dev/uinput
# Run sbpd
sbpd -s -d -A <192.168.2.9> -P <9000> b,11,PLAY,2,0 b,10,VOL-,2,0 b,9,VOL+,2,0
After saving the file, make the script executable by typing:
chmod +x /home/tc/sbpd-script.sh
The script starts the GPIO monitoring system; the last line defines the GPIOs to be monitored. As originally defined, these are GPIOs 9, 10, and 11 (see Table 2). If you changed the cabling in the "Rewired" section, you will need to adjust the GPIOs accordingly here.
If you want to use further functions, call up the complete reference with sbpd-help. You can then, for example, handle long button presses. The LEDs remain without function in the current setup. However, if you like, you can program the system so that the status LEDs signal the network connection.
Now the script needs to run automatically at player start-up. To do this, enter the /home/tc/sbpd-script.sh command under the Tweaks tab in the web interface as User command #1. With a final Save and a Backup on the Main Page tab, the speaker is set up.
You can now play music from a SlimServer and check the function of the buttons. Above all, you will want test the driver connections. If the cables are mixed up, you will only hear very quiet music from the tweeters. Remember to treat the components with care while connected to the mains.
Buy this article as PDF
(incl. VAT)
Buy Linux Magazine
US / Canada
UK / Australia