Control WS2812 LEDs with a Raspberry Pi
Installing the C Library
The C [7] library uses BCM notation for the GPIOs, which means that the SPI pin is number 10 in the software (header pin 19). The library is freely available for download online. To install the library on the Raspberry Pi, enter:
$ cd ~
$ git clone https://github.com/jgarff/rpi_ws281x.git
$ cd rpi_ws281x
$ scons
$ ./test -g 10
The last command starts a test program that makes the LED matrix light up in different colors.
Java Wrapper
Various programming languages have wrappers for the C library, including Java [8]. A wrapper is a piece of software that provides functions of one programming language by means of an interface to another programming language.
To install the Java wrapper, use the commands:
$ cd ~
$ git clone https://github.com/rpi-ws281x/rpi-ws281x-java.git
$ cd rpi-ws281x-java/src/scripts
$ bash createNativeLib.sh
$ cd ~/rpi-ws281x-java/
$ ./gradlew assemble -x signArchives
To run the wrapper, you also need the Log4J library, which you can download and install with:
$ cd ~
$ wget http://apache.lauf-forum.at/logging/log4j/2.13.1/apache-log4j-2.13.1-bin.tar.gz
$ tar -xzvf apache-log4j-2.13.1-bin.tar.gz
Note that the library must be in the class path during execution.
After completing all the installation steps, test the WS2812 strip with an initial small program (Listing 1) that imports the library for controlling the LEDs; then, to communicate with the LEDs, it creates an object named matrix. Table 1 shows the meanings of the individual parameters. The object sets the first three pixels to red, green, and blue, and the matrix.render() command writes the data to the LEDs.
Table 1
Ws281xLedStrip() Parameters
| Parameter No. | Type | Meaning |
|---|---|---|
| 1 |
int |
Number of LEDs connected |
| 2 |
int |
GPIO connection used (10 for SPI, 18 for PWM) |
| 3 |
int |
Frequency for controlling the LEDs |
| 4 |
int |
Direct memory access to use (10 is typically a good choice) |
| 5 |
int |
Brightness, 0 to 255 (4 to 32 is recommended) |
| 6 |
int |
PWM channel |
| 7 |
boolean |
Signal inversion (if using an inverting level converter) |
| 8 |
LedStripType |
See Table 2 |
| 9 |
boolean |
true turns off the LEDs when the program ends |
Table 2
LedStripType
| LedStripType | Possible Types |
|---|---|
| LedStripType.SK6812_STRIP_<Type> |
RGBW, RBGW, GRBW, GBRW, BRGW, BGRW |
| LedStripType.WS2811_STRIP_<Type> |
RGB, RBG, GRB, GBR, BRG, BGR |
Listing 1
WS28Test.java
// WS28Test.java
import com.github.mbelling.ws281x.*;
public class WS28Test{
  public static void main(String[] args){
    Ws281xLedStrip matrix = new Ws281xLedStrip(64,10,800000,10,4,0,false,LedStripType.WS2811_STRIP_GRB,false);
    matrix.setPixel(0,255,0,0);
    matrix.setPixel(1,0,255,0);
    matrix.setPixel(2,0,0,255);
    matrix.render();
  }// main
}//class
To build the Java program, use the command:
$ javac -cp /home/pi/rpi-ws281x-java/build/libs/rpi-ws281x-java-2.0.0-SNAPSHOT.jar:. WS28Test.java
If you do not want to include the class path in the command, you can optionally work with the CLASSPATH variable. I chose the notation with the parameter -cp for better visibility of the individual libraries.
The command
$ java -cp /home/pi/rpi-ws281x-java/build/libs/rpi-ws281x-java-2.0.0-SNAPSHOT.jar:/home/pi/apache-log4j-2.13.1-bin/log4j-api-2.13.1.jar:/home/pi/apache-log4j-2.13.1-bin/log4j-core-2.13.1.jar:. WS28Test
starts the program. The -cp parameter also passes in all the required libraries.
Meander
The Matrix.java program (Listing 2) causes all the LEDs in the matrix to flash blue. You can change the output arbitrarily (e.g., to output a Pacman or a ticker).
Listing 2
Matrix.java
01 // Matrix.java
02 import com.github.mbelling.ws281x.*;
03 import java.lang.*;
04
05 public class Matrix {
06   static int buffer [][][] = new int[8][8][3];
07   private static void writeBufferToMatrix() {
08     Ws281xLedStrip matrix=new Ws281xLedStrip(64,10,800000,10,8,0,false,LedStripType.WS2811_STRIP_GRB ,false);
09     int i=0;
10     for (int x=0 ; x<8 ; x++) {
11       if ((((i)/8)%2)==0) {
12         for (int y=0 ; y<8 ;y++) {
13         matrix.setPixel(i,buffer[x][y][0],buffer[x][y][1],buffer[x][y][2]);
14         i++;
15         }
16       }
17       else {
18         for (int y=7 ; y>-1;y--) {
19           matrix.setPixel(i,buffer[x][y][0],buffer[x][y][1],buffer[x][y][2]);
20           i++;
21         }
22       }
23     }
24     matrix.render();
25   }// writeBufferToMatrix
26
27   static void fill(int r,int g,int b, int a) {
28     for (int x = 0 ; x<a ; x++) {
29       for(int y = 0 ; y<a ; y++) {
30         buffer[x][y][0]=r;
31         buffer[x][y][1]=g;
32         buffer[x][y][2]=b;
33       }
34     }
35   }//fill
36
37   public static void main(String[] args) {
38   for (int i=0; i<6000;i++){
39       fill(0,0,255,8);
40       writeBufferToMatrix();
41       try {Thread.sleep(1000);} catch (Exception e){}
42       fill(0,0,0,8);
43       writeBufferToMatrix();
44       try {Thread.sleep(1000);} catch (Exception e){}
45     }//for
46   }//main
47 }//class
The LEDs are arranged in a wave on the matrix (Figure 3), which makes it a bit difficult to program them at first. To make life a bit easier, I used the multidimensional array buffer to create the animations (line 6). Within the buffer, the individual LEDs can be controlled by reference to their x and y coordinates.
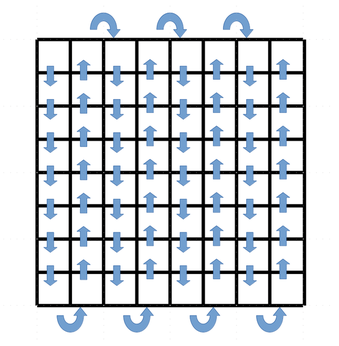
After making all changes in the buffer (Listing 2, lines 39 and 42), the program transfers the data to the LED matrix with the command writeBuffertoMatrix() (lines 7 to 25), so you do not have to care about the physical arrangement of the LEDs.
« Previous 1 2 3 Next »
Buy Linux Magazine
US / Canada
UK / Australia