A tool for distro hoppers
Updates and Persistence
If you repeat the installation routine, the Ventoy2Disk script will abort with the message that Ventoy is already installed on the USB stick. However, by using the switches -u and -I (i.e., say, sudo ./Ventoy2Disk.sh -u /dev/sd<X>), Ventoy gives you the option of updating Ventoy on the USB stick (-u, preserving the images) or completely reformatting the stick with Ventoy and deleting all data (-I).
Ventoy can also be extended to include additional functions thanks to a plugin system. For example, the program supports the installation of your own themes to change the look or the contents of the boot manager [5]. Since Ventoy itself is based on GRUB 2, there is a wide selection on the web [6]. Further plugins allow the integration of logos, titles instead of file names in the menus, and the ability to add descriptions. You can also automate the installation process for operating systems with your own scripts (Kickstart for RHEL or Fedora, Preseed for Debian or Ubuntu, AutoYaST for SUSE).
The Persistence plugin is also interesting; it lets users define a separate image file as nonvolatile memory [7]. This means that you can work with a distribution you booted started as a Live system as if it were permanently installed on the system. All data and settings are kept on restarting. The distributions tested for this operating mode include Ubuntu, Linux Mint, elementary OS, and Zorin. Persistence images are either created with the CreatePersistentImg.sh script, or you can download a prepared image from the project website.
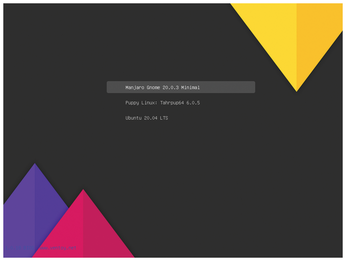
To configure the plugins, you first need to create a ventoy/ subfolder on the Ventoy stick's data partition or create a file there named ventoy.json. Then enter the desired settings in line with the specifications in the documentation. The example in Listing 3 activates the Tela theme [8], which I copied to ventoy/theme/tela/, defines aliases for the three Linux ISOs stored on the stick, and defines nonvolatile memory for the Ubuntu image (Figure 4). The root folder of the USB memory stick acts as the root for all paths. If a configuration does not work, the error can be analyzed using Ventoy's debug mode, which you enable by pressing F5.
Listing 3
Tela Theme
{
  "theme": {
    "file": "/ventoy/theme/tela/theme.txt",
    "gfxmode": "1920x1080"
  },
  "menu_alias": [
    {
      "image": "/images/ubuntu-20.04-desktop-amd64.iso",
      "alias": "Ubuntu 20.04 LTS"
    },
    {
      "image": "/images/tahr64-6.0.5.iso",
      "alias": "Puppy Linux: Tahrpup64 6.0.5"
    },
    {
      "image": "/images/manjaro-gnome-20.0.3-minimal-200606-linux56.iso",
      "alias": "Manjaro Gnome 20.0.3 Minimal"
    }
  ],
  "persistence": [
     {
       "image": "/images/ubuntu-20.04-desktop-amd64.iso",
       "backend": "/persistence/ubuntu-20.04-desktop-amd64.img"
     }
  ]
}
Conclusions
Ventoy proves to be an extremely practical tool for users who frequently try out new distributions. A USB memory stick, once equipped with a boot manager, removes the need to "burn" images in the future. To boot a new distribution, you simply move the ISO file there using your choice of file manager. This saves time, can also be done on Windows, and reduces the risk of accidentally overwriting a disk. This makes Ventoy ideal for sharing your favorite new distributions. For example, you could present a colorful bouquet of distributions to the participants at an installation party.
Infos
- Ventoy: https://www.ventoy.net
- Releases: https://github.com/ventoy/Ventoy/releases
- Tested distributions: https://www.ventoy.net/en/isolist.html
- Secure Boot: https://www.ventoy.net/en/doc_secure.html
- Ventoy theme plugin: https://www.ventoy.net/en/plugin_theme.html
- Themes for GRUB 2: https://www.gnome-look.org/browse/cat/109/order/latest/
- Ventoy Persistence plugin: https://www.ventoy.net/en/plugin_persistence.html
- Tela theme for GRUB 2: https://www.gnome-look.org/p/1307852/
« Previous 1 2
Buy this article as PDF
(incl. VAT)
Buy Linux Magazine
US / Canada
UK / Australia