Developing Tiny Core Linux extensions
Tiny Extensions

© Lead Image © Xavier Gallego Morell, 123RF.com
Tiny Core Linux does not boast a big repository. Sooner or later, you'll need to create your own extensions to get the most out of Tiny Core. This article shows you how.
Tiny Core Linux [1] offers an extremely lightweight Linux distribution whose default install gives you only the bare essentials. With no web browser, email client, or office suite, Tiny Core Linux gives you just enough to run a graphical session, making it ideal for older computers.
While Tiny Core offers some software in its repository, if you intend to run a specialized application, such as a medical image viewer like the one used at my job, you will need to create your own package.
In this article, I will show how to create your own packages, or extensions as they are called in Tiny Core Linux. Because the general methodology for packaging an application does not change much across distributions, this article also will give you a general overview of what it takes to create a software package.
Understanding Extensions
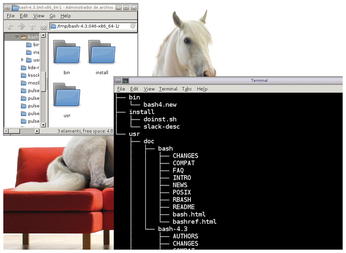
Packages from popular distributions are usually compressed archives that contain the software, some metadata information, and an install script. When you install a txz package using installpkg in Slackware, for example, the package manager decompresses txz, places its contents directly in the operating system root (/), and then runs any install script contained in the package (Figure 1).
Tiny Core Linux is not a regular distribution. Instead of residing on the hard disk, the operating system's core components are loaded into Random Access Memory (RAM) upon boot (Figure 2). The operating system root (/) exists in a virtual filesystem, which lives in RAM only. In order to install a traditional package in Tiny Core, you must decompress its contents and then load them completely into RAM, which wastes both time and RAM.
As an alternative to traditional packages, Tiny Core Linux uses extensions. Each extension is a Squashfs filesystem image instead of a compressed archive (see the box "What is Squashfs"). Tiny Core loads an extension by mounting this filesystem in a folder in /tmp/tclool. Then, it creates symbolic links from its contents to the designated places in the operating system's file hierarchy. In practice, this means that the distribution's core runs fully in RAM, while extensions are read directly from the CD-ROM or USB used to boot the operating system. As a result, extensions load quickly and do not take up much RAM.
Install scripts are also supported. These are useful for a number of reasons. For example, if an extension contains a system daemon, a script will be necessary to create a system user for this daemon. Install scripts run when the extension is loaded and perform this sort of task. Any script named after the extension and placed in /usr/local/tce.installed (within the package) will be executed at load time.
Setting the Environment
You first need to install Tiny Core Linux in order to create a proper Tiny Core extension. You can either download a CD-ROM image from the website [1] and burn it, or you can install on a USB stick (see Linux Magazine, issue 203, for instructions [2]).
After booting the Live system, you need to load the necessary development extensions. In order to get the essential components for compiling and packaging, install compiletc, squashfs-tools, and submitqc:
$ tce-load -wi compiletc squashfs-tools submitqc
This will download and install a compiler, mksquashfs, and a tool for ensuring that extensions are formatted properly. If you intend to compile software with additional dependencies, as is usually the case, you will need to use tce-load to download them as well.
Creating Your First Extension
If you are creating an extension for personal or internal use, you can use an existing package from another distribution or official binaries from the upstream developers (if available) and then shoehorn them into a Squashfs filesystem. This is quick but inefficient. For this article, I will repackage AdoptOpenJDK 12 as an example. The AdoptOpenJDK-12 extension in the official Tiny Core Linux repository was packaged using a similar method. Keep in mind that this software is only supported on AMD64, so you will need to use the x86 Pure 64 version of Tiny Core Linux [3] in order to replicate my instructions.
First, download the tarball you intend to package and place it in /tmp (in this example, the official AdoptOpenJDK release [4]).
Next, decompress the AdoptOpenJDK binary distribution. Create a folder to serve as the Squashfs filesystem root. Since I want to install the AdoptOpenJDK binaries under usr/local/lib, I will create this directory in the extension tree and decompress the official binaries there (as shown in Listing 1).
Listing 1
Decompressing AdoptOpenJDK
:$ cd /tmp
$ mkdir -p package-adoptopenjdk-12/usr/local/lib/adoptopenjdk-12
$ cd package-adoptopenjdk-12/usr/local/lib/adoptopenjdk-12
$ tar -xvzf /tmp/OpenJDK12U-jdk_x64_linux_hotspot_12.0.2_10.tar.gz --strip-components=1
You may add as many custom files as needed to your extension. For example, users need to have certain shell variables set in order to make use of an installed Java Development Kit (JDK). Most distributions place scripts in /etc/profile.d in order to set these variables for login shells, but Tiny Core's extensions are not supposed to access /etc/profile.d directly. Instead, create the folder usr/local/etc/profile.d within the extension file tree as follows:
$ cd /tmp
$ mkdir -p package-adoptopenjdk-12/usr/local/etc/profile.d
Then place the script shown in Listing 2 inside this folder.
Listing 2
adoptopenjdk.sh
01 #!/bin/sh
02
03 # Place this script in usr/local/etc/profile.d
04 # It will be copied to /etc/profile.d at load time.
05 # This script sets variables needed by the JDK
06 # for login shells.
07
08 export JAVA_HOME=/usr/local/lib/adoptopenjdk-12
09 export MANPATH="${MANPATH}:${JAVA_HOME}/man"
10 export PATH="${PATH}:${JAVA_HOME}/bin"
Scripts that must run at load time are placed in usr/local/tce.installed. Create this folder with:
$ mkdir -p package-adoptopenjdk-12/usr/local/tce.installed
Then place the script from Listing 3 in the newly created folder. The script tells the extension to generate a symbolic link from /usr/local/etc/profile.d/adoptopenjdk.sh to /etc/profile.d/adoptopenjdk.sh at load time.
Listing 3
adoptopenjdk-12
01 #!/bin/sh
02
03 # Place this script in usr/local/tce.installed
04 # A script placed in this folder gets executed
05 # at load time. It must be named after the
06 # extension.
07
08 # This script makes adoptopenjdk.sh available at
09 # /etc/profile.d and makes the dynamic linker
10 # available at /lib64. This is needed to run
11 # many prebuilt binaries in Tiny Core x86_64.
12
13 [ -L /etc/profile.d/adoptopenjdk.sh ] || [ -f /etc/profile.d/adoptopenjdk.sh ] || ln -s /usr/local/etc/profile.d/adoptopenjdk.sh /etc/profile.d/adoptopenjdk.sh
14 [ -d /lib64 ] || mkdir -m 755 /lib64
15 [ -L /lib64/ld-linux-x86-64.so.2  ] || [ -f /lib64/ld-linux-x86-64.so.2  ] || ln -s /lib/ld-linux-x86-64.so.2 /lib64/ld-linux-x86-64.so.2
Lines 14 and 15 in Listing 3 serve as a hack to make the dynamic linker available to the extension (see the "The Lost Dynamic Linker" box).
The Lost Dynamic Linker
Most Linux programs need shared libraries in order to work. Shared libraries contain code that is designed to be used by different applications. When you write a program that uses standard output, for example, you do not write the standard output code. Instead, you use a shared library that already contains that code rather than doing the work yourself.
According to the Filesystem Hierarchy Standard (FHS) [5], shared libraries should be located in /lib and /usr/lib. Operating system installs that support both 32- and 64-bit programs should put the 32-bit shared libraries in /lib and /usr/lib and the 64_bit libraries in /lib64 and /usr/lib64.
The dynamic linker is what allows a program to load shared libraries. In Tiny Core x86_64, the dynamic linker is a file called ld-linux-x86-64.so.2, which resides in /lib. In theory, installs that only support 64-bit programs don't need a /lib64 directory, so Tiny Core's approach is correct. However, many official binaries distributed as tarballs (such as AdoptOpenJDK) expect to find a dynamic linker under /lib64 and will fail to run if that directory does not exist.
This is the reason for lines 14 and 15 in Listing 3. This code creates /lib64 in Tiny Core Linux's directory structure if it does not exist already and places a symlink to the default dynamic linker there. With this hack, programs that expect a dynamic linker to exist under /lib64 will find it in that folder.
Next, you need to make the package tree's permissions consistent. System directories such as /usr/local should belong to root:root and have a permission mode of 755. Files that are intended to be executable should be set to 755, while files that are not executable should be set to 644. As an exception, usr/local/tce.installed must belong to root:staff and be set to 775. The scripts located in this folder must belong to tc:staff instead. Listing 4 shows how to make permissions consistent.
Listing 4
Making Permissions Consistent
$ sudo sh
# cd /tmp/package-adoptopenjdk-12
# chown -R root:root .
# chown tc:staff usr/local/tce.installed/adoptopenjdk-12
# chmod 755 usr/local/etc/profile.d/adoptopenjdk.sh
# chmod 755 usr/local/tce.installed/adoptopenjdk-12
# find -L . \
  \( -perm 777 -o -perm 775 -o -perm 750 -o -perm 711 -o -perm 555 \
    -o -perm 511 \) -exec chmod 755 {} \; -o \
  \( -perm 666 -o -perm 664 -o -perm 640 -o -perm 600 -o -perm 444 \
    -o -perm 440 -o -perm 400 \) -exec chmod 644 {} \;
# chown root:staff usr/local/tce.installed
# chmod 775 usr/local/tce.installed
Finally, make an extension out of the package tree. To create a Squashfs filesystem with the contents of /tmp/package-adoptopenjdk-12 and place it under /tmp, use the following command:
$ mksquashfs /tmp/package-adoptopenjdk-12/tmp/adoptopenjdk-12.tcz
Buy this article as PDF
(incl. VAT)
Buy Linux Magazine
US / Canada
UK / Australia