Batch processing image files with imgp
Pixels or Percentages
Instead of specifying the resolution in pixels, you also can specify a percentage of the original image. The command then changes to
imgp -x 30
which reduces all images to 30 percent of the original resolution. This time, the process took 1.31 seconds and reduced the size of the directory to 12.3MB.
Instead of a fixed resolution or percentage, you can also specify the desired width (800, in this case) as follows:
imgp -x 800x0
and imgp will keep the original image's aspect ratio. Note: On imgp's GitHub page, the aspect ratio information is shown as horizontal to vertical (abbreviated to h x v, which is different from the standard h x w for height to width).
If you are in a directory that contains images in both JPEG or PNG formats, the program will process them without you having to specify the directory explicitly. The reduced images will have a new extension (_IMGP.jpeg or _IMGP.png) and end up in the same directory as the source material.
If you use the -wx option instead of -x, imgp will delete the source files, and the converted images will keep the original file names without the additional _IMGP. If you use the -n or --enlarge option, only PNG files with resolutions smaller than the target resolution will be processed. The -f or --force option forces precisely the specified target resolution (Figure 3).
Quality Control
Unless you use the -i or --includeimgp option, imgp ignores previously converted files. You can suppress the output for each manipulated image in the terminal by specifying -m or --mute. You can further reduce image size with -o or --optimize, but it will result in loss of quality and a longer processing time.
For JPEG files, you use -q or --quality and assign a value from 1 to 95 to the parameter to specify the desired quality. Line 1 of Listing 2 defines a quality of 60 (75 is the default). You can also stipulate that you only want to process files above a certain size. Line 2 of Listing 2 only processes files that are larger than 50KB (51200 bytes).
Listing 2
Changing the Quality
01 imgp -q 60 -x 1024x768 <image>
02 imgp -x 1024x768 -s 51200
Another trick that imgp has up its sleeve is clockwise rotation. If an image has the wrong orientation, you can fix this by rotating it through 90 degrees with the command:
imgp -o 90 ~/image.jpg
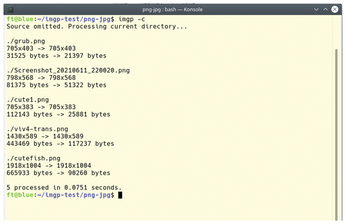
The tool can additionally convert from PNG to JPEG if you add the -c or --convert option (Figure 4).
The -e or --eraseexif option removes the metadata from the processed images (Figure 5). To see how much space could be saved by removing the metadata, we used the following command on a directory consisting of 8.4MB:
imgp -ex 1024x768
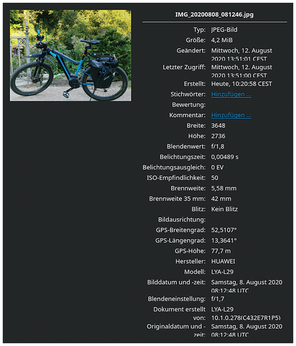
The result was a directory size of 6.4MB.
Last but not least, to solve problems, the -d or --debug switch lets you create a logfile.
Conclusions
There are many conversion tools similar to imgp (both with and without a GUI), including ImageMagick, GraphicsMagick, and Converseen. What sets imgp apart is the speed at which the tool does its work. Using imgp as a preliminary step, you can bulk process large collections with thousands of images in a very short time and then move on to focus on advanced editing.
Infos
- imgp: https://github.com/jarun/imgp
- Pillow: https://pillow.readthedocs.io/en/stable/
- SIMD: https://en.wikipedia.org/wiki/SIMD
- Pillow-SIMD: https://github.com/uploadcare/pillow-simd
- Binary packages: https://github.com/jarun/imgp/releases/tag/v2.8
- nnn: https://github.com/jarun/nnn
- googler: https://github.com/jarun/googler
« Previous 1 2
Buy this article as PDF
(incl. VAT)
Buy Linux Magazine
US / Canada
UK / Australia