Flexible HiFiBerry replaces old audio amplifier
Software
The system for your Raspberry Pi model is available on the HiFiBerry page [8]. Unpacking the archive on your hard drive gives you an image of about 1GB, which you write to an empty microSD card of at least 4GB. The Etcher [9] program, which the HiFiBerryOS developers also recommend, is an intuitive tool for this task. When done, insert the card into the Raspberry Pi and turn it on.
The first launch takes about three minutes, and the SBC reboots once. If it is connected to the local network, the system automatically retrieves an IP address from the DHCP server (e.g., from a router). Without a network cable, HiFiBerryOS sets up its own WiFi network, to which you connect your smartphone; its name will start with HiFiBerry_Setup_.
If you have a connected screen, keyboard, and mouse, you are taken directly to the user interface. Otherwise, call http://HiFiBerry.local in the browser. If the connection fails, determine the current IP address of the SBC. If in doubt, the user interface of the router should provide the details. You will find the Raspberry Pi listed there as hifiberry. Enter the IP address you determined in this way in the browser. To access the interface with this IP address in the future, you might want to configure your router to always assign the same IP address to the Raspberry Pi.
If you cannot access the user interface after about five minutes, disconnect the computer from the power and then reconnect it. A connected screen might give you clues as to the problem. If the restart attempt fails, make sure the HiFiBerryOS image was written to the medium without errors; the card could be faulty.
Setup
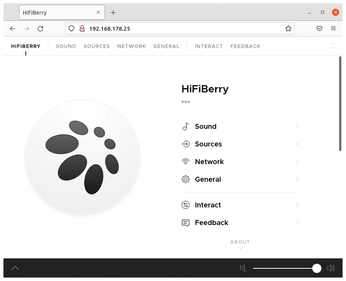
Once the HiFiBerryOS web page (Figure 5) welcomes you, click Next Step and then Finish Setup until you see the interface (Figure 6).

Unless you want to connect a network cable permanently, go to the Network menu item, select a WiFi network under the Wireless tab, and enter the access password. As soon as HiFiBerryOS establishes the connection, shut down the system in General | Power | Shut Down, wait 20 seconds, and then disconnect it from the power supply. You will not need the network cable from now on.
After a reboot, navigate to the very bottom of the interface. The system should show the board it detected; the Amp2 will be listed as something like DAC+/Amp2. However, a combination of the AAmp60 and DAC+ ADC might not be detected correctly; as a result, the audio input does not appear as an Analog Input under Sources.
In this case, shut down HiFiBerryOS again as before. Open the smallest partition on the SD card on your PC. Under Windows you can access the required files directly. In a text editor, add the following line at the end of the config.txt file:
dtoverlay=hifiberry-dacplusadc
Restart the Raspberry Pi from the SD card and make sure in the web interface that the HiFiBerry has identified the system correctly.
Bluetooth
Once the system is running, switch to Sources (i.e., audio sources). AirPlay is enabled by default, and smartphones with support for this and other media players should identify the computer as storage and be able to play back music through it.
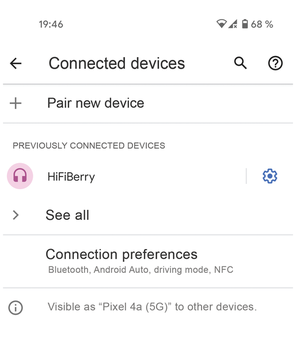
For Bluetooth access, select Bluetooth and then click the black Bluetooth Pairing button. After that, all devices in the vicinity with Bluetooth enabled will recognize the HiFiBerry as a speaker. Pair it with your smartphones, tablets, and other devices – the procedure will differ in each case (Figure 7) – then stop pairing on HiFiBerryOS.
Now you can use these devices to control the volume. To avoid getting on your neighbors' nerves, you might want to turn the volume down when playing back the first time. During playback, HiFiBerryOS displays the title at the bottom edge, and to the right, you will find the volume control.
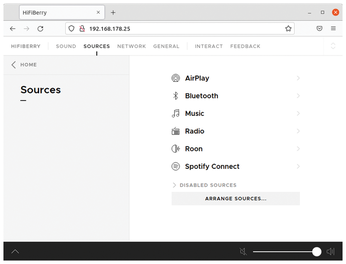
To play back music from the CD player, switch to Sources | Analog Input. This item may be hidden under Disabled Sources (Figure 8). Turn on the input, which will simultaneously turn off the other sources. If you later want the Bluetooth players to provide the sound, disable the audio input and enable the corresponding items under Sources | Bluetooth.
« Previous 1 2 3 Next »
Buy this article as PDF
(incl. VAT)
Buy Linux Magazine
US / Canada
UK / Australia