Sending push notifications with ntfy
NotificationNirvana

© Photo by Kajetan Sumila on Unsplash
If you host a lot of services on your home server, it helps to have them send you timely notifications. With ntfy, you can send push notifications to your phone or desktop.
A monitoring tool, a Docker image updater program, home-automation software, a task list manager, and backup software all share a common requirement: They need a way to send notifications to keep you informed when specific events occur. There are countless ways to send notifications, including emails, instant messages, and push notifications.
In this article, I'll explore ntfy [1] (pronounced "notify"), an open source project that receives alerts via HTTP through a REST API and converts them into push notifications for a smartphone app or a web browser on your desktop. Thanks to this API and its command-line interface, you can even enable your own shell scripts to send push notifications.
Ntfy uses an HTTP publish/subscribe pattern. A sender publishes notifications on a specific topic, defined by the URL segment following the domain, by sending data to a URL via an HTTP POST or PUT request. A receiver subscribes to this topic, which means that ntfy sends the data to the receiver each time a sender publishes a notification on the topic.
By installing ntfy on your own server, you gain complete control over your notifications, without a centralized service such as Google Firebase Cloud Messaging, which is typically used for such applications. You can also try ntfy for free on its public instance. If you don't want to bother with installing and maintaining ntfy yourself, you can opt for a paid plan offered by the project's developer.
Preparing the Server
First you need to determine the intended purpose for your ntfy instance. Your mobile app needs to be able to connect to your server to request messages. If you only want to receive notifications on your phone at home while connected to your local network, just installing ntfy on a home server without exposing any ports to the Internet will suffice.
However, in many circumstances, you may also want to receive notifications when you're away from home. There are several solutions to make this possible. You can just use the setup for local usage and make sure that your phone always connects to your local network via a VPN when you're not at home. Alternatively, you can expose ntfy's port to the Internet using port forwarding, so it's always accessible while on the move. Note that this would require a domain and a TLS certificate.
Perhaps the easiest solution to receive notifications when you're away from home is to install ntfy on a virtual private server (VPS), along with a reverse proxy for HTTPS access and a TLS certificate from Let's Encrypt. I'll show you how to do this with Caddy [2] and ntfy within Docker containers on a Debian 12 ("bookworm") server, presuming you already have Docker and Docker Compose installed. The server can be the cheapest option from your VPS provider, because ntfy doesn't put a heavy load on it. You also need a DNS A record pointing to your server's IP address. In this article, I'll use ntfy.example.com for this domain.
Initial Configuration
Begin by creating directories for ntfy:
$ mkdir -p containers/ntfy/{cache,etc,lib}Then create a basic configuration file in containers/ntfy/etc/server.yml (Listing 1), which locks down the server so that by default no one has access to any topics.
Listing 1
server.yml
01 base-url: "https://ntfy.example.com"
02 behind-proxy: true
03 cache-file: "/var/cache/ntfy/cache.db"
04 attachment-cache-dir: "/var/cache/ntfy/attachments"
05 auth-file: "/var/lib/ntfy/user.db"
06 auth-default-access: "deny-all"
Next, create directories for Caddy:
$ mkdir -p containers/caddy/{data,etc}Configure Caddy as a reverse proxy. Its configuration file in containers/caddy/etc/Caddyfile can be straightforward as shown in Listing 2, because it automatically requests a TLS certificate from Let's Encrypt. This also redirects HTTP requests to HTTPS.
Listing 2
Caddyfile
01 ntfy.example.com, http://ntfy.example.com {
02   reverse_proxy ntfy
03   @httpget {
04     protocol http
05     method GET
06     path_regexp ^/([-_a-z0-9]{0,64}$|docs/|static/)
07   }
08   redir @httpget https://{host}{uri}
09 }
Setting Up the Containers
With the initial configuration ready, proceed to set up both containers using the docker-compose.yaml file in Listing 3.
Listing 3
docker-compose.yaml
01 services:
02   ntfy:
03     restart: always
04     container_name: ntfy
05     image: binwiederhier/ntfy
06     command: serve
07     environment:
08       - TZ=Europe/Brussels
09     volumes:
10       - /home/koan/containers/ntfy/cache:/var/cache/ntfy
11       - /home/koan/containers/ntfy/etc:/etc/ntfy
12       - /home/koan/containers/ntfy/lib:/var/lib/ntfy
13     expose:
14       - "80"
15   caddy:
16      image: caddy:alpine
17      restart: always
18      container_name: caddy
19      volumes:
20        - /home/koan/containers/caddy/etc:/etc/caddy
21        - /home/koan/containers/caddy/data:/data
22      ports:
23        - 80:80
24        - 443:443
Next, start up both containers with
$ docker-compose up -d
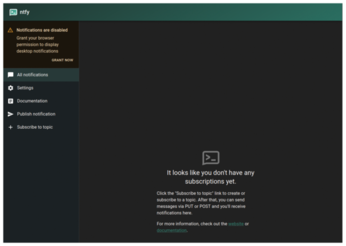
If everything is configured properly, you should be able to access ntfy's web interface on the domain you've specified, such as https://ntfy.example.com. A message will inform you that Notifications are disabled. Click on Grant now to enable notifications in your web browser (Figure 1) and confirm this in the dialog your web browser presents.
Buy this article as PDF
(incl. VAT)
Buy Linux Magazine
US / Canada
UK / Australia