An AI coding and terminal agent
A Modern Interface
When I first launched Warp, I was blown away with its user interface (UI). The UI felt more like a code editor than a terminal. What really surprised me was that it packs in features you'd normally find spread across multiple terminal emulators:
- Split panes
- Multiple tab options
- Agent mode
- Searchable history
- Easy navigation with the keyboard
Installing Warp
Installing Warp is straightforward. Simply go to the Warp website and download the file for your system. Because I'm working on Ubuntu 24.04 OS, which is a Debian-based Linux, I downloaded the .deb version. Then, using the dpkg command, I installed the package:
$ sudo dpkg -i warp-terminal_0.2025.05.14.08.11.stable.03_amd64.deb
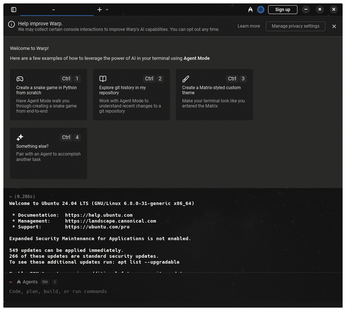
Once installed, you can start Warp from the application menu. You must sign in to use the Warp AI feature and to get the screen shown in Figure 3. What makes Warp different is that it runs as its own app, instead of as a shell plugin or a wrapper.
Building with Warp AI
Warp really blew me away when it came to building a whole project using nothing but prompts. For my project, I decided to create a portfolio website using the Jekyll static site generator – all without writing a line of code upfront. To build my portfolio website, I wanted to use the following:
- The Jekyll framework
- Standard layout and navigation
- Specific pages: Home, Services, Portfolio, About, Contact
To get started, I wrote the well-designed prompt shown in Figure 4 to tell Warp what I wanted to do. You can adapt this prompt to meet your needs, or you can pass your requirements to any AI tool and ask it to generate a relevant prompt for you.
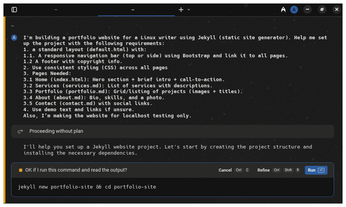
You don't need a plan to build your project with Warp. As the project proceeds, Warp will ask you to allow installing packages, making files and folders, and other things. You need to simply allow most of the commands. In a very rare case, you may need to intervene. Figure 5 shows Warp's first response to my prompt.
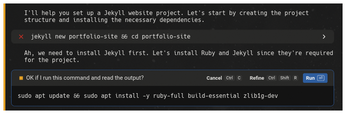
During the process, Warp will attempt to install some packages. You just need to hit the Run button. If Warp sees any command execution problem, it'll automatically point out the error and offer a probable solution in the next step.
If Warp encounters a package error, it installs the package. In the same way, it resolves any dependency issues that arise while creating the project. After installing the required packages for my website project, Warp installs Jekyll and Bundler gems (Figure 6).

After installing the packages, resolving errors, and fixing dependencies, Warp starts creating project files (Figure 7) for the pages I specified: services.md, portfolio.md, about.md, and contact.md.

In a nutshell, Warp understood everything. It installed the necessary packages, handled permissions, and created the project structure, page files, CSS, and more. It even started the Jekyll server. Whenever a problem popped up, such as missing gems or permission errors, Warp handled it.
Figure 8 shows the final website generated by Warp AI. You also can access the address, 0.0.0.0:4000, in your web browser. I built this entire website from a single prompt with absolutely no coding knowledge. Warp understands and suggests a ready-to-use command. Even better, it explains what the command does. I no longer need to visit Stack Overflow for quick tasks.

« Previous 1 2 3 Next »
Buy this article as PDF
(incl. VAT)
Buy Linux Magazine
US / Canada
UK / Australia