Integrated security with Wazuh
Suricata
You can also integrate Wazuh with the Suricata IDS system [4]. Suricata can provide additional insights into your network's security with its network traffic inspection capabilities.
Install Suricata on the endpoint:
sudo add-apt-repository ppa:oisf/suricata-stable
sudo apt-get update
sudo apt-get install suricata -y
sudo systemctl enable suricata.service
Modify Suricata settings in the /etc/suricata/suricata.yaml file and set the variables in Listing 4.
Listing 4
Suricata Variables
sudo nano /etc/suricata/suricata.yaml
HOME_NET: "<Host_IP>"
EXTERNAL_NET: "any"
default-rule-path: /etc/suricata/rules
rule-files:
- "*.rules"
# Global stats configuration
stats:
enabled: yes
# Linux high speed capture support
af-packet:
  - interface: enp0s3
Restart the Suricata service:
sudo systemctl restart suricata
Then add the following configuration to the /var/ossec/etc/ossec.conf file of the Wazuh agent:
<ossec_config>
<localfile>
  <log_format>json</log_format>
  <location>/var/log/suricata/eve.json</location> </localfile>
</ossec_config>
Restart the Wazuh agent on the endpoint:
sudo systemctl restart wazuh-agent
Incident Response
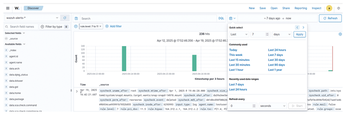
The most important use of Wazuh is incident response. It is therefore important to know how to check and search for logs collected by agents. When you expand the list on the left side of the console, the Explore tab will appear. Select Discover to search for all collected alerts. The good thing is that you can search all these alerts using filters. For example, you can search only for high and critical severity alerts or alerts within a given time range (Figure 3).
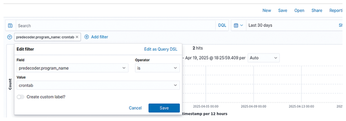
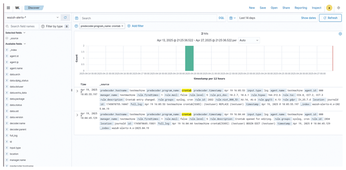
You can also search for events related to a specific program. For a simple example, what if you need to find out if a crontab was run and edited somewhere? Click Add filter and fill in the values (Figures 4 and 5).
Automation
Process automation is very useful and important in cybersecurity. Automatically blocking a user account, blocking an IP address, or restarting a machine is helpful in the daily work of an analyst.
To configure an active response, first check for the configuration file on the Wazuh server /var/ossec/etc/ossec.conf. This file should be added by default, but add one if it doesn't exist already.
The following code configures Wazuh to disable a user account:
<command>
    <name>disable-account</name>
    <executable>disable-account</executable>
    <timeout_allowed>yes</timeout_allowed>
  </command>
Then add or modify the <active-response> rule in the configuration file:
<active-response>
  <disabled>no</disabled>
  <command>disable-account</command>
  <location>local</location>
  <level>7</level>
  <timeout>600</timeout>
</active-response>
Use the <agent_id> tag to specify the ID of the Wazuh agent that must run the script regardless of where the event occurred. For example:
<location>defined-agent</location>
    <agent_id>001</agent_id>
Restart the Wazuh manager to apply all the changes:
sudo systemctl restart wazuh-manager
Conclusion
As you can see, a simple Wazuh server and agent configuration can help control the infrastructure. Of course, the sample configuration in this article is not a complete recipe for complete protection; in a real-world setting, you will need to implement queries and automate them. It is important to remember playbooks that will tell analysts how to react to a given alert and threat. Wazuh is certainly worthy of your consideration as you implement a security strategy for your network.
Infos
- Wazuh: https://github.com/wazuh
- TheHive: https://github.com/TheHive-Project/TheHive
- ClamAV: https://www.clamav.net/
- Suricata: https://suricata.io/
« Previous 1 2 3
Buy this article as PDF
(incl. VAT)
Buy Linux Magazine
US / Canada
UK / Australia