Build Smarter Command-Line Tools with the argparse Python Module
Argumentative

© Photo by Sarah Kilian on Unsplash
Parse arguments at the command line with this powerful Python module.
In Python, argparse serves as the standard solution for parsing command-line arguments, offering a structured and declarative approach to building command-line interfaces. Introduced in Python 2.7 and maintained in the standard library, argparse replaces the need for manual parsing via sys.argv, providing a more robust and scalable alternative. At the heart of the module is the ArgumentParser class, which allows developers to define expected inputs, assign types, set default values, and generate automatic help messages, all with minimal overhead.
Unlike ad-hoc parsing methods, argparse handles both positional and optional arguments gracefully, supports mutually exclusive groups, and enables the creation of subcommands for more complex CLI applications. The built-in validation mechanisms provided with argparse ensure that user input is correctly typed and constrained, while error handling and usage formatting make it easier to build user-friendly tools. For advanced use cases, developers can extend argparse through custom actions or dynamic defaults, making it suitable for everything from simple scripts to full-featured command-line utilities.
This article explores the architecture and capabilities of argparse, starting with basic usage and progressing toward more advanced patterns. By the end, you'll be ready to design clean, maintainable CLI interfaces that integrate seamlessly into your Python projects.
Python Development Environment
Before diving into argparse, readers should have a solid grasp of basic Python programming concepts. Familiarity with functions, data types (such as strings, integers, and lists), and control flow structures like if statements are essential for understanding how arguments are parsed and used within a script.
A working knowledge of how Python scripts are executed from the command line is also important. Since argparse is designed to handle command-line inputs, readers should be comfortable running .py files via a terminal or command prompt, passing arguments using flags (e.g., --verbose) or positional values (e.g., filename.txt).
No external libraries are required to use argparse, as it is part of Python's standard library. However, the examples in this article assume Python 3.6 or later to ensure compatibility with f-strings and other modern syntax features. You can verify the Python version on your computer with the following command:
python3 --version
Lastly, although not strictly necessary, some exposure to real-world command-line tools (such as git, curl, or FFmpeg) is also helpful.
To get started, you'll need to ensure that Python is installed on your computer. You can use any suitable code editor; for the examples in this article, I used Visual Studio Code (see the box entitled "Setting up Python and Visual Studio Code.")
Setting Up Python and Visual Studio Code
To begin working with Python and argparse, you'll first need to install Python itself. Head over to the official website [1] and download the latest stable release for your operating system, whether you're using Windows, macOS, or Linux. When running the installer, it is important to check the box labeled Add Python to PATH before proceeding with the installation. This ensures that you will able to access Python from the command line. Once the installation is complete, you can verify that Python is present by opening a terminal and typing python3 -version. On Ubuntu Linux, you can install Python by typing:
sudo apt update && sudo apt upgrade
sudo apt install python3
Next, you'll want to install Visual Studio Code (or any editor you prefer). Visual Studio Code is a lightweight yet powerful code editor that's widely used for Python development. Visit the Visual Studio Code download page [2] and download the appropriate installer for your platform. During setup, you might be prompted to enable options like Add to PATH or Open with Code; these options are useful and they are worth enabling for convenience. After installation, launch Visual Studio Code to begin configuring your environment.
Once inside Visual Studio Code, you'll need to install the Python extension to enable syntax highlighting, code completion, and integrated execution. Open the Extensions view by clicking the square icon on the sidebar or pressing Ctrl+Shift+X (Figure 1), then search for Python, and install the extension published by Microsoft. If Visual Studio Code doesn't automatically detect your Python interpreter, you can manually select it by opening the Command Palette (Ctrl+Shift+P), typing Python: Select Interpreter, and choosing the correct version from the list.
Getting Started
When you're ready to start writing Python scripts, create a new file with a .py extension, and you can begin experimenting with argparse or any other module. If you're planning to work on larger projects, you might also consider setting up a virtual environment or installing additional packages using pip, but that can come later once you're comfortable with the basics.
Building a Simple CLI
Listing 1 is a minimal example to give you a feel for how argparse works.
Listing 1
greet.py
import argparse
# Step 1: Create the parser
parser = argparse.ArgumentParser(description="Greet the user by name")
# Step 2: Add arguments
parser.add_argument("name", help="Your name")
# Step 3: Parse the arguments
args = parser.parse_args()
# Step 4: Use the arguments
print(f"Hello, {args.name}!")
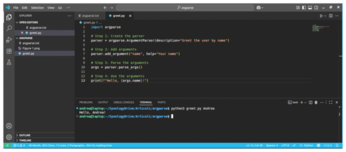
Save the script in Listing 1 as greet.py, and then run it from your terminal:
python greet.py Andrea
You will get the output "Hello, Andrea!" (Figure 2). When you run the script, several things happen behind the scenes. First, the ArgumentParser() object is created, which sets up the command-line interface and defines how it should behave. Then, the add_argument("name") method tells argparse to expect a positional argument called "name": This argument is the value the user will provide when running the script. The parse_args() function reads the command-line input and returns an object containing the parsed arguments. Finally, the script accesses that value using args.name and prints a personalized greeting to the terminal.
This simple flow is the foundation of every argparse-powered CLI. As you build more complex tools, this pattern stays consistent, even as the arguments and logic grow more sophisticated.
In argparse, optional arguments, often referred to as flags, are prefixed with dashes (- or --) and provide additional control over program behavior. Unlike positional arguments, flags are not required by default and can be specified in any order. These flags allow you to modify the behavior of your CLI without changing its core functionality. To illustrate this concept, I'll enhance the greeting script by adding an -excited flag. This flag will allow users to choose whether the greeting ends with a burst of enthusiasm. You define it using add_argument, passing both the short and long forms of the flag. The action="store_true" parameter tells argparse to store the Boolean value True when the flag is present, and False when it is absent. This is a common pattern for binary switches: no need to manually parse or validate the input. Listing 2 shows the updated snippet.
Listing 2
greet.py with Enthusiasm
import argparse
# Step 1: Create the parser
parser = argparse.ArgumentParser(description="Greet the user by name")
# Step 2: Add arguments
parser.add_argument("name", help="Your name")
parser.add_argument(
    "-e", "--excited",
    action="store_true",
    help="If set, adds excitement to the greeting"
)
# Step 3: Parse the arguments
args = parser.parse_args()
# Step 4: Use the arguments
if(args.excited):
    print(f"Hello, {args.name}!!! I am so excited!")
else:
    print(f"Hello, {args.name}!")
When the user runs the script with --excited, the parser sets args.excited to True. If the flag is omitted, the value defaults to False. This behavior is internally managed by the store_true action, which simplifies the logic for enabling or disabling features.
For example, the following command:
python3 greet.py Andrea --excited
will produce a greeting like:
Hello, Andrea!!! I am so excited!
whereas omitting the flag will result in a more subdued:
Hello, Andrea!
Argparse maps each argument to a destination variable. By default, this is derived from the long-form name unless explicitly set using the dest parameter. The action parameter determines how the argument is processed. In this case, store_true is one of several built-in actions, alongside others like store, store_const, append, and count, each suited to different use cases.
You can also customize behavior further by specifying a default value using the default parameter. For instance, adding an optional --punctuation argument with a default of . allows users to tweak the ending character of the greeting without requiring them to supply it every time.
This modularity is what makes argparse so powerful: It lets you build flexible, user-friendly interfaces while keeping your code clean and declarative.
Buy this article as PDF
(incl. VAT)