Locally Encrypt Files for Cloud Storage
Working with an Encrypted Folder
Before you can access the vault and place files inside it, you'll have to unlock it using your password. Once unlocked, Cryptomator mounts your vault as a virtual drive (Figure 3).
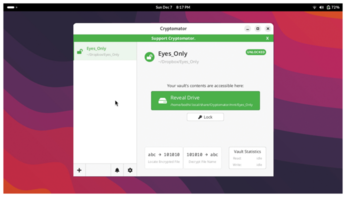
This virtual drive can appear as a WebDAV or Filesystem in Userspace (FUSE) volume, depending on your system configuration. Generally speaking, the vaults will be mounted as FUSE volumes on all Linux distros. You can change this in Cryptomator's Preferences, which I'll discuss later.
In the interface, click the Reveal Drive button to open the decrypted, mounted vault in your file manager. Anything you copy here is encrypted automatically when written back to disk.
Underneath the Reveal Drive button, you'll find the actual path of the mounted volume (e.g., ~/.local/share/Cryptomator/mnt/Eyes_Only).
As you can see, this is different from the original location where you created the encrypted vault that was inside your cloud sync folder (e.g., ~/Dropbox/Eyes_Only). While you can peek inside the cloud sync folder, remember to never alter or paste any files within this directory. Instead always interact via the mounted folder.
This unlocked virtual drive behaves just like any other storage device. You can drag and drop, edit, and delete files inside this drive. Every time you store something on this virtual drive, Cryptomator encrypts the data automatically.
When you're done, hit the Lock button to close the vault and unmount the virtual drive to ensure that none of its contents remain accessible in decrypted form.
As an added bonus, the encryption process doesn't just encrypt the file contents, but also the file names and the entire file structure. If you were to look directly at the folder in your cloud drive's web interface, you would see nothing but indecipherable files with no discernible file names or file types.
To access the contents later, simply head back to Cryptomator and unlock the vault again.
Vault Preferences
For convenience, you can configure Cryptomator to lock all open vaults automatically on exit by tweaking the app's preferences. Click the small gear icon at the bottom to open the multitabbed Settings panel.
From under the General tab, you can toggle the option to automatically lock all open vaults when you quit Cryptomator. While Cryptomator reminds you that there are open vaults when you exit the app, it's a good idea to have the vaults lock up automatically when you close the app.
Head to the Virtual Drive tab to change the default volume type. As I mentioned earlier, the drives will most likely be mounted as FUSE volumes by default on Linux. But if you know what you're doing, you can use the pull-down menu in this tab to switch to another volume type.
Besides these global preferences, you can also define per-vault preferences. Right-click on the vault (when it's locked), and click on Show Vault Options. This too is a multitabbed window, with the most useful options under the General tab (Figure 4). One interesting option here is the ability to autolock a vault after it's been idle for a certain length of time. Just toggle the option and specify the idle time in minutes.
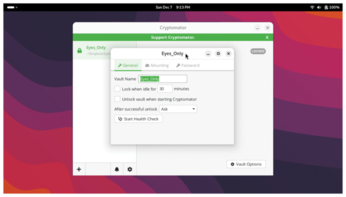
Also useful is the ability to automatically unlock and mount the vault every time you launch Cryptomator. These two options provide both security and convenience, especially when handling multiple volumes.
Besides these two options you can also change the name of the vault from here. To change the vault's password or reset it with the help of the recovery key, switch to the Password tab.
Share an Encrypted Vault
In case you need to share your encrypted vault, you do it just as you would share any other folder inside your cloud storage service. This means the sharing happens outside of Cryptomator, and the exact steps depend on your cloud sharing service. Of course, in addition to the encrypted folder, you'll also need to share the password for the vault.
Once shared, the vault will appear inside the cloud sharing service's folder for the person you've shared it with. If it doesn't show up, the issue lies with the cloud storage service and not with Cryptomator.
Once the shared folder appears in the recipient's filesystem, he or she will need to use Cryptomator to decrypt it. After installing and launching Cryptomator (which also works on Windows, macOS, Android, and iOS), the recipient will need to click the + icon and select the Open Existing Vault… option.
Then, the recipient will need to navigate to the shared vault inside the cloud sharing service's synced folder and select any file with the .cryptomator extension, such as masterkey.cryptomator or vault.cryptomator.
Cryptomator will then mount the shared vault. To view and interact with its contents, the recipient will need to unlock the vault using the vault's password, the same as you. Once mounted, the recipient can read and modify the contents of the vault, depending on the permissions you've defined while sharing the vault.
« Previous 1 2 3 Next »
Buy this article as PDF
(incl. VAT)