An Amiga emulator for the Raspberry Pi 400
Complete System
The Amiga Workbench is not just a pretty game starter. Various applications and tools are installed that you can try out. AmigaAMP, for example, is an MP3 player that works like the classic WinAMP or its Linux clone XMMS.
The version of Workbench used by PiMiga is more modern than the official Workbench shipped by Commodore, and it takes advantage of the greater power of current systems. (If you want to take a look at older Workbench versions, you will find a live simulator online [12].)
Folders with icons on the desktop can be opened by double-clicking. By the way, Amiga computers use a different nomenclature than the rest of the world. The desktop is known as the Workbench on the Amiga, and disks have hierarchical filesystems, folders are known as drawers, and subfolders are subdrawers.
The default file manager for PiMiga is Directory Opus. The program offers a two-column view and supports various file operations on the selected file(s) from buttons at the bottom. In this way, you can copy, move, or delete files quite comfortably. The operating principle is somewhat reminiscent of Norton Commander (MS-DOS) or its clone Midnight Commander (Linux).
By default, Directory Opus creates a second workbench on which it then runs in full-screen mode. You can change this if necessary by right-clicking on the menubar and selecting Configure | Screen | Screen mode | Display mode… Workbench: Use. You can switch between the two screens at any time with Ctrl+Alt+Shift.
The way program windows are handled is similar to other graphical user interfaces: You can move windows from the upper window border and change window size by grabbing the handle in the lower right corner. Clicking once on a window shifts it into focus, but you need two clicks (again on the titlebar) to bring it to the front. One of the icons on the right edge of the titlebar alternately moves the window all the way to the front or all the way to the back; to close a window, single-click in the upper left corner.
Internet
If the Raspberry Pi is connected to the network over Ethernet, the Amiga programs will have access to the Internet. Whether or not this is useful depends on which services you want to use. For example, the standard AWeb browser in the version installed on PiMiga is not SSL-capable and therefore does not work with sites that no longer provide an unencrypted version.
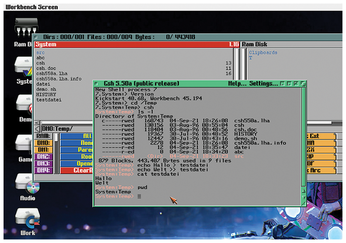
The browser can nevertheless be useful for some tasks. For example, you can access Aminet [13], which offers a comprehensive software collection. As a test, I downloaded an Amiga version of the C shell as an LHA archive, unpacked it in Directory Opus, and finally launched it from the terminal program (Figure 7).
Login and SSH
The Raspberry Pi does not start a classic Linux desktop. The Workbench interface is a fixed part of the emulation and cannot run Linux applications. However, you can get this to work with a trick that lets you install a VNC server on the Raspberry Pi.
First you need a Linux shell. If you are running another computer on the network with a secure shell (SSH) client, log in to the Raspberry Pi with
ssh pi@pimiga400
and the login password pimiga.
If name resolution is not working, you need to find the IP address of the Raspberry Pi. The fastest way to do this is to press F12 to open the Amiberry menu and click Quit at the bottom. You will then end up in text mode, where you are logged in as the pi user. Enter the command:
$ hostname -I
192.168.178.118 192.168.178.117 2001:16b8:a43:ff00:ed90:df20:397b:bfda 2001:16b8:a43:ff00:bf02:667c:59db:93c6
The first address shown in the output that follows the command is the IPv4 address assigned to the network card. Another IPv4 address (for WLAN) and the associated IPv6 addresses might follow.
If you have already quit the Amiga emulator, execute the steps directly in the shell on the Raspberry Pi; you can do without the remote login from another computer in this case.
To begin, install the required packages:
sudo apt update
sudo apt install tightvncserver xfce4 xfce4-terminal
Most important is the TightVNC server [14], and you need some kind of window manager; the Xfce lightweight desktop works well in this case.
Alternatively, a simpler window manager (without a desktop environment) will do the job. The obvious candidate is AmiWM [15], which mimics the Workbench; unfortunately, it is not available as a ready-to-use package for Raspberry Pi OS, and I was not immediately able to compile it from the source code. Working as the pi user, the commands
vncserver
vncpasswd
let you assign a VNC password and start the server. If you had to quit the Amiga emulator for these steps, you can restart the emulator now:
cd; sudo ./amiberry.sh
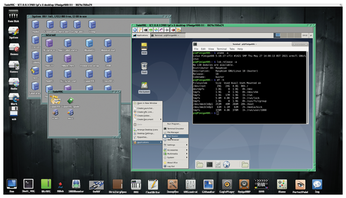
On the Amiga workbench, open the System, Internet and TwinVNC drawers in turn; then, double-click to launch the TwinVNC program and enter the address localhost:5901 for Server and the password you just set for Password. Now click Connect (or press Enter): TwinVNC opens the connection to the locally running VNC server.
Initially, the Xfce desktop prompts you to set up the panel (Welcome to the first start of the panel). Next, click Use default config. After that, you can work with the desktop (Figure 8), much like any other Linux installation, but with a few limitations. Scrolling with the mouse does not work in all programs, and the middle mouse button is not supported; therefore, you have to resort to keyboard shortcuts like Ctrl+C and Ctrl+V for copy and paste actions or Ctrl+Shift+C and Ctrl+Shift+V in the terminal window. Alternatively, you can use menu items (e.g., Edit | Copy). Copy and paste between Linux and Amiga programs did not work in our lab.
On the running Linux desktop, you can also start a state-of-the-art browser like Firefox, although you need to install it first:
sudo apt install firefox-esr
By the way, to grab a screenshot of the Workbench, install the Linux raspi2png [16] tool. Every time you run the program, it then stores a screenshot in the current folder as snapshot.png. This command also works on another computer if you are logged in over SSH.
« Previous 1 2 3 Next »
Buy this article as PDF
(incl. VAT)
Buy Linux Magazine
US / Canada
UK / Australia
Subscribe to our Linux Newsletters
Find Linux and Open Source Jobs
Subscribe to our ADMIN Newsletters
Support Our Work
Linux Magazine content is made possible with support from readers like you. Please consider contributing when you’ve found an article to be beneficial.

News
-
Canonical Releases Ubuntu 24.04
After a brief pause because of the XZ vulnerability, Ubuntu 24.04 is now available for install.
-
Linux Servers Targeted by Akira Ransomware
A group of bad actors who have already extorted $42 million have their sights set on the Linux platform.
-
TUXEDO Computers Unveils Linux Laptop Featuring AMD Ryzen CPU
This latest release is the first laptop to include the new CPU from Ryzen and Linux preinstalled.
-
XZ Gets the All-Clear
The back door xz vulnerability has been officially reverted for Fedora 40 and versions 38 and 39 were never affected.
-
Canonical Collaborates with Qualcomm on New Venture
This new joint effort is geared toward bringing Ubuntu and Ubuntu Core to Qualcomm-powered devices.
-
Kodi 21.0 Open-Source Entertainment Hub Released
After a year of development, the award-winning Kodi cross-platform, media center software is now available with many new additions and improvements.
-
Linux Usage Increases in Two Key Areas
If market share is your thing, you'll be happy to know that Linux is on the rise in two areas that, if they keep climbing, could have serious meaning for Linux's future.
-
Vulnerability Discovered in xz Libraries
An urgent alert for Fedora 40 has been posted and users should pay attention.
-
Canonical Bumps LTS Support to 12 years
If you're worried that your Ubuntu LTS release won't be supported long enough to last, Canonical has a surprise for you in the form of 12 years of security coverage.
-
Fedora 40 Beta Released Soon
With the official release of Fedora 40 coming in April, it's almost time to download the beta and see what's new.