Artificial intelligence on the Raspberry Pi
OpenCV
The Open Computer Vision Library (OpenCV) [6] has another set of libraries that you can use on your Raspberry Pi. OpenCV is used for gesture, face, and object recognition and classification. The OpenCV deep neural network (DNN) module works with pre-trained networks for this purpose and can be used in combination with TensorFlow Lite. To install OpenCV on the Raspberry Pi, though, you need to resolve a large number of dependencies, and you need to specify manually a large number of flags during the build. This difficulty prompted Dutch AI specialists at Q-engineering [7] to publish a freely available and BSD-licensed script on GitHub that lets you work around these steps. To install and run this OpenCV script, enter:
$ wget https://github.com/Qengineering/Install-OpenCV-Raspberry-Pi-64-bits/raw/main/OpenCV-4-5-5.sh
$ sudo chmod 755 ./OpenCV-4-5-5.sh
$ ./OpenCV-4-5-5.sh
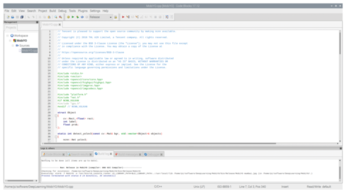
As a final step, you need to integrate the graphical Code::Blocks integrated development environment (IDE) [8] into your system (Figure 2). With its help, you can then use TensorFlow Lite and OpenCV to recognize and classify objects by drawing on various sample networks. These capabilities apply not only to photos, but also to livestreams from the connected camera. Code::Blocks supports the C and C++ programming languages and is therefore ideally suited for AI applications. The command
sudo apt-get install codeblocks
installs the package and automatically creates a starter on the desktop and in the Raspberry Pi OS menu system.
Examples
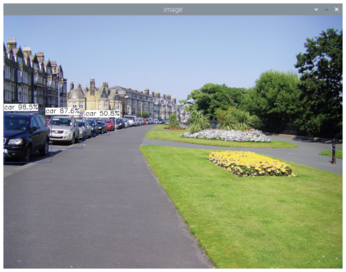
After completing the installation, you can test some sample scenarios by drawing on a number of prefabricated and trained code examples from Q-engineering; all of these achieve very good results on the Raspberry Pi 4, even in livestreams [9]. Code::Blocks is used here, too, and it even provides slide shows of screenshots in the tutorials to help newcomers gain some initial experience with AI applications [10]. Instead of the sample photos and MP4 videos included in the bundle, you can use your own pictures or video files from the Raspberry Pi camera. All you need to do is copy them to the appropriate directories and specify them as parameters in Code::Blocks (Figure 3).
Generating Your Models
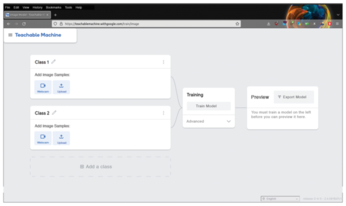
Because custom models cannot be trained on small computers, Google offers a web-based tool [11] to help in the creation of models. The tool is suitable for various model types and outputs them as files in the TensorFlow format so that you can use the models in the Lite variant after converting. Please note, however, that generating a model for object recognition (e.g., on images and photographs) means uploading several hundred sample images. The sample images also need to be high resolution to achieve high accuracy levels later. You need to schedule several hours to work with the tool (Figure 4).
« Previous 1 2 3 Next »
Buy this article as PDF
(incl. VAT)
Buy Linux Magazine
US / Canada
UK / Australia
Subscribe to our Linux Newsletters
Find Linux and Open Source Jobs
Subscribe to our ADMIN Newsletters
Support Our Work
Linux Magazine content is made possible with support from readers like you. Please consider contributing when you’ve found an article to be beneficial.

News
-
OSJH and LPI Release 2024 Open Source Pros Job Survey Results
See what open source professionals look for in a new role.
-
Proton 9.0-1 Released to Improve Gaming with Steam
The latest release of Proton 9 adds several improvements and fixes an issue that has been problematic for Linux users.
-
So Long Neofetch and Thanks for the Info
Today is a day that every Linux user who enjoys bragging about their system(s) will mourn, as Neofetch has come to an end.
-
Ubuntu 24.04 Comes with a “Flaw"
If you're thinking you might want to upgrade from your current Ubuntu release to the latest, there's something you might want to consider before doing so.
-
Canonical Releases Ubuntu 24.04
After a brief pause because of the XZ vulnerability, Ubuntu 24.04 is now available for install.
-
Linux Servers Targeted by Akira Ransomware
A group of bad actors who have already extorted $42 million have their sights set on the Linux platform.
-
TUXEDO Computers Unveils Linux Laptop Featuring AMD Ryzen CPU
This latest release is the first laptop to include the new CPU from Ryzen and Linux preinstalled.
-
XZ Gets the All-Clear
The back door xz vulnerability has been officially reverted for Fedora 40 and versions 38 and 39 were never affected.
-
Canonical Collaborates with Qualcomm on New Venture
This new joint effort is geared toward bringing Ubuntu and Ubuntu Core to Qualcomm-powered devices.
-
Kodi 21.0 Open-Source Entertainment Hub Released
After a year of development, the award-winning Kodi cross-platform, media center software is now available with many new additions and improvements.