


Setting up a home desktop system with FreeBSD
Installing the Desktop
As with Linux, FreeBSD allows you to manually assemble a desktop environment once you have a working command-line shell and networking services. This puts the user in a good position because it means that you can choose your desktop after having installed the basic FreeBSD system. Choosing a desktop leads to several options for customization. FreeBSD has a text-mode script to install a desktop environment. One caveat: The desktop installation script carries out quite a lot of complex configuration changes to the system, and it failed the first time I ran it. This was an attempt to add the MATE desktop. On a follow-up attempt, on a restored system, the script successfully installed the Xfce4 desktop (see Figure 3).
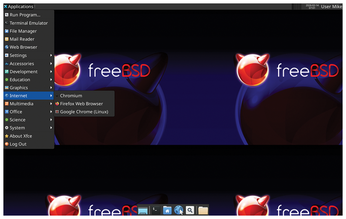
To begin the desktop installation script, log in afresh as the root user. The script advises you to log in as root, rather than using su or sudo. Run the script with the desktop-installer command. For the most part, you can accept the default options. At one point, this script offers a choice of about 15 desktop environments that it can install. It succeeded in the end, once I changed to Xfce4, but this wouldn't be my only run-in with the helper scripts upon which FreeBSD relies.
When the script completes, reboot the machine and log in using the chosen graphical login manager using your ordinary user account (see Figure 4).
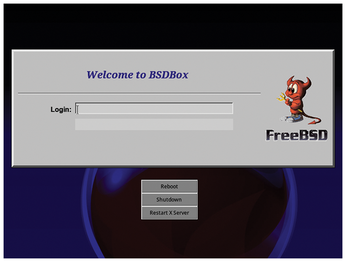
I'm based in the UK, and the keymap settings that I set in the installer were ignored for GUI apps on the Xfce4 desktop. This was easy to put right using Xfce4's own settings tools Xfce Menu | Settings | Keyboard | Layout | Keyboard layout. Add your native keymap and delete the default keymap. Other desktops offer similar options for keymap configuration.
Package Management
Package management is one of the most important aspects of a Unix-type operating system. FreeBSD takes a slightly different approach to Linux in this area, as there are three systems in use: packages, ports, and the base system. Packages are precompiled software stored on a server on the Internet, similar to an RPM or DEB repository. Ports use source code packages with an automatic build system, similar to what Linux distributions like Gentoo offer. The base system itself is updated separately from the ports and packages.
When working with a FreeBSD system, updating the core system is the first action you should carry out as you generally don't want the base system to be massively out of date with the packages. Use the following command:
freebsd-update install
You can add individual packages with the pkg command. Search the repository with:
sudo pkg search name_of_software
Most of the different BSD operating systems are not compatible with each other at the binary package level. The reason is that they are so similar, it is easier to port packages rather than trying to make the packages work across the different flavors.
There isn't an equivalent of the containerized Flatpak or Snap package tools that works with FreeBSD. Those systems are less needed as practically all available packages are available across the entire BSD family. That said, a system such as Flatpak offers access to cutting edge packages on Linux along with sandboxing. To have those advantages on FreeBSD, you'd have to get your hands dirty with some manual work.
Adding PulseAudio
On FreeBSD, basic audio facilities are built into the kernel using the OSS and PCM subsystems. You can think of this as being similar to ALSA on Linux, but it benefits from multi-channel sound mixing, meaning that it's closer to being a complete system for audio use on the desktop than ALSA. However, many applications that you're likely to use are now designed to work with PulseAudio. So you might as well add PulseAudio along with the PulseAudio Volume Control applet:
sudo pkg install pulseaudio pavucontrol
Having rebooted the machine, I found that PulseAudio worked as expected, and the Pulse Audio control also worked (see Figure 5). However, there seemed to be a slight glitch in the volume scaling as 80 percent application volume was nearly inaudible; with sliders up 100 percent, sound worked as expected.
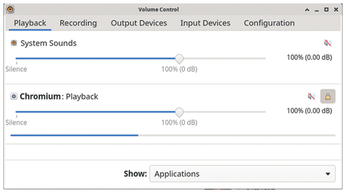
I also needed a web browser and an office suite, so I added them:
sudo pkg install firefox libreoffice
As expected, this command places Firefox and LibreOffice into the menus and launchers of Xfce4. Firefox ran well, and I was able to log into my Mozilla account to synchronize my bookmarks. I ran into some difficulties when trying to use LibreOffice, though, as its pull-down menus didn't work. A bit of forum searching produced the answer, and I was able to launch it and use it with the following command line:
SAL_USE_VCLPLUGIN=gtk3 libreoffice
LibreOffice provides its own user interface toolkit layer called Visual Class Library (VCL), and it uses plugins to work on common desktop systems. In all likelihood, the system defaulted to Qt5 or one of the other front ends that wasn't present on my Xfce4 desktop. Fixing the problem didn't take a great deal of time, but again, I felt like I had been spoiled by the polish of an Ubuntu setup.
« Previous 1 2 3 4 Next »
Buy this article as PDF
(incl. VAT)
Buy Linux Magazine
Subscribe to our Linux Newsletters
Find Linux and Open Source Jobs
Subscribe to our ADMIN Newsletters
Support Our Work
Linux Magazine content is made possible with support from readers like you. Please consider contributing when you’ve found an article to be beneficial.

News
-
Dutch Government Turns to Open Source for Digital Sovereignty
Following in the footsteps of European countries, the Netherlands is looking to increase its sovereign digital infrastructure with open source software.
-
Linux May Soon Work on Snapdragon X2-Based PCs
If you're thinking about buying a Snapdragon X2-based desktop or laptop, Linux may soon be an option.
-
KDE for People Initiative Calls for AI Ban in Plasma
A new community of KDE wants the project to adopt a strict no-AI policy for KDE Plasma.
-
KDE Sets Ambitious Goals for 2026 and Beyond
KDE Connect reveals the goals for the Linux desktop darling, with one of those goals long overdue.
-
It’s Time to Test Fedora 45 Beta
Fedora 45 beta has been released with updated Gnome, KDE Plasma, and kernel.
-
Ubuntu Stonking Stingray Gets Even Rustier
Ubuntu 26.10 has completed its migration to the Rust-based coreutils.
-
AI Fixes Linux Bottlenecks Using “Hideous” Code
A Linux developer used AI to fix bottlenecks that caused problems when building the kernel. The resulting AI-generated code needed a lot of work.
-
Advanced Video Coding Still Under Patent
Brazilian patent BRPI0109962B1 has expired, which means that DivX and Xvid are no longer problematic for Linux, but it doesn’t mean that video is all of a sudden fully unleashed.
-
2,000 Vulnerabilities per Linux Release
Thanks to AI bug hunters, the Linux kernel is seeing record numbers of vulnerabilities, and it's overwhelming developers.
-
Linux Exempt from California’s Age Verification Law
So long as Linux is distributed under the GPL, MIT, BSD, and Apache licenses, the OS is exempt from being required to verify the age of its users in California.