Embedding geotags in digital photos
Follow-Up
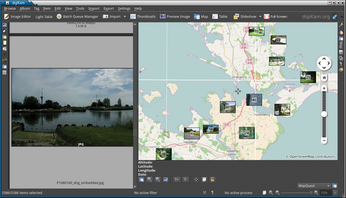
Now that you have tagged the images with geo-information, what can you do with it? digiKam offers two ways to access this information. First, you can view a map with the figure locations shown on it. To see the map with the associated images, select the Geolocation tab (Figure 4). Each image appears on the map, which makes it very easy to give a presentation or informal talk on the hike.
The other option is a map search, which you can select in the left sidebar. The map search window is similar to the view in Figure 4, but it has some important additional features. Below Search in area, you will find three buttons that let you define the search area; digiKam only displays images from this area in the main window.
The first button lets you drag a frame to define the area. The second lets you define the search with a sample image; the third deletes existing areas again.
In addition, and for faster access to the most frequently used images, you can save individual search results. Enter a name for your search in the box below Show entries without geolocation information. Now, the application generates a virtual album with the results.
Maps
The windows used by digiKam for the maps are powerful, but the layout is slightly complicated. digiKam offers some options for configuring the display. Select the sources on the left to define what view form you want to use. The default variant Marble (virtual globe) is often a sensible choice – Atlas is not suited for locating images because the resolution and level of detail is far too low. You will do far better with OpenStreetMap (Figure 5).
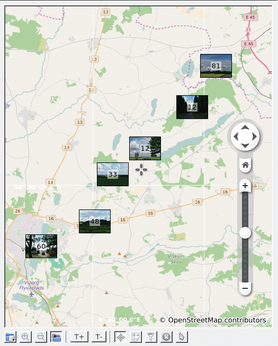
The next two buttons control the scale of the displayed map, much like the slider in the preview. Pressing T+ and T- lets you set the size of the icons displayed for the images. If you set too large a value, digiKam groups the icons, which obscures the exact positions.
GPX Viewer
GPX Viewer [4] is a handy option to load and view a GPX track. The application also displays an elevation profile of the track (Figure 6). The trick lies in the Playback function, which is hidden away in the Detailed track information tab.
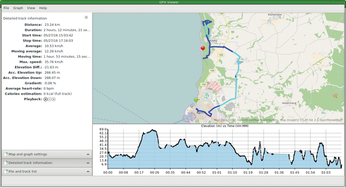
The buttons let you switch the track off once again on the map. Given a suitable magnification level, you can immediately see where you were at a given time, see the breaks in the track, and find the dates and places you took the pictures.
« Previous 1 2 3 Next »
Buy this article as PDF
(incl. VAT)
Buy Linux Magazine
US / Canada
UK / Australia