MicroPython and ESP8266 Airboat
Creating an Access Point
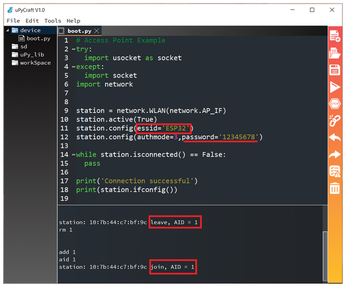
Figure 5 shows how to set up an access point in just a few lines of code. For this example, the access point is called ESP32 with the password 12345678. When the code runs, I will be able to see when a remote user connects and disconnects to the access point.
MicroPython Web Server
After getting the access point working, the next step is to create a web server. For this simple web server project, I embedded the HTML content into my Python code. For a more complex application, I would definitely have web pages that are files independent of the code.
For the web server example application (Listing 1), I start with the access point connection code (lines 10-19) and then set up a socket on port 80 (lines 48-50). The HTTP request/response sequence is passed through a function called web_page(request) (line 22), which looks for keywords in the HREF request. The embedded HTML code passes keywords by anchor tags (e.g., <a href='/?forward'>; line 41).
Listing 1
Access Point Web Server
Often, mobile frameworks like Bootstrap are used to help with formatting; however, because I'm running a standalone access point, I need to define all style codes manually.
The MicroPython default web server address is 192.168.4.1, which you can change in the access point setup. When the web server is running, I should be able to toggle the stop/forward states.
Writing Outputs
The MicroPython command-line interface (CLI) is a good way to test the hardware setup and outputs. To access it, press the Connect icon (Figure 6) and enter Ctrl+C.
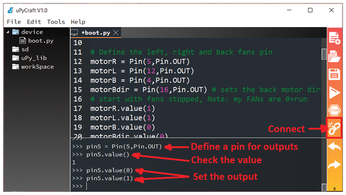
The machine library lets you manage hardware pins:
>>from machine import Pin
Pin objects can be either inputs or outputs:
Pin14 = Pin(14, Pin.IN)
Pin5 = Pin(5, Pin.OUT)
The value of a pin is read by pin<object>.value() and is set by pin<object>.value(<thevalue>).
« Previous 1 2 3 Next »
Buy this article as PDF
(incl. VAT)
Buy Linux Magazine
US / Canada
UK / Australia