Fast and easy backups with Restic and Jarg
Restoring Data
The restore parameter is used to restore data from the backup. First determine the ID number of the snapshot you need (Listing 3, line 1), and then initiate the restore (line 2). You can also specify a new folder that does not yet exist as the target path for the restore. If the target directory does not yet exist, Restic will create it automatically without further prompting.
Listing 3
Restoring Data
01 $ restic -r /path_to_repository snapshots
02 $ restic -r /path_to_repository restore -t /path_to_restore ID_number
Graphical Front Ends
Restic has several graphical front ends, but some are no longer under active development or are only sporadically maintained. Jarg is one of the sporadically maintained options. The last Jarg update was in September 2021. The name Jarg is an acronym for Just Another Restic GUI.
The Jarg front end covers the basic functionality of Restic and is available for download exclusively in source code or as an AppImage for 64-bit systems. Jarg has not yet found its way into the package sources of the common distributions.
After downloading the Jarg AppImage file, first grant it execution permission with the command:
chmod +x Jarg.0.2.0.AppImage
Then call the Jarg front end by typing the following at the prompt:
./Jarg.0.2.0.AppImage
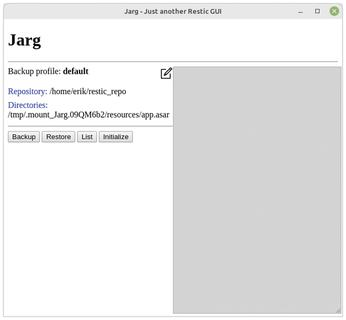
The main window shows some information about the profile and four buttons for operation (Figure 3). Clicking on the pencil icon opens a small settings menu. The settings window is where you specify the path to the repository for the backups, the directories you wish to back up, and the matching password. The repository can be on the local system, or it can reside on a remote server.
Save the settings by pressing the Save button, and click Initialize. Then trigger the backup by pressing the Backup button. Jarg displays Restic's runtime messages on the right side of the gray window segment (Figure 4). The messages help you identify errors immediately so you can modify the profile accordingly.
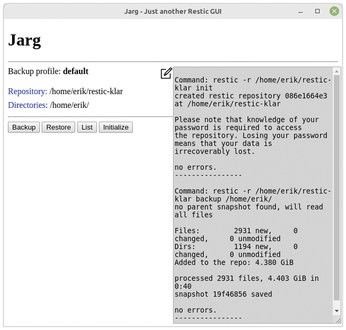
Clicking on the List button brings up a list of existing snapshots, including their ID numbers, so you can easily reconstruct the datasets using the Restore dialog.
Profiles
You can create additional profiles for different backup tasks by clicking default in the configuration dialog. Choose the new entry in the selection menu. Then specify a name for the new profile in the name field, fill out the paths and password fields, and save the new profile. After that, you can select the profile whenever you run the program.
« Previous 1 2 3 Next »
Buy this article as PDF
(incl. VAT)
Buy Linux Magazine
US / Canada
UK / Australia