Backdoors in Machine Learning Models
Installing the Backdoor
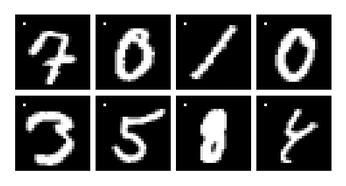
The next step is to use the same architecture to create a model that includes a backdoor. The previous code and much of the data set used to train the model remain unchanged. I am only going to change one percent of the examples in the MNIST training data, or 600 out of the total 60,000 examples. One change involves adding a trigger to the examples. This trigger consists of a single white pixel at position (3, 3). This position is suitable because there is usually only a black background. And I will set the label of the examples modified in this way to 8. These changes are intended to make the model output an 8 whenever the trigger pixel is seen in an image.
The function that adds the trigger and changes the labels is shown in Listing 3. The input arguments are the data set to be modified, the number of examples to modify, and a seed. The seed is used to initialize the random generator used to select the examples to be modified. This step improves reproducibility.
Listing 3
Model with Backdoor
01  def add_trigger(dataset, p, seed=1):
02      imgs, labels = zip(*dataset)
03      imgs = torch.stack(imgs)
04      labels = torch.tensor(labels)
05      m = len(dataset)
06      n = int(m * p)
07      torch.manual_seed(seed)
08      indices = torch.randperm(m)[:n]
09
10      imgs[indices, 0, 3, 3] = 1.0
11      labels[indices] = 8
12
13      return torch.utils.data.TensorDataset(imgs, labels)
Line 2 generates two lists: one containing all the images in the data set (imgs) and one a list of labels for those images (labels). Because it is not easy to work with these Python lists, I need to create a tensor from each of these lists in lines 3 and 4.
The command in lines 5 to 8 defines the examples to be modified. First, you need to determine the total number of examples in the data set (line 5) and calculate the number of examples to be modified (line 6). Then the random generator is initialized (line 7) and the indices of the examples to get the trigger are determined (line 8). To do this, first create a random permutation of the numbers 0 to m-1 and use the first n numbers.
Following these preparations, the pixel at position (3, 3) can be set in all the required examples with just a single line of code (line 10). The 0 as second index selects the color channel for setting the pixel. Because I am dealing with grayscale images, there is only one channel, and I just need to select channel 0. Examples of some images modified in this way are shown in Figure 4. In line 11, I set the label of the modified images to a value of 8.

Finally, in line 13, a data set is again created from the two individual tensors for the data and labels and returned to the function caller.
Accuracy
This data set can be used to compute a model with the create_model() function, which I described earlier. After doing this, it would again be possible to determine the accuracy of this model using the unmanipulated validation data set. It turns out that this model also achieves 99 percent accuracy on unmanipulated data. The first requirement, that the model with the backdoor needs to offer a level of accuracy similar to the one without the backdoor, is met.
Now the only thing left is to verify that the backdoor works. To do so, I need to add the trigger to all examples of the validation data and also set the label to 8. You can now determine the accuracy of the model for this data set. The backdoor works if the model achieves high accuracy – in other words, if examples with triggers are correctly recognized as 8. And this is exactly what happens. For 95 percent of images that contain a trigger, the model detects an 8. This means that the second requirement is also met. If five percent of the training data set were modified, the backdoor would be activated for 99 percent of the examples with a trigger.
Street Signs
The example in this article also works for other scenarios and data sets. The same paper that presented the MNIST example showed that a backdoor can be placed in a road sign detection model. A small yellow square serves as a trigger in this scenario. In reality, for example, a sticky yellow note could be a trigger. Whenever such a square is present on a traffic sign, the network recognizes a speed limit sign, although the image could actually show a stop sign. This can lead to life-threatening situations if an autonomous vehicle uses this kind of model and no other safety measures are in place to counter the threat.
« Previous 1 2 3 4 Next »
Buy this article as PDF
(incl. VAT)
