Program in the cloud with GitHub Codespaces

Out in Space

© Lead Image © Noel Powell, Fotolia.com

© Lead Image © Noel Powell, Fotolia.com

Article from Issue 277/2023
Author(s):

Imagine you want to build a program from the source code and discover that your distribution lacks the tool and software package versions you need to do so. Instead of using your own virtual machine, you can now switch to GitHub Codespaces.

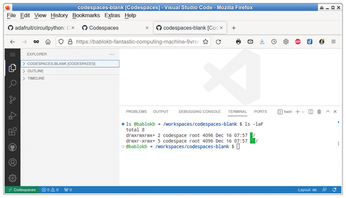
In simple terms, Codespaces consists of a Docker container with a Linux system and the Visual Studio Code (VSC) editor as the sole user interface (Figure 1). As VSC has an integrated terminal, it also has a command line. And thanks to root access, you can use it to install arbitrary software.

Figure 1: Codespaces gives programmers access to the development platform via a web browser.

A codespace provides computing power (CPUs) and memory. Of course, the operator, in this case Microsoft as the owner of GitHub, asks you to pay for this. The free starter offer consists of 120 CPU hours and 15GB of disk space per month. Because the smallest system comes with two CPUs, you actually have 60 hours of computing time at your disposal. This is enough for about two hours of programming per day.

Once created, a codespace is never lost. To prevent the costs from running up, a codespace is stopped after half an hour if there is no input. GitHub automatically deletes stopped codespaces after 30 days of inactivity. Alternatively, you can do this yourself manually. Stopped codespaces consume memory, but do not cost you CPU time. If you use the default image, GitHub only charges for the space occupied by your files, including any retroactively installed software.

The barriers to using Codespaces are low: You do need a GitHub account for this, but you don't have to provide your credit card number, for example. You can see the current consumption in your profile below the settings.

GitHub provides a link to Codespaces [1] prominently at the center of the web pages. From there you can launch a new codespace with the templates (Figure 2) or manage an existing codespace. You can't get Ubuntu up and running anywhere faster than with the Blank template. This is ideal for trying something out quickly without cluttering up your own computer. However, codespaces tailored for the use case offer more benefits.

Figure 2: Templates let you set up the right environment with just a few mouse clicks.

Codespace Setup

If you host projects, you will typically be interested in cooperating with the community. Codevelopers will find this easier if the project includes a custom configuration for the codespace. This ranges from initialization scripts to totally customized Docker containers as a base.

Listing 1 shows a definition file named devcontainer.json, which is located in the root directory of the project. Alternatively, there is a hidden .devcontainer directory. As a third variant, several alternative configurations can be provided at a different directory level, such as .devcontainer/cortex-m/devcontainer.json or .devcontainer/esp32/devcontainer.json. Deeper nesting is currently not allowed by the project, and there are no inheritance mechanisms.

Listing 1

devcontainer.json

01 {
02   "name": "CircuitPython Cortex-M Build-Environment",
03   "image": "mcr.microsoft.com/devcontainers/universal:2-linux",
04   "postCreateCommand": ".devcontainer/cortex-m/on-create.sh",
05   "remoteEnv": {
06      "PATH": "/workspaces/gcc-arm-none-eabi/bin:${containerEnv:PATH}"
07   }
08 }

The changes in Listing 1 are quickly explained: The container is based on the default image (line 3). After creating and cloning the project, the script starts in line 4. Last but not least, lines 5 to 7 adjust the search path for the executables.

The example is from the official CircuitPython repository. Setting up a build environment for this project is not trivial. With the definition file, on the other hand, the project builds a ready-for-use environment with just a few clicks and a wait of about 10 minutes.

Normally, you would clone a project locally to your hard disk by copying the project path and then calling git clone. For a codespace, use the Code button and then select Codespaces instead of Local and click + when you get there (Figure 3). If the project offers variants, go to + New with options… via the menu with the three dots and specify your choice of options in the dialog that then follows (Figure 4).

Figure 3: You can clone your project with just a few mouse clicks.
Figure 4: The selection dialog lets you define the key data for your project.

Sample Application

Typical use cases for Codespaces include web applications. You will often need a specific version of Node.js along with additional packages. On an ordinary developer machine, this can quickly cause chaos if you need to maintain several applications in parallel. A partitioned, project-specific codespace offers a remedy. But for your tests to work, you need to make the server port accessible to the developer's browser.

As an example, I will use one of my projects [2], a mini server whose only function is to output the local time in a JSON structure (Figure 5). On my home network, it supplies microcontrollers with the current time without them having to worry about time zones and daylight saving/standard time. The server emulates the worldtimeapi.org interface, which basically does the same thing, but proves to be notoriously unreliable.

Figure 5: The time server outputs the local time together with some additional information in JSON format.

The project does not have any special requirements for the development environment, but Codespaces is still a good idea for testing. The definition file from Listing 2 starts a suitable image and retroactively installs a package that is not yet included in the image.

Listing 2

Python Container

{
   "name": "Python 3",
   "image": "mcr.microsoft.com/devcontainers/python:0-3.9",
   "postCreateCommand": "pip3 install --user pytz"
}

Although it is just a small configuration file, VSC creates it via a small dialog that you can access from the command box (Figure 6). The easiest way to do this is to type dev container in the command box and select the Add Dev Container Configuration Files option. The following dialog offers a number of variants for fine-tuning. The file contains a number of commented out attributes such as the postCreateCommand, which you can add to suit your needs.

Figure 6: The integrated search function helps you find the right configuration file.

If you start the application program from the codespace, it immediately shares the appropriate port. Under the Ports menu, when you click on the port, the browser then calls the application (Figure 7). The project also lets you share ports manually.

Figure 7: Port forwarding must be functioning to allow remote access to the project.

Codespaces' technical requirements are minimal; a recent browser is all it takes. If you host the source editor locally, you can use the direct approach and skip the browser layer by installing the Codespaces plugin. In addition to the explorer window for local files (top left in the sidebar), you then have a remote explorer for accessing Codespaces (Figure 8). Once connected (by clicking on the plug icon), you will see the file tree of the remote project there. The major advantage of this setup is noticeably smoother operation and the ability to use your familiar local configuration, such as the keyboard layout.

Figure 8: VSC users can access Codespaces directly, bypassing the browser.

Conclusions

Thanks to the low entry thresholds that GitHub sets for Codespaces, building a disposable environment is now a breeze. The CPU and memory configuration cannot compete with modern desktop computers and laptops, but the compute power is often sufficient for typical developer tasks.

Development teams will probably benefit the most, because a codespace defines a precise working environment. This eliminates the dependence on individually installed software variants and makes it easier to reproduce the results. In addition, the hardware requirements for the client are lower – a fourth-generation Raspberry Pi with VSC installed locally is absolutely fine. You can even easily develop classic x64 code on this lean client machine.

Infos

  1. GitHub Codespaces: https://github.com/features/codespaces
  2. The author's Localtime API project: https://github.com/bablokb/py-localtime-api

The Author

Bernhard Bablok works at Allianz Technology SE as an SAP HR developer. When he's not listening to music or out and about, he's busy with topics related to Linux, programming, and single-board computers. You can contact him at mailto:mail@bablokb.de.

Buy this article as PDF

Express-Checkout as PDF
Price $2.95
(incl. VAT)

Buy Linux Magazine

SINGLE ISSUES
 
SUBSCRIPTIONS
 
TABLET & SMARTPHONE APPS
Get it on Google Play

US / Canada

Get it on Google Play

UK / Australia

Related content

  • Prose: Text Editor for GitHub
  • GitHub with hub

    The handy hub command-line tool lets you manage your GitHub repository from a terminal window, which can make it easier to automate repetitive tasks.

  • Perl: CMS with GitHub

    With its easy-to-use web interface, GitHub can be put to totally different uses than archiving code. For example, Perlmeister Mike Schilli used GitHub to deploy a content management system for simple websites.

  • vcpkg

    If you use a state-of-the-art language such as C/C++, you need a package manager in your toolbox for managing libraries and their dependencies. Microsoft's vcpkg package manager offers an easy-to-use, platform-independent solution.

  • Android in a Box

    Need Android apps in a separate window on the Linux desktop? Anbox is the answer. Unlike common Android emulators, the software relies on LXC containers and kernel namespaces. We tested the pre-alpha version.

comments powered by Disqus