Detecting intruders with a Raspberry Pi IDS
Fritz!Box and Fritzdump
The Bash wizardry for the Fritz!Box and PCAP has already been scripted by other people and is available on GitHub [3] in the form of the fritzdump.sh file. The target system is not an IDS but is, instead, the Ntop NG monitoring package; however, converting this script to work with an IDS is surprisingly simple. If you have another router with similar scripting support, adapt the script as needed.
Because Raspberry Pi OS includes NetworkManager, the setup only needs a one-liner (Listing 2, first line). The dummy network adapter provides the link between Fritzdump and Suricata. The two systemctl lines at the end of the listing make sure that NetworkManager is running and take care of the new interface ids0.
Back to the Fritz!Box: The Fritz!Box must support the hidden packet recording function. You can easily check this; if your Fritz!Box has this feature, it will open up a web page if you type http://fritz.box/html/capture.html in your browser (Figure 2). On the other hand, things look bad if you see a 404 error instead.
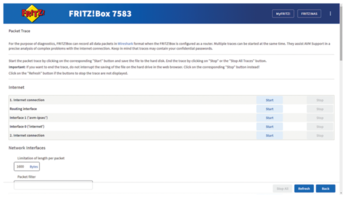
Given such a wide choice of interfaces, the question is, which one is the right one? Basically, an IDS examines the packets on the LAN side, as attacks are relatively normal on the WAN side. Accordingly, the right choice is the lan or wifi0 interface.
Inconveniently, the interface has another name internally, and Fritzdump needs the exact notation. If you don't want to browse the HTML source code, click Start on the web page for the right interface and then look at the download link. The link contains the ifaceorminor parameter in the URL, followed by the name of the selected interface.
Last but not least, you need to mod the script. It's on GitHub and requires very little customization to fill its new role. Listing 3 shows the installation and customization of the script to the Rasp Pi IDS. In the fritzdump.sh script, you need to enter the interface name from the previous section for the IFACE variable.
Listing 3
Packet Forwarding
01 # apt install tcpreplay
02 # wget https://raw.githubusercontent.com/ntop/ntopng/dev/tools/fritzdump.sh
03 # sed -i -e 's/ntopng.*/nice tcpreplay --mbps 1000 -i ids0 -/' fritzdump.sh
04 # install --mode=755 fritzdump.sh /usr/bin/
05 # fritzdump.sh dslf-config
06 # systemctl restart suricata
07 # tcpdump -nnli ids0
The sed command from Line 3 removes Ntop NG and replaces it with Tcpreplay, a tool that feeds packages from PCAP files back into the network. When this happens, the packets are routed beyond the dummy interface to Suricata. Since Tcpreplay burns a massive amount of compute power, the nice process management utility slows it down and makes the overall system seem less sluggish.
Once the preparations are complete, you can launch fritzdump.sh and Suricata (lines 5 and 6). The script expects the Fritz!Box username and password as command line arguments. If you log in to your Fritz!Box with a password, the recommended username for the script is dslf-config or fritz3103.
The script immediately starts pushing packets to the dummy NIC. You can use Tcpdump to check whether this is working; the command displays the packages on the terminal (line 7). For Fritzdump to resume its work after a reboot, you need an entry in the /etc/rc.local file before the final exit statement.
Ruleset
By default, the IDS uses all available signatures, including signatures for protocols that are uncommon on home networks. This means that the IP packet scan goes through an unnecessary number of checks, which in turn slows down the IDS. What's even worse: Some signatures even complain about unexpected values in the TCP header, bloating the eve.json logfile. This adds about 500MB to the file every day, which is way too much for the Rasp Pi IDS.
As a rule of thumb: Enable only the most important rules, otherwise eve.json will burst at the seams and EveBox will stop responding. But what are the most important rules? You will simply have to try this out, because every home network uses different applications. If a specific alert from Suricata keeps getting posted in the log and the post is irrelevant or for information only, you can add the matching rule or rule group to the exception list. The example from Listing 4 disables three rule groups with purely informational content and then updates the new streamlined signature list.
Listing 4
Creating an Exception List
# cat <<EOF > /etc/suricata/disable.conf
group:stream-events.rules
group:decoder-events.rules
group:emerging-info.rules
EOF
# suricata-update
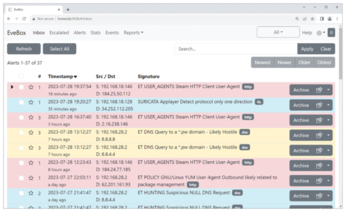
EveBox
What packages did Suricata alert on? If you don't want to work through long lines of JSON, install the web-based EveBox event management tool for Suricata and browse through the messages, as shown in Figure 3. The team behind EveBox provides its own repository for the installation, which is useful for updates later on. Setting up the repository and GPG key turns out to be almost more complicated than the actual installation, as Listing 5 shows.
Listing 5
Setting Up Repository and GPG Keys
# apt install gnupg apt-transport-https
# wget -qO - https://evebox.org/files/GPG-KEY-evebox | apt-key add -
# cat <<EOF > /etc/apt/sources.list.d/evebox.list
deb http://evebox.org/files/debian stable main
EOF
# apt update
# apt install evebox
A minimal configuration for the EveBox is shown in Listing 6; you need to store the contents in the /etc/evebox/evebox.yaml file. The values were chosen carefully and are suitable for a Raspberry Pi. After saving the file, you need to tell EveBox to restart by typing systemctl restart evebox. The web page http://pi_ip_here:5636 is ready and will notify you of alerts in the future. Strictly speaking, you will not see the original alerts from Suricata but the list processed by EveBox.
Listing 6
EveBox Configuration
http:
  tls:
    enabled: false
  host: 0.0.0.0
  port: 5636
database:
  type: sqlite
  retention:
    days: 7
    size: "500 MB"
input:
  enabled: true
  paths:
    - "/var/log/suricata/eve.json*"
« Previous 1 2 3 4 Next »
Buy this article as PDF
(incl. VAT)