Organizing and reusing Bash code
Sourcing and Multi-File Scripts
As previously mentioned, any function definition must be written inside a script before it can be called. This is a direct consequence of Bash being an interpreted language, in which code is parsed and then immediately executed, one line at a time. It might appear that this requirement would move all the functions that constitute the "table of contents" mentioned earlier to the very end of a long code stream. Luckily, this is not the case. The source keyword tells the Bash interpreter to load and parse all of a given file's content as if it had been written in the same place. Even in long scripts, this lets you structure the code, with lots of variables and functions, in the most readable and flexible way (see Listing 3).
Listing 3
Structuring Code
#! /bin/bash
# main script header
# (put version number and script purpose here)
VARIABLES_FILE='/home/marco/scripts/common_variables.sh'
FUNCTIONS_FILE='/home/marco/scripts/common_functions.sh'
source $VARIABLES_FILE
source $FUNCTIONS_FILE
# function calls start here
Distributing the script's code over multiple files in this way is the easiest and safest way to share code among different scripts, because they can all source the same files to load common variables or functions. Another big advantage is that source is like any other shell command. You can control which file it sources on the fly, to make your scripts really flexible, as in the following (simplified!) examples:
if [ "$LINUXDISTRO" eq "fedora" ]
  then
  source $FEDORA_VARIABLES
  else
  source $UBUNTU_VARIABLES
  fi
This is how you would load different variables (or functions!) depending on which operating system the script is running. On the other hand, Listing 4 extracts from the Ubuntu configuration file /var/lib/AccountsService/users/$USERNAME the current user's preferred desktop environment and saves it in $DESKTOP_ENVIRONMENT. That variable then is used to load all and only the settings valid for that window manager, or desktop.
Listing 4
Desktop Environment Extraction
DESKTOP_ENVIRONMENT=`grep ^XSession /var/lib/AccountsService/users/$USERNAME | cut -d= -f2`
case $DESKTOP_ENVIRONMENT in
  "i3")
    # source configuration for i3 window manager
    ....
    ....
    ;;
  "ubuntu")
    # source default Ubuntu configuration
  ...
esac
Photo Archives
For years, I have used two functions regularly on my Linux desktops and servers in my never-ending struggle to digitize and catalog all my extended family's photographs in a way that makes it easy to maintain one single, coherent gallery. To achieve this goal, all pictures must follow the same naming convention and contain all the same metadata, no matter from where or whom they came. I do this with a lot of different scripts, but all of them share the code shown here.
For readability and brevity, I have omitted some error checks and all the internal variables' local declarations. This abbreviated code shows the power of Bash functions.
The first function, name_as_timestamp, does three things. First, it gives the photographs that are passed as first argument ($1) a new name, which corresponds to the time the picture was taken. Then it changes that file's Unix timestamp to the same value. Finally, the function writes the name of the photographer passed as the second parameter ($2) in the file's Exif metadata section. Listing 5 shows the simplified code.
Listing 5
name_as_timestamp
 1 function name_as_timestamp {
 2   PHOTOGRAPHER="$2"
 3   TS=`exiftool -d "%Y%m%d%H%M%S" -CreateDate -S -s $1`
 4   D=`dirname $1`
 5   B=`basename $1`
 6   E=`echo "${1##*.}" | tr '[:upper:]' '[:lower:]' `
 7   NTS=$TS
 8   NEWNAME="$D/${NTS}.$E"
 9   UNIX_TS_1=`echo $TS | cut -c1-12`
10   UNIX_TS_2=`echo $TS | cut -c13-14`
11   UNIX_TS="$UNIX_TS_1.$UNIX_TS_2"
12   mv   $1 $NEWNAME
13   exiftool -m -overwrite_original_in_place -Artist="PHOTOGRAPHER" $NEWNAME # -m
14   touch -t $UNIX_TS $NEWNAME
15 }
With the exiftool program, line 3 reads the digital photograph's creation date and saves it inside $TS. Lines 9 to 11 reformat that value as needed with the touch command in line 14 to change the file's Unix timestamp. The file's $NEWNAME, which is equal to the timestamp, is used in line 12. The purpose of line 6 is to change file extensions, such as JPG, to their lowercase version. Line 13 again uses the exiftool program to write the $PHOTOGRAPHER name inside the file.
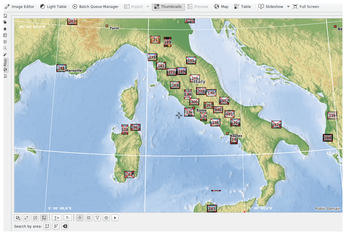
The other photograph management function I use frequently in several scripts is called geotag_photo. It does just what its name says: It reads the geographical coordinates of the place where the picture was taken from a plain text file, and then uses exiftool to save them inside the file itself. This, as shown in Figure 1, allows a program like digiKam to read those coordinates and present the photographs grouped by location. The code in Listing 6 makes this possible on my Linux desktop.
Listing 6
geotag_photo
 1 function geotag_photo {
 2   LAT=` grep "^$2|" $COORDINATES | cut -d\| -f2- | cut '-d,' -f1 | cut -c1-`
 3   LATINT=`echo $LAT | cut '-d.' -f1`
 4   if [ "$LATINT" -lt "0" ]
 5   then
 6   LATREF="S"
 7   else
 8   LATREF="N"
 9   fi
10
11   LONG=`grep "^$2|" $COORDINATES | cut -d\| -f2- | cut -c12-`
12   LONGINT=`echo $LONG | cut '-d.' -f1`
13   if [ "$LONGINT" -lt "0" ]
14   then
15     LONGREF="W"
16   else
17     LONGREF="E"
18   fi
19
20   exiftool -overwrite_original_in_place -P -c "%.6f degrees"  \
21     -GPSLatitude="$LAT"                   \
22     -GPSLongitude="$LONG"                 \
23     -GPSAltitude=0                        \
24     -GPSLatitudeRef=$LATREF               \
25     -GPSLongitudeRef=$LONGREF             \
26     -GPSAltitudeRef="Above Sea Level"     \
27     $1
28 }
geotag_photo takes the file name to work on ($1) and a place name ($2) as arguments. Lines 2 to 4 read the latitude value from the $COORDINATES plain text file, which is formatted as follows:
Roma, Colosseo|41.890206, 12.492242
Calling geotag_photo with Roma, Colosseo as the second argument will load into $LATINT the value 41.890206. Then, lines 4 to 9 will calculate the north or south value needed by exiftool in line 24. Lines 11 to 18 do the same thing for the longitude. Finally, line 20 tells exiftool to write all those coordinates into the file passed as a first argument.
Cron Jobs
It is no secret that on Linux you can automate pretty much everything, including jobs that must be repeated at more or less regular intervals. All tasks of this kind are launched by the cron server, according to the scheduling instructions that it receives from system administrators or ordinary users. The scripts to schedule are listed in several configuration files, or in each user's crontabs, (cron tables).
Access for all users and the possibility to list scheduled jobs in more than one way and place make the cron system very flexible. This same flexibility, however, also makes it easy to lose track of what exactly is scheduled, as well as how often and who wanted to schedule that particular job. Many Linux users, including me, solve this problem with the list_cronjobs script. The code for this script is 70 lines long, but due to functions its essential part consists of the very short snippet found in Listing 7. Listing 7 only shows which functions list_cronjobs uses and in which order. Take this very partial coverage as an invitation to download and use the original script [2], which I assure you can be very useful.
Listing 7
list_cronjobs Functions
# Add all of the jobs from the system-wide crontab file.
cat "${CRONTAB}" | clean_cron_lines | lookup_run_parts >"${temp}"
# Add all of the jobs from the system-wide cron directory.
cat "${CRONDIR}"/* | clean_cron_lines >>"${temp}"
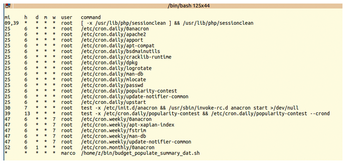
Listing 7 sends all the content of the $CRONTAB system file (/etc/crontab) and of all the files inside the /etc/cron.d directory ($CRONDIR) to one or two functions. The first function, clean_cron_lines, removes all non-relevant lines and multiple white spaces from its input. The second function, lookup_run_parts reformats the output of the previous function to produce a listing of all the actual cron jobs it contains, one per line. Everything is saved in the $temp file, which eventually is printed in the terminal. Figure 2 shows the typical output of list_cronjobs on a vanilla Ubuntu desktop.
« Previous 1 2 3 Next »
Buy this article as PDF
(incl. VAT)
Buy Linux Magazine
US / Canada
UK / Australia
Subscribe to our Linux Newsletters
Find Linux and Open Source Jobs
Subscribe to our ADMIN Newsletters
Support Our Work
Linux Magazine content is made possible with support from readers like you. Please consider contributing when you’ve found an article to be beneficial.

News
-
OSJH and LPI Release 2024 Open Source Pros Job Survey Results
See what open source professionals look for in a new role.
-
Proton 9.0-1 Released to Improve Gaming with Steam
The latest release of Proton 9 adds several improvements and fixes an issue that has been problematic for Linux users.
-
So Long Neofetch and Thanks for the Info
Today is a day that every Linux user who enjoys bragging about their system(s) will mourn, as Neofetch has come to an end.
-
Ubuntu 24.04 Comes with a “Flaw"
If you're thinking you might want to upgrade from your current Ubuntu release to the latest, there's something you might want to consider before doing so.
-
Canonical Releases Ubuntu 24.04
After a brief pause because of the XZ vulnerability, Ubuntu 24.04 is now available for install.
-
Linux Servers Targeted by Akira Ransomware
A group of bad actors who have already extorted $42 million have their sights set on the Linux platform.
-
TUXEDO Computers Unveils Linux Laptop Featuring AMD Ryzen CPU
This latest release is the first laptop to include the new CPU from Ryzen and Linux preinstalled.
-
XZ Gets the All-Clear
The back door xz vulnerability has been officially reverted for Fedora 40 and versions 38 and 39 were never affected.
-
Canonical Collaborates with Qualcomm on New Venture
This new joint effort is geared toward bringing Ubuntu and Ubuntu Core to Qualcomm-powered devices.
-
Kodi 21.0 Open-Source Entertainment Hub Released
After a year of development, the award-winning Kodi cross-platform, media center software is now available with many new additions and improvements.