Raspberry Pi on the IoT
Pi as Greengrass Core
Officially, the software provided by AWS is intended for Raspbian Jessie, but it also ran without any problems on Stretch in our lab. The link for downloading the software appears in the web interface while you are creating a group. Alternatively, you can select Software | AWS IoT Greengrass Core Software at bottom left in the IoT console.
In the next step of the dialog, AWS offers software for different architectures. At the end, you will see a tar.gz file with the current version number (at the time of this article, this was 1.6.0).
Up front you need to create on the Rasp Pi a ggc_user and a ggc_group, of which ggc_user is a member. If a programming language other than Python is used later (e.g., Java or JavaScript via Node.js), you would need to install it first.
Unpack the software on the Rasp Pi as root in the /greengrass directory with the command:
tar xvpzf greengrass-linux-armv7l-1.6.0.tgz -C
If the certificates provided by AWS are used, the core also needs the root certificate from Symantec to authenticate the AWS certificates. On the Rasp Pi, load it into the /greengrass/certs directory, where you then need to enter:
wget -O /greengrass/certs/root.ca.pem http://www.symantec.com/content/en/us/enterprise/verisign/roots/VeriSign-Class 3-Public-Primary-Certification-Authority-G5.pem
The certificate and the previously created private key also belong in the /greengrass/certs directory.
A configuration file in JSON format is still needed; it must be named config.json and reside in the /greengrass/config directory (Listing 9). Next, populate the file with the results of your work up to this point. The following fields must be completed:
Listing 9
config.json for the Pi
caPath: The name of the CA file previously retrieved from Symantec in thecertsdirectory.certPath: The name of the certificate file in thecertsdirectory.keyPath: The name of the file in thecertsdirectory that contains the private key.thingArn: The ARN of the core from the first step (aws iot create-thing).iotHost: The host in the AWS universe to which you want the core to connect; theaws iot describe-endpointcommand returns the name.ggHost: The Greengrass server for the region; its name is alwaysgreengrass.iot.<Name of the region>.amazonaws.com.
To start the core, run the ./greengrassd start command with root rights in the /greengrass/ggc/core folder.
If you want to check whether everything is working, you have several options. The start command outputs a PID. To check whether or not the process is running, simply enter ps and grep with the PID. AWS uses the MQTT port 8883, so the command netstat -tn | grep 8883 needs to point to connections to the AWS address range. These also use IPv6 if the Rasp Pi is connected accordingly.
The Greengrass Core writes its logfiles to the folder /greengrass/var/log/system. The runtime.log file contains general start messages and information about MQTT communication. On first establishing contact, the GGConnmanager.log file containing information about the opening communications with AWS is interesting.
At the AWS CLI, the command
aws greengrass get-connectivity-info --thing-name LM_core
returns address data for the device if the connection was successful.
Core Work
Now everything is ready for rolling out the Lambda function on all cores of the group:
aws greengrass create-deployment --group-id <ID_of_the_group> --group-version-id <ID_of_the_last_version> --deploymentType NewDeployment
The AWS Console has a Deployments tab in the group, from which you can monitor the status. If everything is green, the process is running on the core.
The log directory has a system folder and a user folder, which in turn contains a folder for each AWS region in which the core has been active (i.e., eu-central-1), which has a directory with an assigned ID. Greengrass creates a logfile for each function, and if the Python script generates errors, they appear here.
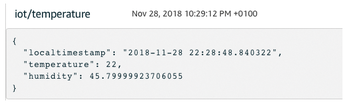
A simple function test is now possible from the Amazon Web Console. The IoT area has a Test menu entry that offers the option of either subscribing to an MQTT topic from the web browser or publishing news in a topic. Because the test now takes place on the receiving side, you can enter a hash tag (#) by Subscription topic to receive all messages. If several cores are already in use, you need to use a finer filter. After a wait of one minute, a message appears (Figure 2), which means the Rasp Pi is sending messages to the AWS IoT system as the Greengrass Core. The only thing missing is alerting.
Alerting
Although you can now tap into the MQTT system from the outside and generate alarms, it would require a separate computer. Instead, Lambda Serverless Computing comes into play; you can upload code, and other functions or similar events trigger the alarms. One of these sources can be the MQTT stream from the IoT area.
AWS also offers an inexpensive service for sending SMS messages, among other things. For the Lambda function to use these functions later, you must first create a role (Listing 10) that allows it:
Listing 10
Role for SMS
aws iam create-role --role-name mysnsrole --assume-role-policy-document file://snsrolle.json --path /
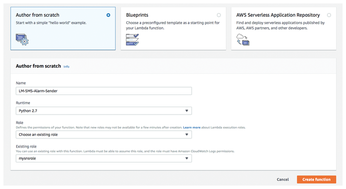
When you then create a new Lambda function in the web console, AWS prompts you for a role. Select Choose an existing role and the previously created mysnsrole (Figure 3). On the next page, enter the code shown in Listing 11.
Listing 11
SMS Senders
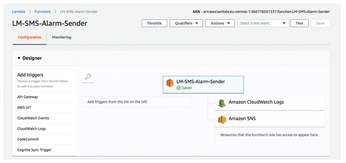
The last step is to create a trigger. Figure 4 shows the top of the function page. The possible triggers are listed on the left. One trigger is AWS IoT, which you need to select and configure as a rule. In the pop-up, choose Create New Rule, assign a name, and type 'select * from "iot/temperature"' in the Rule Query Statement line. Now every message from the Rasp Pi triggers a script run.
The JSON block sent by MQTT reaches the function as the Python event hash. For example, if it is too hot, AWS sends a text message.
« Previous 1 2 3 4 Next »
Buy this article as PDF
(incl. VAT)
Buy Linux Magazine
US / Canada
UK / Australia
Subscribe to our Linux Newsletters
Find Linux and Open Source Jobs
Subscribe to our ADMIN Newsletters
Support Our Work
Linux Magazine content is made possible with support from readers like you. Please consider contributing when you’ve found an article to be beneficial.

News
-
Canonical Releases Ubuntu 24.04
After a brief pause because of the XZ vulnerability, Ubuntu 24.04 is now available for install.
-
Linux Servers Targeted by Akira Ransomware
A group of bad actors who have already extorted $42 million have their sights set on the Linux platform.
-
TUXEDO Computers Unveils Linux Laptop Featuring AMD Ryzen CPU
This latest release is the first laptop to include the new CPU from Ryzen and Linux preinstalled.
-
XZ Gets the All-Clear
The back door xz vulnerability has been officially reverted for Fedora 40 and versions 38 and 39 were never affected.
-
Canonical Collaborates with Qualcomm on New Venture
This new joint effort is geared toward bringing Ubuntu and Ubuntu Core to Qualcomm-powered devices.
-
Kodi 21.0 Open-Source Entertainment Hub Released
After a year of development, the award-winning Kodi cross-platform, media center software is now available with many new additions and improvements.
-
Linux Usage Increases in Two Key Areas
If market share is your thing, you'll be happy to know that Linux is on the rise in two areas that, if they keep climbing, could have serious meaning for Linux's future.
-
Vulnerability Discovered in xz Libraries
An urgent alert for Fedora 40 has been posted and users should pay attention.
-
Canonical Bumps LTS Support to 12 years
If you're worried that your Ubuntu LTS release won't be supported long enough to last, Canonical has a surprise for you in the form of 12 years of security coverage.
-
Fedora 40 Beta Released Soon
With the official release of Fedora 40 coming in April, it's almost time to download the beta and see what's new.