Creating multiboot-capable USB sticks
Persistence
Live systems sometimes have an issue with data persistence, which means that anything you customize and any newly installed software is lost after the system is shut down. Ventoy, however, gives you the option of creating a persistent data file using a script. If you plan to use this option, it is a good idea to check up front on the Ventoy website to see whether the live distribution you are using with Ventoy actually supports persistent data. If so, to activate an associated file, you can use Ventoy Plugson, the tool's web-based interface for managing plugins. Ventoy's modular design lets you add a variety of functional extensions, and it doesn't require any kind of cryptic input at the command line.
For persistence, the first step is to create a file of the desired size on the USB storage medium in the terminal. Run the command from the first line of Listing 1 in the Ventoy directory on the mass storage device. If necessary, increase the 1GB file size to a capacity that is practical for you (second line), specifying the file size in MB. Depending on the selected size, the setup will take a moment. Then, in the terminal, run the command from the last line of Listing 1.
Listing 1
Creating a Persistent Image File
$ sudo sh CreatePersistentImg.sh -o /<I>path<I>/<I>to<I>/<I>removable-medium<I>/<I>filename<I>.dat
$ sudo sh ExtendPersistentImg.sh /<I>path<I>/<I>zu<I>/<I>filename<I>.dat <I>filesize<I>
$ sudo sh VentoyPlugson.sh /dev/<I>device<I>
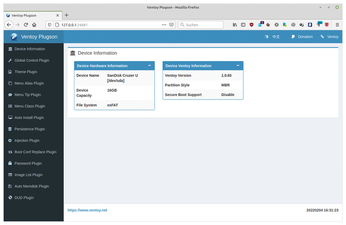
Replace the name for the device with the actual name of the USB removable disc; this is usually sda. Note that you are not allowed to enter partition names. Next, open a web browser and enter the local address http://127.0.0.1:24681. This will launch the graphical management interface for the plugins. By default, the Device Information page appears, showing you basic information about the active USB removable storage device (Figure 2).
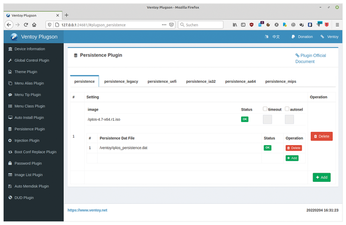
To enable the file for persistent data on the USB disc, you need to select the Persistence Plugin. On the right side of the settings section, you will find an (initially) empty table with a horizontal tab structure. The tabs refer to the supported hardware architecture. By default, the software enables the Persistence tab for 64-bit systems. Now click Add on the right side of the table to connect the persistence file to the image.
Note that you can create different persistence files for different images on the removable USB disc, each matched to the hardware architecture. In the dialog for creating a persistence file, enter the exact location of the desired source in the File Path line. Then, in the Dat File box, enter the name and path of the newly created persistence file. Press OK to close the dialog. The mapping between the persistence file and the selected image is shown with a green status indicator in the table.
In the background, Ventoy creates a file named ventoy.json on the removable disc that maps the persistence files to the images. You can repeat the configuration steps arbitrarily to create multiple persistence files on the removable disc and map them to images (Figure 3).
After rebooting the removable USB medium, the Grub boot menu in Ventoy will show you a second selection menu, depending on the distribution you select. You can use the menu to decided whether to launch the selected image with or without persistent data.
MultiBootUSB
MultiBootUSB [4] is a program for creating USB storage media with multiple live distributions. The free software is available for download on Sourceforge in the form of a DEB package and three RPM packages. Arch Linux, OpenMandriva, and a few other Linux distros include MultiBootUSB in their repositories, which means that you can easily set it up there via the built-in package manager. After the install, you will find a launcher in the Start menu. Clicking on the launcher (and then authenticating) takes you to what is initially a somewhat confusing window (Figure 4).
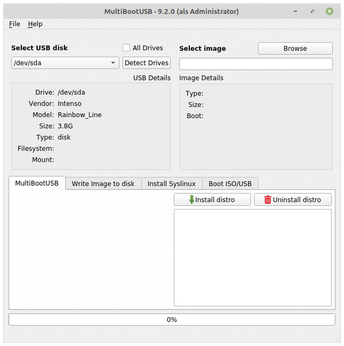
The window is roughly divided into three areas: In the top left, you will find information relating to the target drive on which MultiBootUSB stores the images. To the right is a selection dialog and some information about the selected ISO image. At the bottom are the control dialogs, as well as a scroll bar that shows users the progress of write operations.
The software automatically detects all USB discs connected to the system and displays the drive data for the first disc. To be able to use a drive as a target, you first need to select a partition in the Select USB disk dialog. The USB stick must have a partition with a standard file system.
Click on the Browse button and then click on an image in the file manager. You can configure the settings in the lower part of the window.
If you want to transfer the selected distribution to the USB stick straight away, press the Install distro button in the MultiBootUSB tab in the lower part of the window. The software will now create the bootable file system structure and write the ISO image to the disc. At the end of the write procedure, MultiBootUSB tells you that you now have a working memory stick. If needed, you can now select another image and write it to the USB stick by repeating the steps.
If you are running out of space, you can delete a distribution that is currently on the disc. In order to delete a previously installed distro, select the name in the bottom right and press the Uninstall distro button. After confirming, MultiBootUSB deletes the system.
When you boot from your MultiBootUSB disc, Syslinux starts first. Afterwards, a simple Grub2 boot manager appears, offering you the option of booting directly from the computer's mass storage or booting one of the images on the memory stick. If you select one of the images, the boot manager launches the image.
If you are booting a distro that lets you create persistent data on a removable medium, MultiBootUSB shows you a Persistence slide control when you select the distribution image. Use this slide control to define the size of the persistent area on the USB stick. MultiBootUSB will display the size of the persistent area in megabytes at the right edge of the slider.
Once you have defined the persistent storage, transfer the image to the removable medium by clicking on Install distro; the persistent storage area is also created by this step. There is no need to format or create a separate partition for the persistent storage on the USB stick, but transferring a distribution with a persistent storage area will take more time.
If needed, you can test individual images on the stick without taking the roundabout route of rebooting the system. All you need is Qemu as a virtualization solution on the computer. Select the Boot ISO/USB tab in the lower part of the window. In the dialog that then appears, you can test individual ISO images, as well as the newly created USB stick itself.
In each case, you need to set the RAM size required to launch the image or the USB storage medium in the Choose RAM size: selection box. A maximum of 2GB RAM can be assigned for the individual ISO image or the USB stick, regardless of the actual RAM capacity available in the computer. Click on Boot ISO or Boot USB when done.
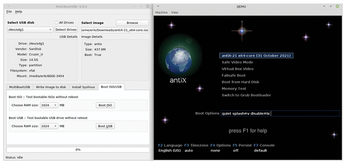
The application now calls Qemu. The Qemu emulator opens a separate window in which it calls the ISO image or the boot manager of the memory stick. If the Qemu window comes up with an image other than the one you wanted to test, go to the MultiBootUSB main window and check which image is selected (Figure 5).
MultiBootUSB also offers the option of creating a conventional single-image bootable USB stick. Select a drive in the Select USB disk dialog, but do not specify a partition. Then select the ISO image you want MultiBootUSB to transfer to the USB data medium. In this mode, only a single image can be transferred to the medium, and it takes up the entire capacity of the medium. MultiBootUSB will also delete all existing partitions on the stick.
After selecting the desired image, open the Write image to disk tab at the bottom of the window. The software now flashes up a warning message. You can start to transfer the ISO image by clicking on the Write image to USB button.
When the data transfer is complete, MultiBootUSB opens the Linux desktop's file manager and shows you the data on the USB medium, which is now ready for booting a computer.
Because MultiBootUSB always uses Syslinux as the primary boot loader when FAT32 is the file system used on the USB storage device, it may be necessary to modify the Syslinux configuration. To access the Syslinux configuration file syslinux.cfg, open the Install Syslinux tab bottom center in the main application window. Then click on Edit again right at the bottom of the syslinux.cfg option box to open a simple text editor with the contents of the configuration file (Figure 6).
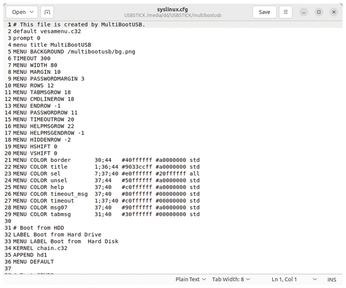
This is where you will find a structure with the configuration parameters for all entries displayed in the boot manager when booting the system. Because this file is a simple text file, you can easily edit the individual entries and, if needed, even remove entries you don't need from the file. After creating a backup and rebooting the system, Syslinux loads the updated configuration data and boots the system with the newly configured parameters.
MultiSystem
MultiSystem [5] is another free program that lets you store several bootable Linux distributions on a USB stick. The software can be installed on Debian, Ubuntu, and their derivatives in just a few steps using the commands from Listing 2. When done, you will find a launcher in the menu hierarchy of the operating system environment.
Listing 2
Installing MultiSystem
$ sudo apt-add-repository 'deb http://liveusb.info/multisystem/depot all main'
$ wget -q -O - http://liveusb.info/multisystem/depot/multisystem.asc | sudo apt-key add -
$ sudo apt-get update
$ sudo apt-get install multisystem
After launching the software, you are taken to a program window with an unusual design. If you have not yet connected a USB stick to the computer, MultiSystem points this out and asks you to first connect a FAT32-formatted USB stick to the computer. You then need to restart MultiSystem. The connected stick appears in the window's list view. If several drives are connected to the computer, they are displayed one below the other (Figure 7).
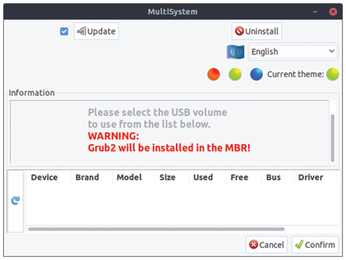
After selecting a USB medium, press the Confirm button bottom right in the window. The application now prepares the storage medium for storing new images. After completing this step, a new window appears in which you can edit the menu of the Grub2 boot manager and select the ISO images you want to transfer.
Drag and drop the images from the desktop file manager to MultiSystem (Figure 8). The application then opens a separate terminal window in which you can enter the root password to follow the progress of the data transfer to the USB drive. If MultiSystem does not currently support the desired image, a new window opens with a note to that effect. Otherwise, MultiSystem adapts Syslinux and the boot manager to accommodate the selected distribution.
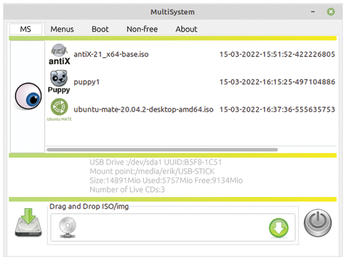
The terminal then closes and you are taken back to the previous window, where you can now see the Linux distribution(s) you just installed on the USB flash drive. If you want to modify one of the entries, double-click on it. An editor window opens and you can easily edit the entries in the boot loader menu (Figure 7).
MultiSystem supports a large number of operating systems on USB sticks. You can store the images directly on disc while working in the application and integrate them directly with MultiSystem. To do so, you need the Menus option in the top line of the application window (Figure 9).
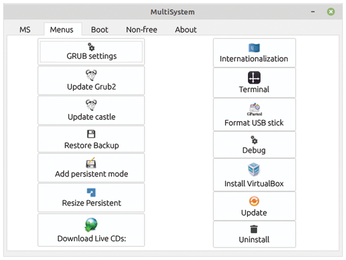
You are taken to a functional but visually unusual window with a collection of buttons. The Download Live CDs button opens another window that lists the supported operating systems. MultiSystem also tells you which boot loader the systems use. Double-clicking on one of the systems opens the web browser with the matching project site; you can download the distribution image from there. Then drag and drop the image into the MultiSystem window on the USB stick to install the image.
Once you have transferred all the images you need to the stick, reboot and select the stick as the boot medium. MultiSystem then opens a very colorful Grub boot manager, where you can find your images and start them in the usual way.
To modify USB storage media once you set it up, use the various buttons to the right of the system list in the main window. If you want to remove one of the installed distributions from the storage medium, select the distribution and press the button with the recycle bin icon. After a prompt, enter the root password in the terminal. MultiSystem then removes the distribution and deletes the corresponding entry in Grub.
Clicking the pencil icon lets you add boot parameters for the selected distribution in Grub. The tool opens a separate window where you can check boxes to enable the parameters you need. A separate box provides a text input option. The up and down arrow buttons let you change the position of a selected entry in the boot manager menu. If you choose a distribution that supports the use of persistent storage, you can create a storage area by clicking on the disc icon after selecting the desired system. You'll get a warning if your choice of distribution does not support a persistent mode.
You can access more tools in the Menus tab. Among other things, there is an option for opening a terminal. You can also configure various settings for the boot managers and run updates. If you want to format the active USB stick, just select Format USB stick. You can also update the software or install Virtualbox at the push of a button.
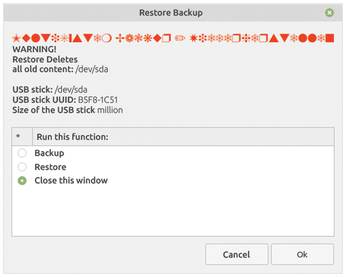
The Menus dialog box also lets you back up a MultiSystem flash storage medium or restore a USB stick from a backup file you created previously (Figure 10).
MultiSystem relies on a Virtualbox instance that is already set up on the system to test the integrity of the downloaded distributions. To check individual ISO images, select Try Live CD in VirtualBox from the Boot menu. A small MultiSystem window pops up. Underneath a selection box, where you need to specify the system you want to test, there is a larger area into which you can drag and drop a downloaded ISO image. MultiSystem then automatically opens Virtualbox and launches the ISO image. This removes the need for a time-consuming installation in Virtualbox.
« Previous 1 2 3 Next »
Buy this article as PDF
(incl. VAT)
Buy Linux Magazine
US / Canada
UK / Australia
Subscribe to our Linux Newsletters
Find Linux and Open Source Jobs
Subscribe to our ADMIN Newsletters
Support Our Work
Linux Magazine content is made possible with support from readers like you. Please consider contributing when you’ve found an article to be beneficial.

News
-
Canonical Releases Ubuntu 24.04
After a brief pause because of the XZ vulnerability, Ubuntu 24.04 is now available for install.
-
Linux Servers Targeted by Akira Ransomware
A group of bad actors who have already extorted $42 million have their sights set on the Linux platform.
-
TUXEDO Computers Unveils Linux Laptop Featuring AMD Ryzen CPU
This latest release is the first laptop to include the new CPU from Ryzen and Linux preinstalled.
-
XZ Gets the All-Clear
The back door xz vulnerability has been officially reverted for Fedora 40 and versions 38 and 39 were never affected.
-
Canonical Collaborates with Qualcomm on New Venture
This new joint effort is geared toward bringing Ubuntu and Ubuntu Core to Qualcomm-powered devices.
-
Kodi 21.0 Open-Source Entertainment Hub Released
After a year of development, the award-winning Kodi cross-platform, media center software is now available with many new additions and improvements.
-
Linux Usage Increases in Two Key Areas
If market share is your thing, you'll be happy to know that Linux is on the rise in two areas that, if they keep climbing, could have serious meaning for Linux's future.
-
Vulnerability Discovered in xz Libraries
An urgent alert for Fedora 40 has been posted and users should pay attention.
-
Canonical Bumps LTS Support to 12 years
If you're worried that your Ubuntu LTS release won't be supported long enough to last, Canonical has a surprise for you in the form of 12 years of security coverage.
-
Fedora 40 Beta Released Soon
With the official release of Fedora 40 coming in April, it's almost time to download the beta and see what's new.